
There are circumstances you may wonder how to leave a voicemail without calling on iPhone to avoid bothering someone or just avoid having an awkward conversation directly with someone? Instead of leaving a voicemail without calling, what comes into your mind first may be texting or sending an email, but sometimes there is no replacement for the emotion and inflection of your voice.
Leaving a voicemail without calling, rather than having their phone ring, that person will only receive a notification that they have a new voicemail, which becomes more convenient if you want to leave messages for your wife or husband without actually disturbing them in the late evening, to surprise your girlfriend or boyfriend when she or he is working or in meeting room, or to avoid embarrassments like intending to break up with your girlfriend or just a trick to confuse someone if that’s what you are aiming for.
Part 1: How to Leave a Voicemail without Calling on iPhone with iOS before 9.2
To leave a voicemail without calling? Using an iPhone with iOS before 9.2 and find that your iPhone doesn’t support this feature directly? Mmm...That’s what slydial may magically do for you, allowing you to bypass a person’s phone and go directly to their voicemail. What’s more exciting is that you don’t need to pay for it!
- Step 1: Download the app from your iTunes and then click on the slydial icon on your iPhone to launch it.
- Step 2: Logging in with your account or sigh up for an new account which is free of charge unless you choose to upgrade to a premium slydial account to enjoy more functionality including skipping the advertisements, dialing by recipient’s name straight from your iPhone without having to memorize the exact number or approaching up to 10 contacts with one same voicemail and other expanded features.
- Step 3: Choose a contact or enter the telephone number of the person you wish to leave a voicemail without calling.
- Step 4: Record your voicemail and the app will connect directly to the slydial network and send your call directly to voice mail without calling.

Note: Slydial calls are only available from a U.S. phone to U.S. mobile phones.
Part 2: How to Leave a Voicemail without Calling on iPhone with iOS 9.2 or Above
If your iPhone is updated with iOS 9.2 or above, luckily you can leave voicemail without calling directly from your iPhone with no aid of any third-party app. Before you can directly send voicemail from your iPhone, you have to set up voicemail on your iPhone first.
Set Up Voicemail on an iPhone with iOS 9.2 or Above

Navigate to the Phone app from the Home screen → Tap the Voicemail tab on the bottom right corner of the screen → Tap Set Up Now in the middle of the page → Create a password whose length may differ with different carrier and then tap Done on the top right corner of the screen → Re-enter your password to confirm and then tap Done → Select Custom to record a new greeting → Tap Record to record your voicemail message → Tap Stop when you finished → Tap Save. And your recorded voicemail message will be appeared in your voicemail list.
Now your iPhone voicemail should be activated and you can move forward. But if you find this method is not in fact applicable for you, please help yourself find other effective ways out there.
Leave an Voicemail without Calling on an iPhone with iOS 9.2 or Above
- Step 1: Open the Phone app on your iPhone and head to Voicemail to view your recent voicemail including those you recorded previously.
- Step 2: Select the voicemail message that you’d like to send to the destination people you want to leave a voicemail without calling and then tap the Share icon in the top right corner of the app.
- Step 3: Select which method you’d like to Share your voicemail by taping Messages, Mail or Notes in Share menu.
- Step 4: Hit Send button to share the voicemail.

Now you successfully leave a voicemail without calling. The receipt will receive your voicemail as an audio file attachment in the M4A format instead of any phone call.
Part 3: How to Recover Mistakenly Deleted Voicememo/Voicemail
Other than Voicemail, voicememo is also frequently used, what if you accidentally deleted or lost all your voicemails or voicememo including some important ones? Is it possible to get them back? The answer is YES, follow the instructions below to get back your voicemails.
- 1. Open the Phone app and tap the Voicemail section.
- 2. Scroll all the way down and tap Deleted Messages (which will only appear if you have any).
- 3. Select any message you want to recover and tap Undelete.
This is very simple to get your lost or deleted voicemail message back on your iPhone with Voicemail app itself as long as your voicemails are still in in the Trash folder within 24-48 hours and you haven't synced your phone since you lost your voicemails.
When a voicemail doesn't appear in the Deleted Messages section, though, it's likely gone for good. But if you still want to find them back, Leawo iOS Data Recovery should be the most effective way you can resort to.
Leawo iOS Data Recovery is an all-inclusive data recovery software for iPhone, iPad and iPod which is a risk-free, comprehensive and absolutely the best iPhone voicemail recovery program on Mac and PC, supporting up to 14 types of data recovery caused by as many as possible reasons from various modes including iOS device data recovery mode, iTunes data recovery mode and iCloud data recovery mode. Just in case, it is also an excellent iPhone/iPad/iPod Touch data backup tool to recover lost data. Below is the instructions for recovering mistakenly deleted data like voicemails and voicememos.
![]()
![]()
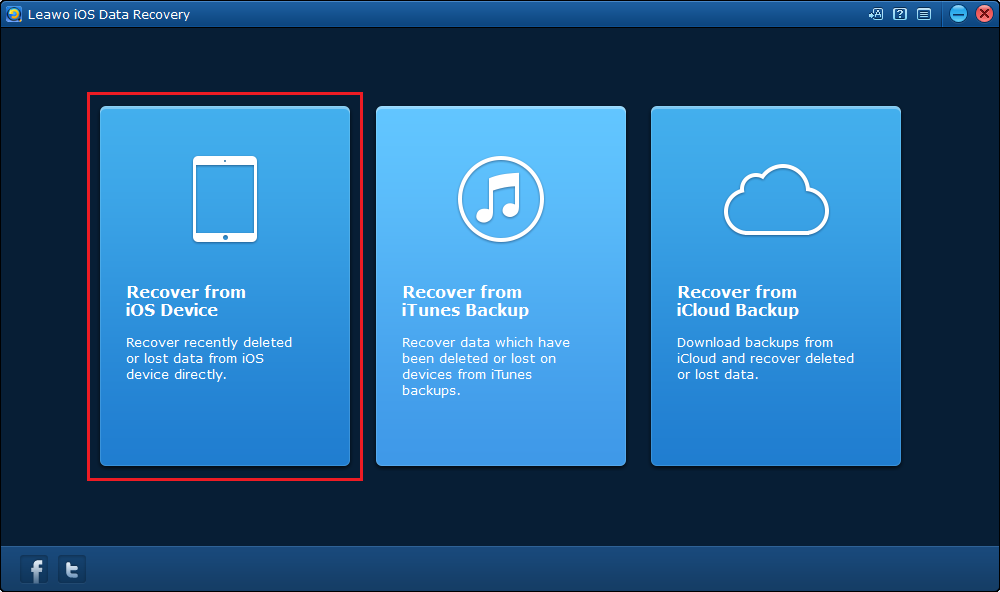
Step 1: Download and install Leawo iOS Data Recovery and open it. There would be 3 tabs on the interface, click on the first one if you are recovering voicemails and voicememos from the device itself. .
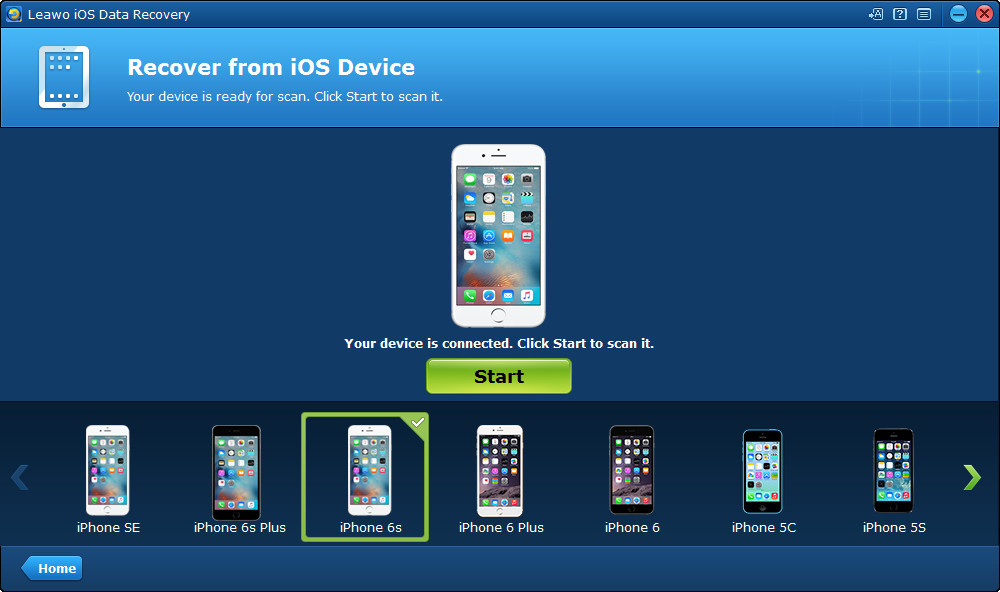
Step 2: Connect your device to PC and choose your iPhone on the device list. And then click Start button. The program would start scanning your iPhone and later all the data on your device would be presented to you on the interface. .

Step 3: On the left column, click on Voice Memos to check out all the voicememos on your iPhone including the deleted ones. To show only the deleted files, check the Only display the deleted items" option.
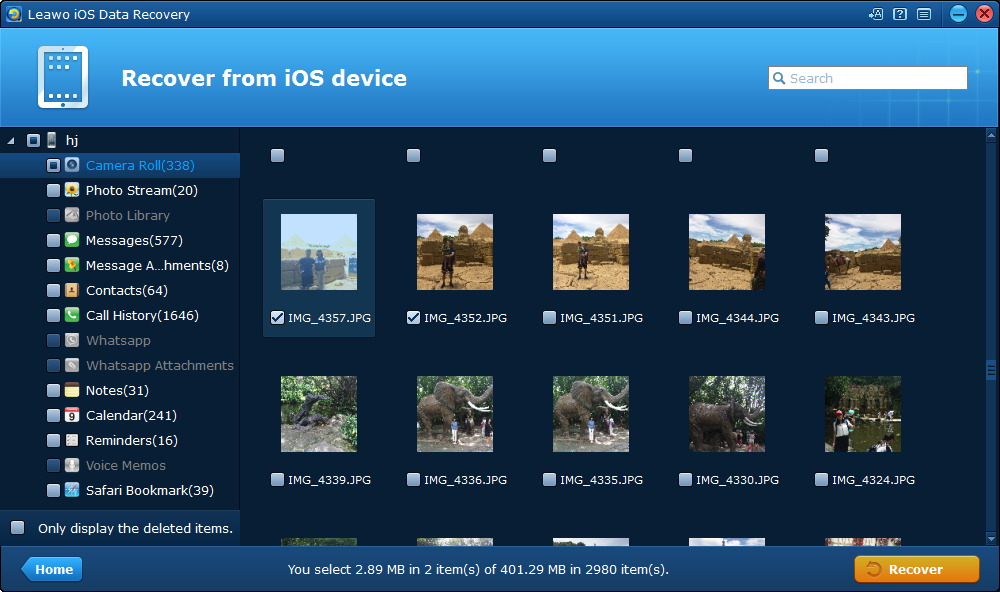
Step 4: Choose the files you'd like to recover to your iPhone and click Recover button on the bottom right. .
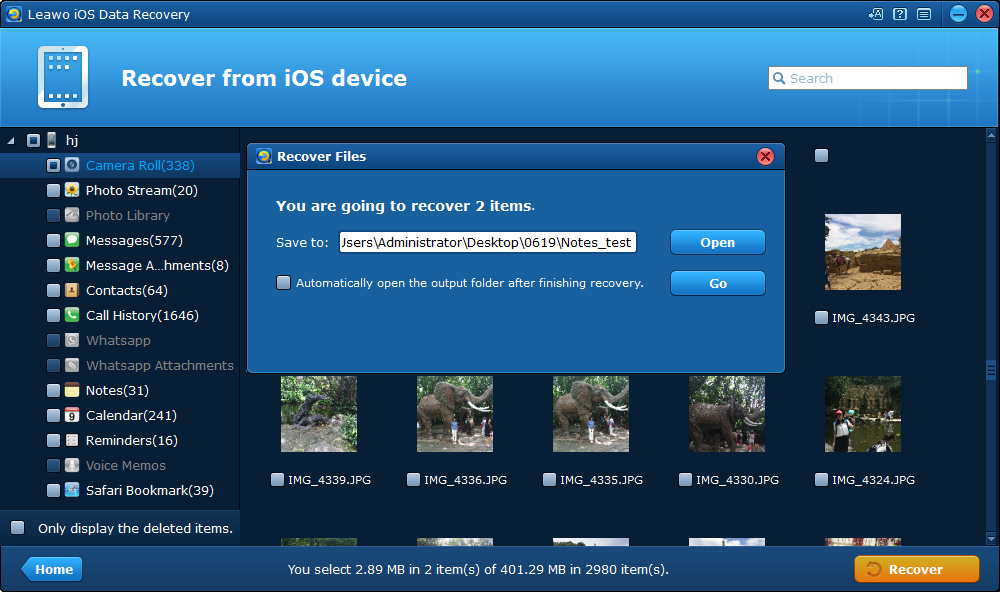
Step 5: After clicking on the Recover button, a window would pop up and you need to set the directory for the backup file(the voicememos you've chosen to recover to your iPhone would be backed up to your computer hard drive simultaneously). And the last step is to click on the Go button to start recovering.
Whichever way you choose, just remember do it fast. The earlier you try, the more data you may recover.
 Sep. 08, 2021 by


 Prof. Media
 Blu-ray Ripper
 Blu-ray Copy
 iOS Data Recovery
 [12/29/23] MAX Downloader V15.0.0
 10,000,000 people are using Leawo!
 All Transactions are protected!
 30-Day Money Back Guarantee!