iPad is a very nice tool to watch videos. The mobile device is big enough so that you can see what’s on the screen easily, and is small enough so that you can carry it around with a backpack. However, if you need to move your videos from iPad to other devices, then you would probably have some problems. Like Apple’s other products, iPad stores its videos in a unique way. Not only could the iPad videos be protected by DRM, they could also be in a format that your other devices couldn’t read. In order to successfully transfer or process the iPad videos, normally you need to convert the iPad video with iPad converter tools. If you are not so sure about how to convert iPad videos, then I’m sure this article will help as it introduces some of the best iPad video converter tools for you to convert your iPad videos, and also gives you the detailed instructions on how to do that yourself effortlessly.
Part 1: Convert iPad video with Prof. DRM
One of the biggest problems about iPad video is DRM. If your video is protected by DRM, then it would be very tricky to convert it. DRM stands for Digital Rights Management. It is a technological protection measure used to protect the copyrights of digital products. When your video is protected by DRM, you will not be able to edit, change it, move it to other devices and open it with other players, even if you have already paid for it.
DRM has been a controversial technology for years. Some think that it helps protect the publishers’ copyrights, while others think it heavily violates the customers’ rights on the product they pay for. Although videos protected by DRM are very hard to deal with, there are still solutions to convert iPad videos protected by DRM. For example, Prof. DRM is one of the best DRM removal programs that you can ever get your hands on.
Prof. DRM is one of the best DRM removal programs that have the ability to deal with iTunes videos, music, audiobooks, eBooks and all kinds of Spotify products protected by DRM. With the powerful DRM processing ability, Prof. DRM is able to convert these unique protected files into regular media files that can be moved, edited or viewed on any other devices. Despite the product is extremely powerful, it’s surprisingly easy-to-use. With a simple guide, anyone can convert iPad videos with this iPad video converter within a short amount of time. If you are interested, here is a brief guide for you.
Step 1: Download and install Prof. DRM on your computer.
Step 2: Make sure your iPad video is synced with your iTunes account and launch Prof. DRM. When asked, you have to agree to authorize the computer to access your iTunes account by signing in with your Apple ID.
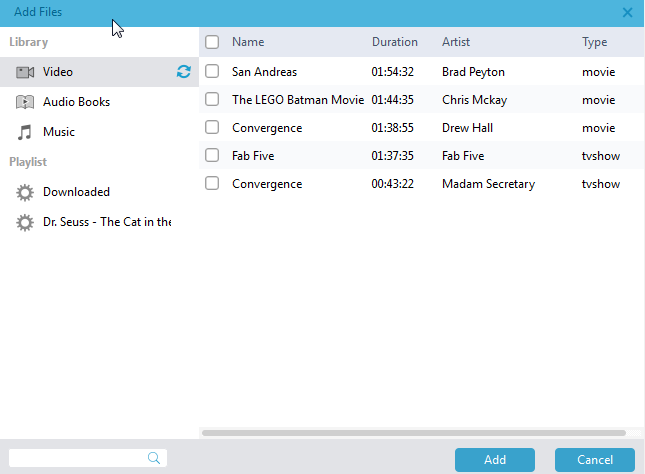
Step 3: Click the “Add Files” button in Prof. DRM or directly drag the iTunes item and drop it in the program interface to import your iPad video.
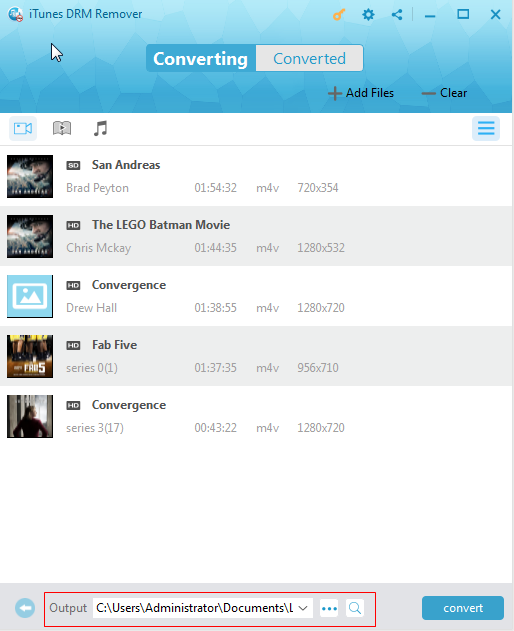
Step 4: Choose an output directory in the “Output” box below, and then click the “convert” button to convert the DRM protected iPad video to a regular MP4 video.
Part 2: Convert iPad video with Leawo Video Converter
When dealing with iPad videos, DRM is really an annoying thing. With Prof. DRM, you can easily remove the DRM protection on your iPad video and convert the video to a regular MP4 file. However, since the Prof. DRM product specializes in DRM removal rather than video format conversion, if you want your iPad video to be converted to some other video format, then there is really not much that Prof. DRM can do.
As you may already know, iPad videos, as well as many other Apple’s video files, are stored in some formats like “M4V”. M4V and similar formats are not very compatible video formats. Other than Apple’s product and some of the best QuickTime Player alternatives, there is barely any player or device that can deal with these video formats. In order to give a better compatibility to the iPad video file, you need to convert the video to other formats like MKV, AVI or something else. So, if the thing that worries you is not the DRM protection but the video format, then the powerful video converter Leawo Video Converter is probably a better solution to consider.
As one of the most recommendable iPad converter programs, Leawo Video Converter can convert iPad video files to some common video files in a simple way. Trusted by millions of users, Leawo Video Converter is capable of not only converting iPad videos, but also converting more than 180 kinds of other video files to each other. Also, this iPad video converter has advanced video converting technology, allowing it to convert any video file with a 6 times higher speed than average while keeping the original quality at the same time.
Leawo Video Converter has a simple and straightforward user interface. With a little guide, anyone can convert iPad video with Leawo Video Converter with only a couple of minutes. Here is a brief guide on this iPad video converter.
Step 1: Import source video
Launch Leawo Video Converter, then navigate to the “Video Converter” function module. To import the source M4V video file, you can drag and drop the file to the center of the main interface, or click “Add Video” and locate the file manually.
Step 2: Edit your video (Optional)
Leawo Video Converter has a practical built-in video editor. After importing the source iPad video, you can click the ‘edit’ icon on the right to do some further editing on the video. Leawo Video Converter provides various kinds of further editing options including trimming, adding watermark, cropping, adding special effects, adding 3D effects and removing noise. Once you are done editing, click the “OK” button to confirm the adjustments and go back to the main window.
Step 3: Select output format
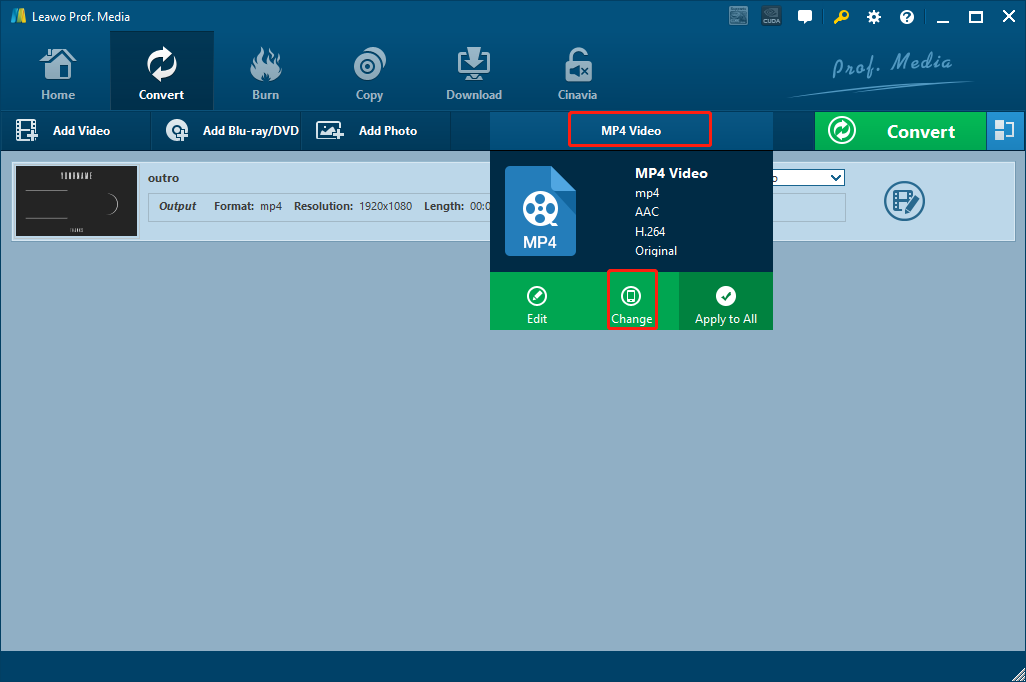
As you can see from the area next to the green “Convert” button, the default output format in Leawo Video Converter is “MP4 Video”. You can either leave it be and have MP4 as your output format, or click on the “MP4 Video” area and then choose “Change” to go to the format selection window to select a new output format.
Step 4: Start the conversion
Once you have set the correct output format, click the green ‘Convert’ button, select an output directory and click the “Convert” icon down below to start the conversion immediately.
Part 3: Convert iPad video with Aconvert
Besides using a professional video converter program like Leawo Video Converter to convert your iPad video, you can also choose one from the best free online converters to do the same job. Comparing to professional video converter programs, online converters can offer a simpler workflow for the conversion tasks, but also have various restrictions at the same time. With an online video converter, you don’t need to download and install an extra program to convert your videos, but you have to make sure that your video is not too big in size because some online video converting services don’t accept big files as input.
As one of the best online video converter services, Aconvert is a very good choice for you to convert your iPad videos online. It has a clean user interface, it has multiple language support and it has 26 converting servers to guarantee a high and stable converting speed. If you want to convert iPad video with Aconvert, here is how you can do that.
Step 1: Visit the official website of Aconvert.
Step 2: At the homepage of Aconvert, click the “Add Files” button to upload your source iPad video file. You can also directly drag your file and drop it into the box in the center of the webpage.
Step 3: Click on the “Target” dropdown box to select your target output format for the conversion.
Step 4: When the format is selected, click the “Convert Now” button next to the “Target” dropdown box to start the conversion task.
Step 1: Launch IQmango 3D Video Converter. Click the “Open” button in the middle to import your YouTube video into the program. You can also drop the video file in the middle directly to import it.
Step 2: Click the drop-down box at the lower left corner to choose a 3D mode for your video. You can also change 3D shift and 3D depth with the two sliders next to it.
Step 3: When everything is set, you can also preview the result before you convert it by clicking the “Preview” button below the 3D mode selection box. If you are happy with the 3D effect, click the “CONVERT” button at the lower right corner to start the 3D conversion.
Part 4: Convert iPad video with VLC
VLC is most commonly recognized as a video player. However, what most people don’t know is, the player also as many advanced multimedia processing functions, including converting iPad videos to other formats. Although VLC does not have the most professional and efficient video converting function, it still could be a convenient iPad converter if you already have VLC installed on your computer and don’t want to install another dedicated video converting program.
Despite the user interface of VLC is not very intuitive, converting iPad video with VLC is actually not complicated. With a simple guide, anyone can convert an iPad video with VLC effortlessly. Now here is a guide on how to convert iPad video with VLC.
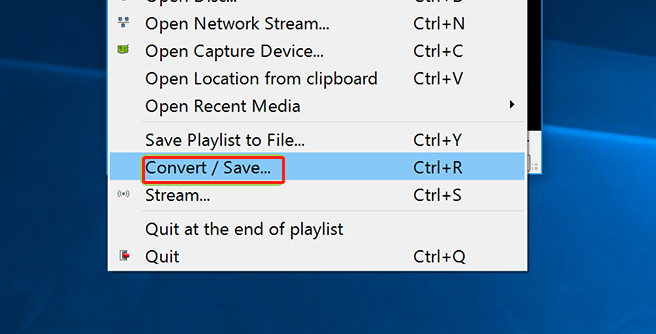
Step 1: Launch VLC Player. In the menu bar, find “Media”, and then click the “Convert / Save” in the dropdown menu under “Media”
Step 2: Click “Add” and open the video that you want to convert with VLC.
Step 3: When the video is imported, click the downward arrow on the “Convert / Save” button, and then choose “Convert”.
Step 4: In the newly opened window, set your output format using the “Profile” dropdown box, and set an output directory using the “Browse”. Once they are all set, click the “Start” button to start the conversion.

