
Nowadays, all the phone users are trying to figure out ways to make their iPhone full of their own styles. Making some customized ringtones will be the first change. The customized ringtones can be ripped from a song, or completely created by the users themselves. They are able to add these ringtones to iTunes library, and then sync them to their iPhones. Some iPhone users will choose to purchase some fantastic ringtones in the App Store, and download them to their iPhones. Both of the methods can make the iPhone different from others'. This post will you how to transfer ringtone from iPhone to iPhone with iTunes, and transfer customized ringtones with other solutions. Following the guidance below to know how to transfer ringtones from iPhone to iPhone.
- Part 1: How to Transfer Ringtone from iPhone to iPhone Using iTunes?
- Part 2: How to Transfer Ringtone from iPhone to iPhone Using iTransfer?
- Part 3: How to Transfer Ringtone from iPhone to iPhone Using AirDrop?
- Part 4: How to Transfer Ringtone from iPhone to iPhone Using iTunes Store?
- Part 5: How to Transfer Ringtone from iPhone to iPhone Using Dropbox?
Part 1: How to Transfer Ringtone from iPhone to iPhone Using iTunes?
When users want to transfer ringtones from iPhone to iPhone for backing up or other reasons, they will come up with the sync problem when using iTunes. iTunes provides a "Transfer Purchases" function for the users to transfer purchased items back to iTunes library, but the customized ringtones cannot be transferred back. If you are not sure about how to use the "Transfer Purchases" function of iTunes, check out the following tutorial:
Step 1: Launch iTunes and prevent syncing automatically
Start iTunes, and go to "Edit > Preference > Devices". Check "Prevent iPods, iPhones and iPads from syncing automatically".

Step 2: Connect iPhone to computer
Connect your iPhone to PC via USB cable, then double click on the iTunes icon to launch the iTunes app on your computer if it did not start automatically when your iPhone is connected to computer.
Step 3: Transfer purchases from iPhone
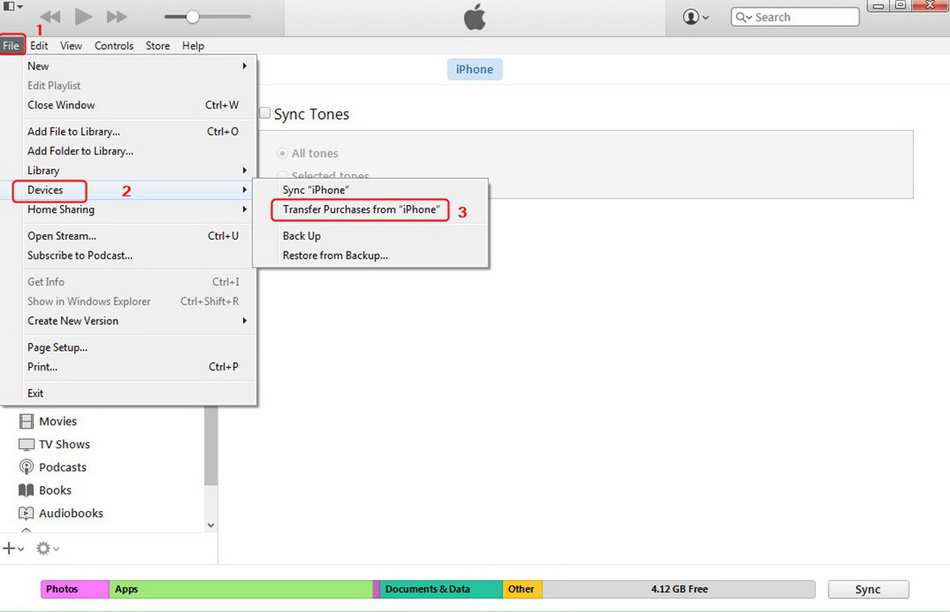
Click "File> Device> Transfer Purchases" at the upper corner. Then click "Apply" at the right bottom. iTunes will automatically sync the transferred items to iTunes library, and the purchased ringtones will be transferred back as well.
Step 4: Sync ringtone to another iPhone
Then disconnect the iPhone from computer. Connect another iPhone to iTunes following the step 2. Click on your iPhone icon, and then hit on the "Tones" menu to open the ringtones tab. Check the box for "Sync Tones" and then check the boxes for the ringtones you want to sync. There are 2 options available, check "All tones" to choose all the ringtone files to sync, or check "Selected tones" to select the specified ringtones that you want to transfer. Finally click "Sync" button in the bottom right corner of iTunes, it will start transferring ringtones from iPhone to iPhone via iTunes. The synced ringtone files will appear on your iPhone as a ringtone automatically.

Part 2: How to Transfer Ringtone from iPhone to iPhone Using iTransfer?
If you want to transfer ringtones from iPhone to iPhone with no efforts, you can take advantage of some third-party iPhone transfer software, such as Leawo iTransfer. The following guidance will show you how to transfer ringtones from iPhone to iPhone, and you are allowed to free download the software to have a try. Note that the trial version has limited transfer times.
Step 1: Download and install iTransfer
Go to the official website of Leawo iTransfer on your computer to download it to your computer and then install it by following the on-screen instructions.

-
Leawo iTransfer
- Transfer files among iOS devices, iTunes and PCs with ease.
- 6x faster than iTunes
- Transfer up to 14 kinds of data and files without iTunes.
- Support the latest iOS devices like iPhone 12, iPhone 12 Pro, etc.
- Play back, view, and delete data and files on iOS devices.
- Support Windows & Mac OS
Step 2: Run the software and connect iPhone
Fire up Leawo iTransfer and connect the iPhone to computer with a proper USB cable. The software will automatically detect the libraries of your iDevice, and then show the libraries in the left sidebar.

Step 3: Choose ringtones for transferring to computer
Go to " iPhone icon> Library> Ringtones" tab to select ringtones from iPhone for transferring to another iPhone. Check them and then right click to choose "Transfer to> My Computer" option, or click the "Transfer" icon at the bottom right corner. You could choose either purchased ringtones or customized ringtones as you like.

Step 4: Set output directory and transfer ringtones
A panel will show up, and you need to set the output directory of the exported ringtones. Check “Save to Folder” in the dialog and tap “Change” to select a folder on your iPhone. Tap “Transfer Now” to begin to transfer ringtones from iPhone to PC. When the process is over, your iPhone ringtones will be available on your computer. .

Step 5: Unplug iPhone and connect another iPhone to computer
After your iPhone ringtones are transferred to computer, you can then disconnect it and plug another iPhone into your PC with a suitable lightning cable.

Step 6: Choose ringtones
Click "iPhone icon> LIBRARY> Ringtones", all ringtones are displayed on the right interface. You are allowed to drag and drop the ringtones from computer to start transferring. Or click "File > Add > Add File/Add Folder" to add ringtones that you have just exported from your iPhone.

Step 7: Add ringtones to iPhone from computer
When the ringtone transfer is ongoing, a progress bar will show you the percentage of the transfer process. The transfer will be finished in short time, and you will get the transferred ringtones in your new iPhone when the transfer is done.
Part 3: How to Transfer Ringtone from iPhone to iPhone Using AirDrop?
It is also feasible to realize the goal of transferring ringtones from iPhone to iPhone via AirDrop. This calls for no cable connection, which can assist you to wirelessly transfer various files like documents, pictures, videos, songs, apps, ringtones, etc. However, you need to ensure the short distance between your iPhones and remember to turn on both Bluetooth and Wi-Fi on your devices. If you plan to transfer lots of ringtones or other files between your iPhones, this way is not the perfect choice for you, for the transfer speed is low and the efficiency is not satisfactory. If you do not mind the slow speed and low efficiency, here are the steps for you to refer to.
Step 1: Put your two iPhone close and switch on both Bluetooth, Wi-Fi, and AirDrop by going to the Control Center on your devices.
Step 2: After you enable the feature of AirDrop, you need to choose Contacts Only or Everyone from the panel shows up. Here I recommend you select the option of “Everyone”.

Step 3: Launch the Music app on your source iPhone and then choose the ringtones you would like to transfer to another iPhone.
Step 4: Hit on the Share icon on the pop-up window and then click on the name of your target iPhone to send them to it immediately.

Step 5: In the end, you need to hit on the Accept option on your target iPhone to receive the ringtones.
Part 4: How to Transfer Ringtone from iPhone to iPhone Using iTunes Store?
If you have purchased some of your favorite ringtones via iTunes Store, it is sensible for you to redownload them to your new iPhone. This can save you much money and allow you to access your favorite ringtones freely on your new iPhone. Here comes how to make it with several simple steps.

Steps:
- On your new iPhone, you need to navigate to the Settings app and then choose the option of “Sounds & Haptics”.
- Move to the section of “Sounds and Vibrations Patterns” and hit on the tab of “Ringtone”.
- Under the “STORE” section, you will see the option of “Download All Purchased Tones”. Hit on it and the process of downloading all formerly bought ringtones and alerts for the current Apple ID in use.
In some cases, you may fail to redownload some previously bought ringtones, for the ringtone owner has stopped selling the ringtone and the ringtone file is not available in the iTunes Store any longer.
Part 5: How to Transfer Ringtone from iPhone to iPhone Using Dropbox?
You can also resort to Dropbox when it comes to how to transfer ringtone from iPhone to iPhone or how to transfer ringtone from iPad to iPhone. It is one free app that allows you to back up essential files and info. It is similar to other cloud services. Now let’s begin to see how to use this software to assist you to transfer ringtone between two iPhone devices.

Step 1: Download and install Dropbox app on both iPhones. Then you need to sign in your account after you run Dropbox on your source iPhone.
Step 2: Quit Dropbox and then open the app that has the ringtone you would like to transfer to another iPhone.
Step 3: Choose your target ringtone and then hit on the “Share” icon. Choose the button of “Save to Dropbox” on the toolbox.
Step 4: Afterwards, you need to select a proper location in your Dropbox account. Hit on "Save" or "Upload" to send the chosen ringtone to the Dropbox server. Repeat the operation to save other ringtones to your Dropbox account.
Step 5: Now, you need to run the Dropbox app on another iPhone to find the ringtones. Remember to sign in your Dropbox app using the same account.
Step 6: Hit on the menu icon to download the ringtones to your target iPhone for usage.
 Sep. 06, 2021 by


 Prof. Media
 Blu-ray Ripper
 Blu-ray Copy
 iOS Data Recovery
 [12/29/23] MAX Downloader V15.0.0
 10,000,000 people are using Leawo!
 All Transactions are protected!
 30-Day Money Back Guarantee!