Deactivation is the best solution when you are separated from your old iPhone and erasing the content and settings of your iPhone is able to perform the deactivation. You can restore the device to the original factory condition and make it become unusable before setting up again. Regardless you are selling iPhone, taking it for fixing or intending to find it, the deactivating feature is able to make sure that the information and the usage stored in iPhone are used personally and limitedly. You can use iOS and iTunes to deactivate old iPhone, also can close iCloud in a remote way to complete the deactivation.
Part 1: Why do we need to deactivate old iPhone
Privacy and safety are closely related to each other. It is obviously seen for smartphones. Safety is an essential element to enforce your decision on privacy. Sometimes, the mutual conflict happens between privacy and safety, and you have no idea your privacy has been invaded. However, in most cases, the privacy on your iPhone can be totally controlled by yourself, no matter how much you worry about the third-party application, the FBI or the thief to get access to the data on your iPhone.
You may don’t know where to start to keep personal information safe on your iPhone, as lots of settings are hidden in your iPhone, you can try some ways to discover them like the location data, the lock on your screen, the password, the credit card and the widgets, etc. Of course, it is not the best selection for absolute privacy, however, you must get to know that your personal information has been used in what ways. Don’t miss any restriction or disability on your iPhone for keeping your personal information private and safe. The limit and the restriction on your iPhone are up to your decision.
Part 2: How to deactivate old iPhone
Here we will introduce you four ways of how to deactivate old iPhone and make your personal information keep secured.
Use iOS to reset iPhone
1. Tap on “Settings” from home screen on your iPhone and enter “General”. Scroll down to the bottom of the device’s screen.
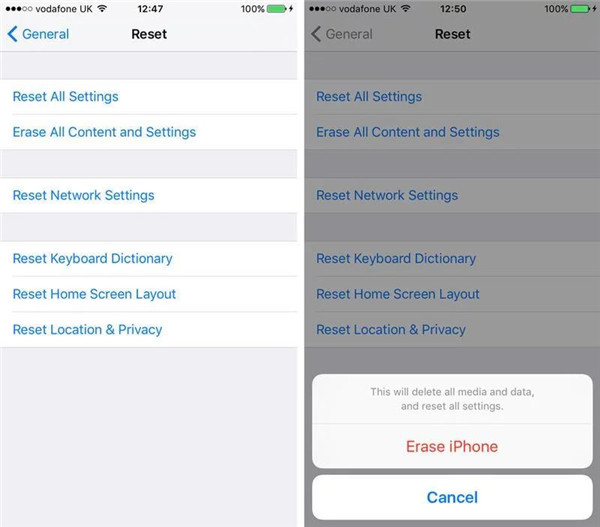
2. Tap on “Reset” and there are several options displaying on the screen.
3. Select the option “Erase All Content and Settings”. Then, a prompt will ask you to enter your iPhone’s Apple ID along with passcode. All the data, the information, as well as the settings on your iPhone, will be removed by this operation, which includes the feature “Find My iPhone Activation Lock” on iOS 7. Restart your device after the erasing, the prompt “Slide to Set Up” will be displayed on the screen.
Use iTunes to restore iPhone
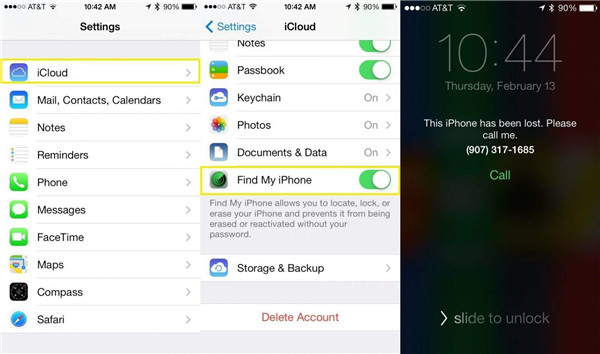
1. Tap on “Settings” on your device and enter “iCloud”. If the feature “Find My iPhone” has been enabled on your iPhone, switch it off by toggling the button to the disabling position. Then enter Apple ID and passcode of your iPhone and tap on “Turn Off”.
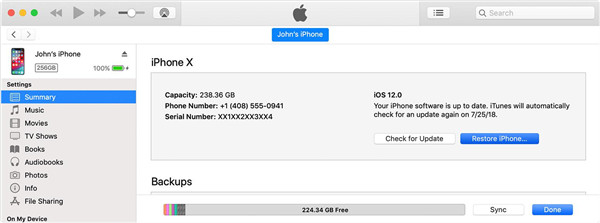
2. Run iTunes on computer and associate your iPhone with the computer via USB cable. Select your device in iTunes window.
3. Click on “Restore iPhone” from the Summary. Then choose the option “Restore” and confirm you would like to get your iPhone’s factory settings reinstated. Your iPhone will restart after the erasing, the prompt “Slide to Set Up” will be displayed on the screen.
Use iCloud to wipe iPhone in a remote way
1. Get access to iCloud.com on your computer web browser. Enter the Apple ID that you use for the service of iCloud on your iPhone. Then Tap “Find My iPhone”.
2. Choose your iPhone in the drop-down menu “All Devices” in order to show the information screen of iPhone.
3. Tap “Erase iPhone” from the information screen and enter your Apple ID and passcode in the prompt. If your iPhone is running base on iOS 7 system or later, a phone number and a message must be entered to show up on the device’s screen when your iPhone is erased. Wiping in a remote way will be done at once on the iPhone which is online, or the iPhone will effectively become deactivation when it pops up online. Check the email to confirm the erasure on the email address with your Apple ID.
Get rid of the SIM Card
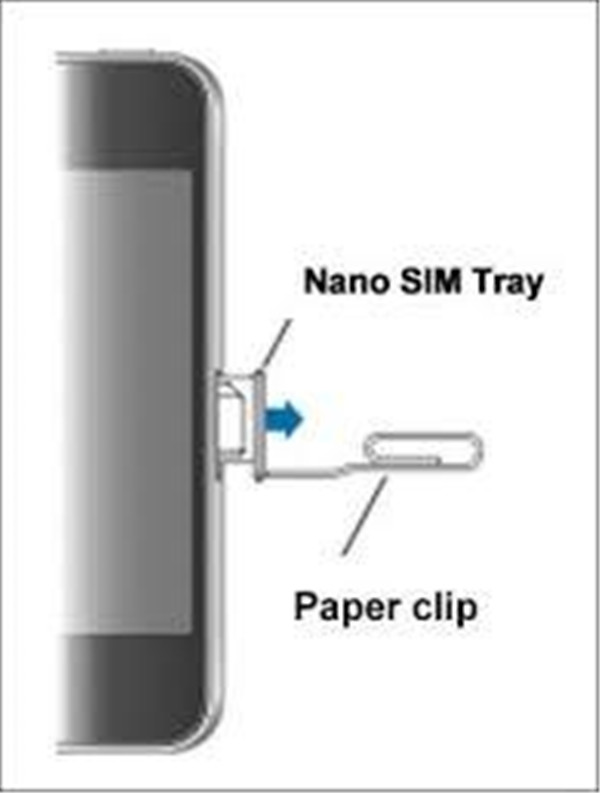
1. Get the SIM tool with pointed end inserted into the hole beside the tray of SIM card, then eject the tray by pushing it.
2. Pull out the SIM card tray and get rid of the SIM Card.
3. Push the tray back to iPhone till a clicking noise can be heard.
Part 3: How to activate new iPhone
It is very easy to activate a new iPhone, and it just needs several steps to finish this task, you can follow the instructions below step by step to get your new iPhone activated.
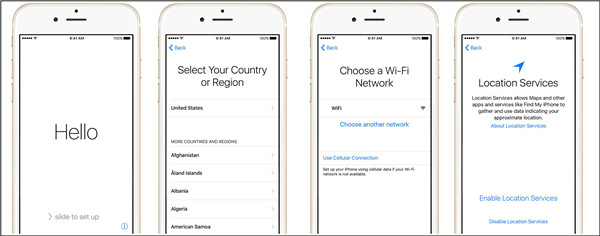
1. When your new iPhone is switched on, different languages can be seen on the Hello screen, such as English, Chinese, Spanish and more. Go ahead by sliding across the screen with your finger.
2. Select proper language and then tap on your country or the region from new iPhone. If your old iPhone is running based on iOS 11 version or later, the option “Automatic Setup” can be chosen. You just need to make your two iPhones get close to each other, then Apple ID, preferred setup, Wi-Fi information and the passcode for iCloud Keychain will be transferred by following the screen. Otherwise, choose Set Up in a manual way to go on.
3. Select Wi-Fi connection network and then type the password to access to Wi-Fi on new iPhone. If there is no Wi-Fi, cellular network can be used by tapping on Use Cellular Connection.
4. Whether Enable Location Services should be chosen depends on your decision. This service can be changed at any time according to your needs.
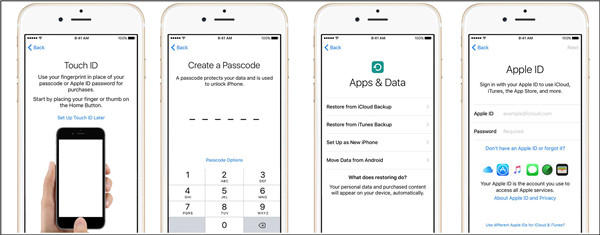
5. Your face ID can be set on your new iPhone X/XS (Max)/XR. Your touch ID can be set on iPhone 8 or former version device. Then set up a password in four or six digits, tap on Password Options to complete it.
6. Get access to screen about App & Data and the options can be seen in the list, select one option to suit your needs. To move the selected data to your new iPhone from the old iPhone or computer, set up new iPhone can be chosen and make the data move.
7. Enter Apple ID and password. A new ID can be created if you do not have Apple ID yet. Or this step can be skipped and finish it via Settings app in the later time.
8. Make iCloud Drive and Apple Pay and the iCloud keychain set up and accept the Terms and Condition from your new device.
9. Siri can be chosen to enable or disable, no matter what you have decided, enabling or disabling Siri can be done on your new device at any time.
10. Select settings for application analysis and the True Tone. Sharing information can be chosen or not with Apple.
11. Tap on “Choose a View”, select the option “Standard” or “Zoomed” and then tap on “Next”.
12. Tap on “Get Started” to start getting your new iPhone put into use.
Extra: How to back up iPhone before disabling old iPhone
If you want to deactivate old iPhone and activate new one, backing up the data from old iPhone in order to prevent any data loss is an important issue that you should concern. Here we will guide you two methods to back up your old iPhone before disabling.
Back up iPhone via Leawo iTransfer
Leawo iTransfer is a powerful transfer software which offers great solutions to transfer the data between iOS devices and computer. Up to 12 types of files like photos, music, apps and more can be supported by this software. For example, you can transfer music from iPhone to computer with simple clicks. Moreover, Leawo iTransfer assures 100% safety and rapidness in transferring the data with no data loss. You can refer to the following steps to back up your iPhone via Leawo iTransfer.
Leawo iTransfer
☉ Transfer up to 14 kinds of data and files without iTunes.
☉ Support the latest iOS devices like iPhone X, iPhone XR, etc.
☉ Play back, view, and delete data and files on iOS devices.
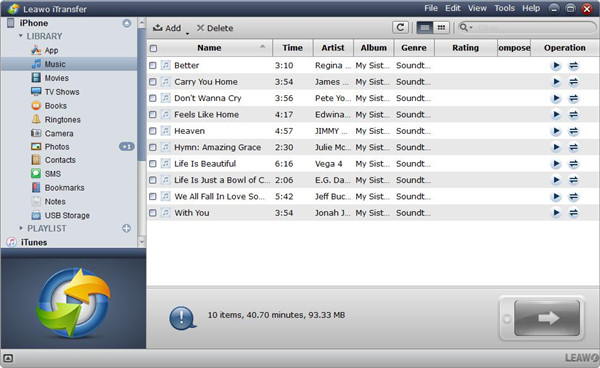
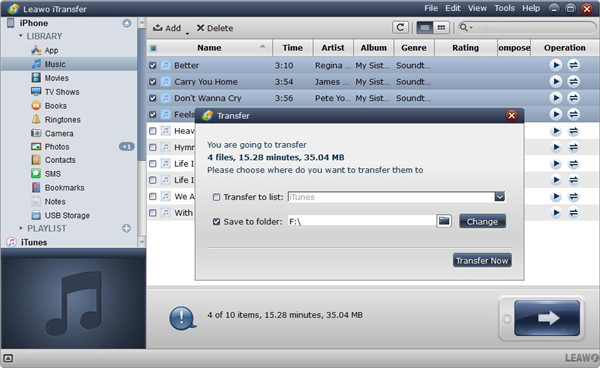
1. Connect your iPhone to computer via USB cable and then launch Leawo iTransfer. Your iPhone will be recognized and detected by the software, iPhone library will be displayed in the left sidebar.
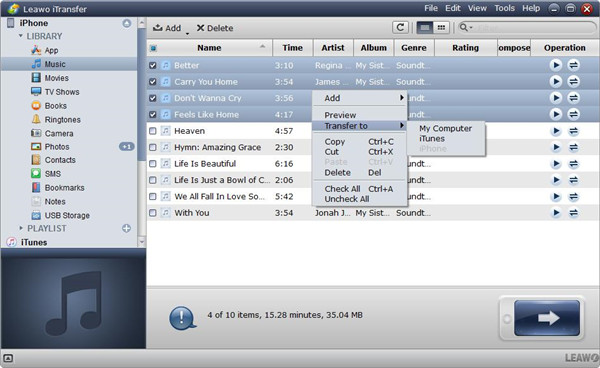
2. When you choose the items you want to back up in the library, the specific related files will be shown in the right part of the window. You can enable the square checkbox next to Name for selecting all files to back up, then click on the transfer button on the right bottom corner. Or you can choose some files for transfer by holding the key Ctrl/Shift, then right-click on what you have selected and chosen the option Transfer to > My Computer.
3. A pop-up dialog will ask you to choose the output directory for your transferred data, enable Save to Folder and then click on the button Change to select the location for the transferred files. Finally, click on the button Transfer Now to begin backing up your iPhone to computer.
Back up your iPhone via iTunes
1. Connect your iPhone to the computer via USB cable.
2. Launch iTunes on your computer.
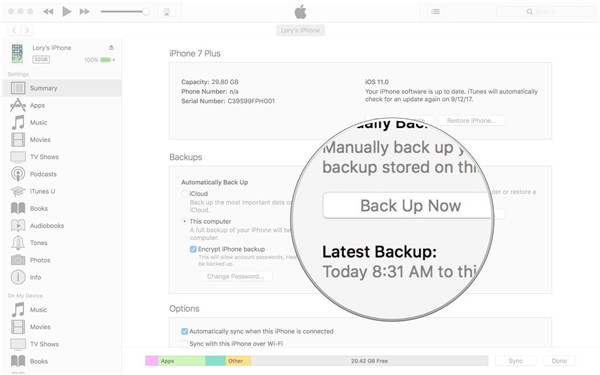
3. Choose Device icon beside the drop-down menu about items category which is in the left column of iTunes window.
4. Choose the option “Summary” in the left sidebar.
5. Choose the option Back Up Now below Manually Back Up and Restore.
6. Click on the button “Done” once the progress of backing up is finished.

