
How to Transfer Music from iPod to Computer on Mac or Windows?
At present, more and more people like to use some mobile devices, such as: iPod to listen to music. And a common feature of these devices is that they are updated quickly. Then, when people buy a new iPod, it becomes necessary to back up and transfer the music from the old iPod to the computer. If you really find the methods of how to transfer music from iPod to computer, then this article can solve your problem perfectly. In addition to introducing how to transfer music from iPod to computer in this article, I will also specifically explain why can't you play certain music from iPod on Windows.
- Part 1: How to Transfer Music from iPod to Computer via iTransfer?
- Part 2: How to Transfer Music from iPod to Computer via AirDrop?
- Part 3: How to Transfer Music from iPod to Computer with E-mail?
- Part 4: How to Transfer Music from iPod to Computer via USB Cable?
- Part 5: Why Can't You Play Certain Music from iPod on Windows?
Part 1: How to Transfer Music from iPod to Computer via iTransfer?
As a software program dedicated to providing perfect solutions for iPhone, iPad and iPod transfer problems, Leawo iTransfer can help users back up and transfer 12 kinds of files between iOS devices, iTunes and PC, such as: apps, photos, music, videos, text messages, contacts, etc. In addition to having a clean and friendly interface, Leawo iTransfer supports almost all iOS devices currently on the market. So, next I will introduce the specific steps on how to transfer music from iPod to computer via using Leawo iTransfer.

-
Leawo iTransfer
- Transfer files among iOS devices, iTunes and PCs with ease.
- 6x faster than iTunes
- Transfer up to 14 kinds of data and files without iTunes.
- Support the latest iOS devices like iPhone 12, iPhone 12 Pro, etc.
- Play back, view, and delete data and files on iOS devices.
- Support Windows & Mac OS
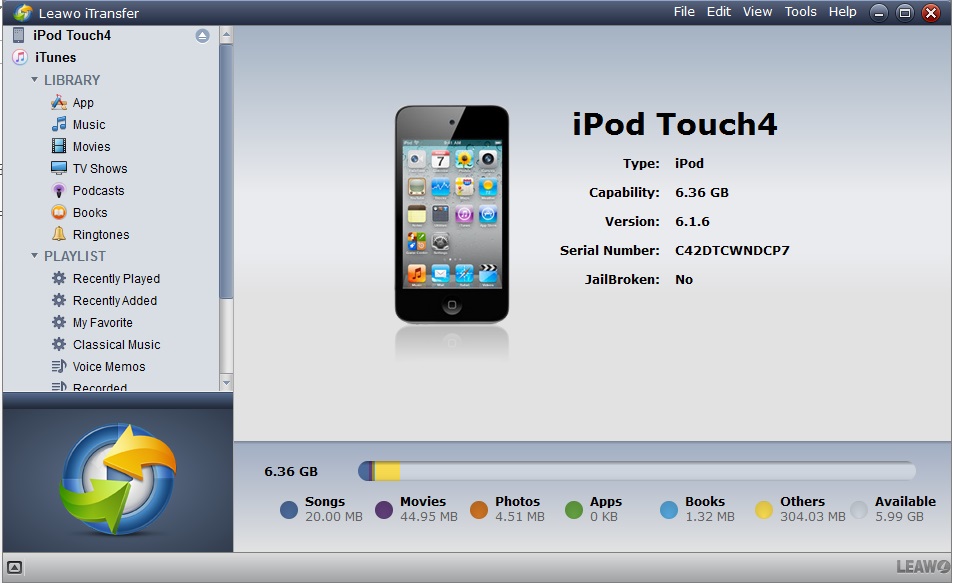
◎Step 1: Launch iTransfer and connect your iPod to PC
Download the iTransfer installation package from Leawo's official website, and then install it on your computer. Before connecting the iPod to the computer with a USB cable, you need to run iTransfer first. After connecting the iPod to the computer with a USB cable, iTransfer will immediately detect the device and display the device's information on the interface.
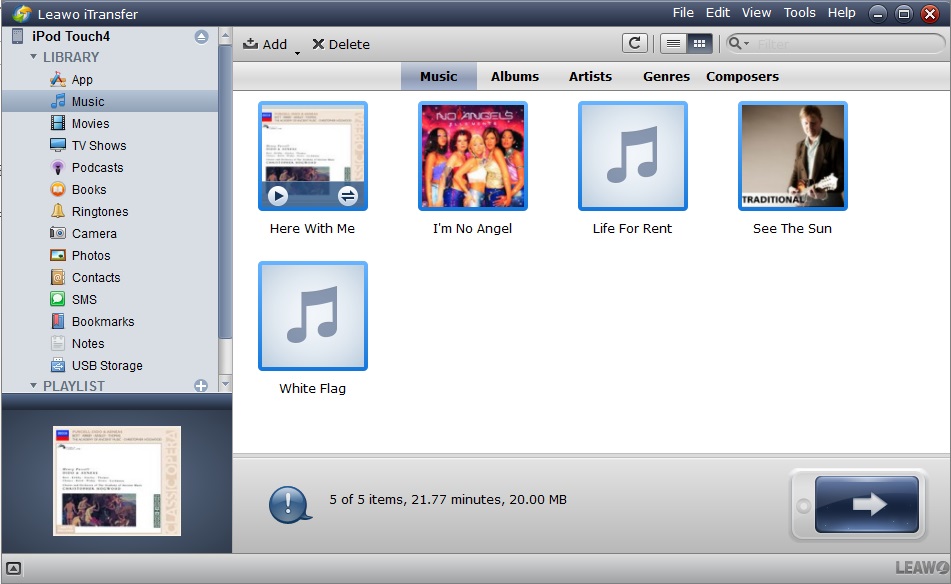
◎Step 2: Select all the iPod music in iTransfer
On the left side of the iTransfer interface will display the information of various data in your iPod. Under the "LIBRARY" tab, click the "Music" button. Then, iTransfer will display the information of all the music files in your iPod on the right side of its interface. You can hold down the "CTRL" key on the keyboard, and then select the music files you need to back up one by one. In addition, a blue border will be added to the selected file to help you identify it.
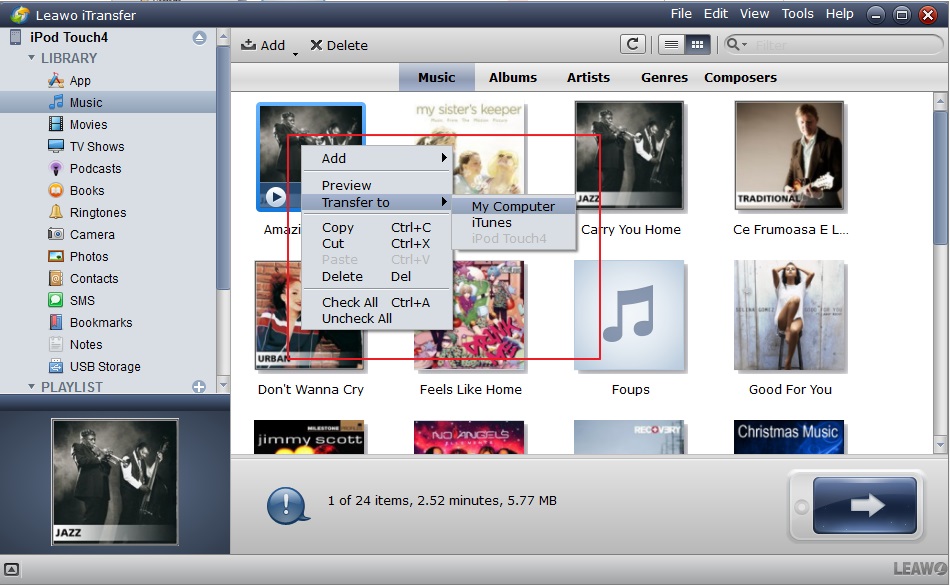
◎Step 3: Choose to copy iPod music to PC
After you select the music file, you can choose any music file you have selected, and then use the right mouse button to click it. At this time, iTransfer will pop up a window. In this window, first move the mouse to the text of "Transfer to", and then click the "My Computer" button.
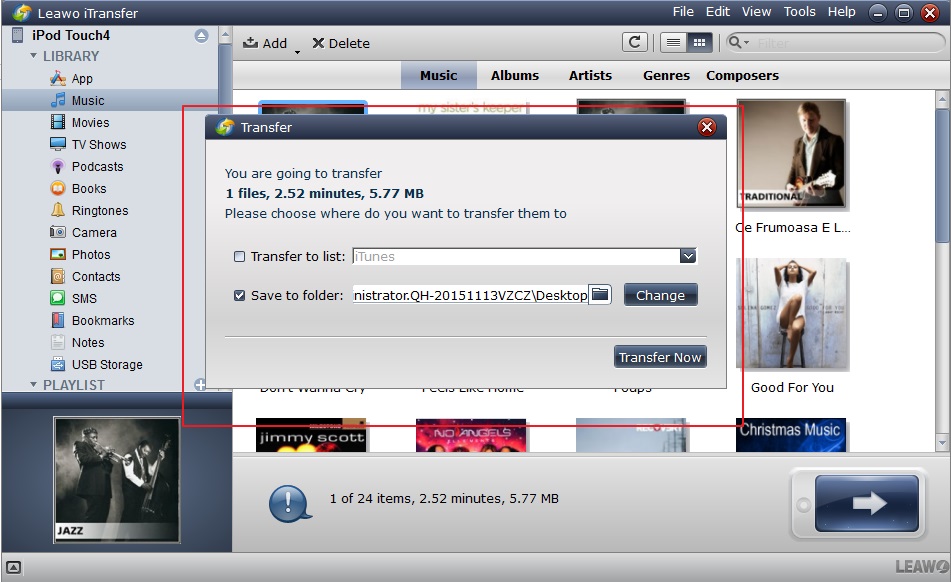
◎Step 4: Set the target directory
Finally, iTransfer will pop up a window and ask you to set the storage location of iPod music files in your computer in this window. In this window, you can select "Save to folder". Then click the "folder" icon on the right, you can customize the storage location of iPod music files in your computer. Finally, click the "Transfer Now" button at the bottom right of that window, and iTransfer will begin to transfer iPod music files to your computer. After a few minutes, you can see the transferred iPod music files on your computer.
Part 2: How to Transfer Music from iPod to Computer via AirDrop?
With the development of Internet cloud technology, more and more Internet companies have begun to provide users with cloud services Starting with iOS 11 and iPadOS 13, Apple provides iCloud cloud disk services for every Apple user. After users log in to iOS devices with their Apple ID, they can upload files or data from these devices to iCloud cloud disk. In addition, any changes the user makes to iCloud will appear on all devices with iCloud set up. In other words, users can transfer music from iPod to computer with the help of iCloud cloud disk. First, the user needs to turn on "iCloud" in the "Settings" of the iPod. Then, in "Settings", choose to open each app listed under iCloud. After completing the above operations, the user can upload the music files in the iPod device to the iCloud cloud disk. And then log in to the iCloud cloud disk on the user's computer. Finally, the user can download the iPod music in the iCloud cloud disk. This method not only requires users to turn on the iCloud cloud disk service, but also has higher requirements on the network, because before transferring iPod music to the computer, users must use the network to upload the music in the iPod to the iCloud cloud disk.
Part 3: How to Transfer Music from iPod to Computer with E-mail?
With the development of Internet technology, e-mail technology is also constantly evolving. Now, we can send all kinds of data to other people by e-mail, including music files. As we all know, we can send a music file as an attachment along with the email when sending an email. Based on this condition, can we transfer music from iPod to our computer via email? The answer is yes. The specific operation is: First, create two email accounts. Then, log in to one of the email accounts in your iPod. Create an email sent to another account in this email account, and select the music files in your iPod as an attachment. Finally, send this email to your other email account. After the sending is successful, log in to your other email account on your computer. After receiving the email that you sent, you can download the music file in the attachment to your computer. At this point, you have completed the operation of transferring the music in the iPod to the computer.

Part 4: How to Transfer Music from iPod to Computer via USB Cable?
We know that the iPod can be regarded as a mobile hard drive. In other words, we can connect the iPod to the computer with a USB cable, and then use the computer to read the data in the iPod. Of course, you can also directly transfer music from iPod to computer with the help of USB cable. The specific steps are very simple, but apart from buying a USB cable, the shortcomings of this method are also obvious. Compared with the above methods, it may take the longest time. First, connect your iPod to your computer with the help of a USB cable. Then, complete the authorization in your iPod and allow your computer to read the data in the iPod. Finally, select the music you want to back up and transfer these music files from the iPod to your computer.

Part 5: Why Can't You Play Certain Music from iPod on Windows?
Just as we can't play certain Spotify music offline, we can't play certain iPod music offline either. The specific reason is that the music files in iTunes are protected by DRM. The full name of DRM is Digital Rights Management. DRM is a technology that refers to the rights protection, use control and management of digital content, such as audio and video program content, documents, e-books, etc., during the production, dissemination, sale, and use process. Due to copyright and fees and other reasons, iTunes does not allow users to play certain songs offline or for free. As a result, the method adopted by iTunes is to add DRM protection to these music files. DRM-protected music files can only be recognized and played by the iTunes application, and other playback software, like: Windows Media Player, cannot play them. Therefore, these music files are in M4P or M4V format instead of the common MP3 format. Therefore, if you want to play DRM-protected iPod music in Windows, you must remove DRM from these music files. Therefore, I strongly recommend you to use Leawo Prof. DRM. As a professional music conversion software, Leawo Prof. DRM can convert iTunes DRM-protected M4P and non-DRM iTunes M4A music to MP3. By using Leawo Prof. DRM to remove DRM from iPod music files, you can use the music player software in Windows to play iPod music. In addition, if you want to know more about iTunes, you can check out MediaMonkey vs iTunes: Detailed Review.

-
Leawo Prof. DRM
- Convert iTunes DRM-protected M4V movie and TV show to DRM-Free MP4
- Remove DRM from M4B, AA, AAX files and convert any Audible AA, AAX file to MP3, even without iTunes authorization
- Convert iTunes DRM-Protected M4P and non-DRM iTunes M4A Music to MP3
- Remove DRM-protection on Spotify music and convert to Universal audio format for enjoying music offline on any devices
- Convert DRM-protected eBook from Kindle, Kobo, Adobe to DRM-free epub, mobi, azw3, txt, etc., format
All in all, as you can see, using iTransfer to transfer music from iPod to computer is much easier and faster than the other three methods. So, I suggest you use iTransfer to copy music files from iPod to PC. In addition, if you want to play music in iPod offline on your computer, you also need to use Leawo Prof. DRM to remove DRM from iPod music.
 Sep. 28, 2017 by


 Prof. Media
 Blu-ray Ripper
 Blu-ray Copy
 iOS Data Recovery
 [12/29/23] MAX Downloader V15.0.0
 10,000,000 people are using Leawo!
 All Transactions are protected!
 30-Day Money Back Guarantee!