Being the most popular video format, MP4 is friendly with nearly all media players, portable devices, video editing programs, video sharing sites, etc. Almost all format incompatibility issues could be solved by converting videos to MP4 format. We talked about how to convert AVCHD to MP4 on Mac before. This how-to post offers five solutions for you to convert video to MP4 format on Mac by using professional Mac MP4 video converter.
- Part 1: Convert Video to MP4 on Mac with Leawo Video Converter for Mac
- Part 2: Convert Video to MP4 on Mac with Movavi Video Converter
- Part 3: Convert Video to MP4 on Mac with QuickTime
- Part 4: Convert Video to MP4 on Mac with iMovie
- Part 5: Convert Video to MP4 on Mac with Aconvert
- Part 6: Comparison Table of Video to MP4 Converters
Part 1: Convert Video to MP4 on Mac with Leawo Video Converter for Mac
Leawo Video Converter for Mac is a professional Mac video converter program that could solve all format incompatibility issues for Mac users. It could be considered as a comprehensive MP4 video converter for Mac for it could convert almost all videos to MP4 format on iMac or Macbook, and convert MP4 videos to other formats, like MKV to MP4, MKV to AVI, AVI to MP4, FLV to MKV, WMV to MOV, MP4 to MP3, MP4 to AVI, FLV to MP3, etc. By converting videos to MP4 on Mac computer, you can easily watch non-MP4 videos on iPhone 7, iPad Pro, iPod touch, Surface, Galaxy S7, Lumia 920, HTC One, etc., edit non-MP4 videos in iMovie, FCP, Adobe Premiere or share movies on YouTube or your website. No format limit exists any more with Leawo Video Converter for Mac.
Download and install Leawo Video Converter for Mac on your computer, and then follow the guide below to convert video to MP4 on Mac with this Mac MP4 video converter.
Step 1.Import Source Video Files
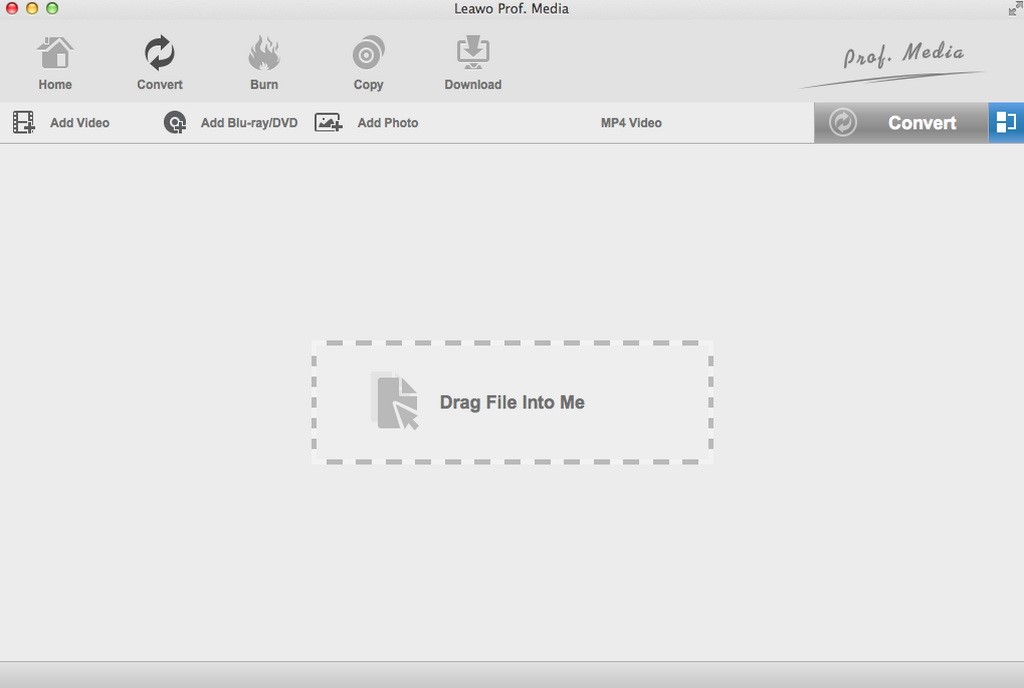
Launch Leawo Video Converter for Mac to enter the main interface. Under the "Convert" module, click the "Add Video" button to browse and choose source video file or directly drag and drop source video files into this Mac MP4 converter.
Step 2. Set MP4 as Output Format
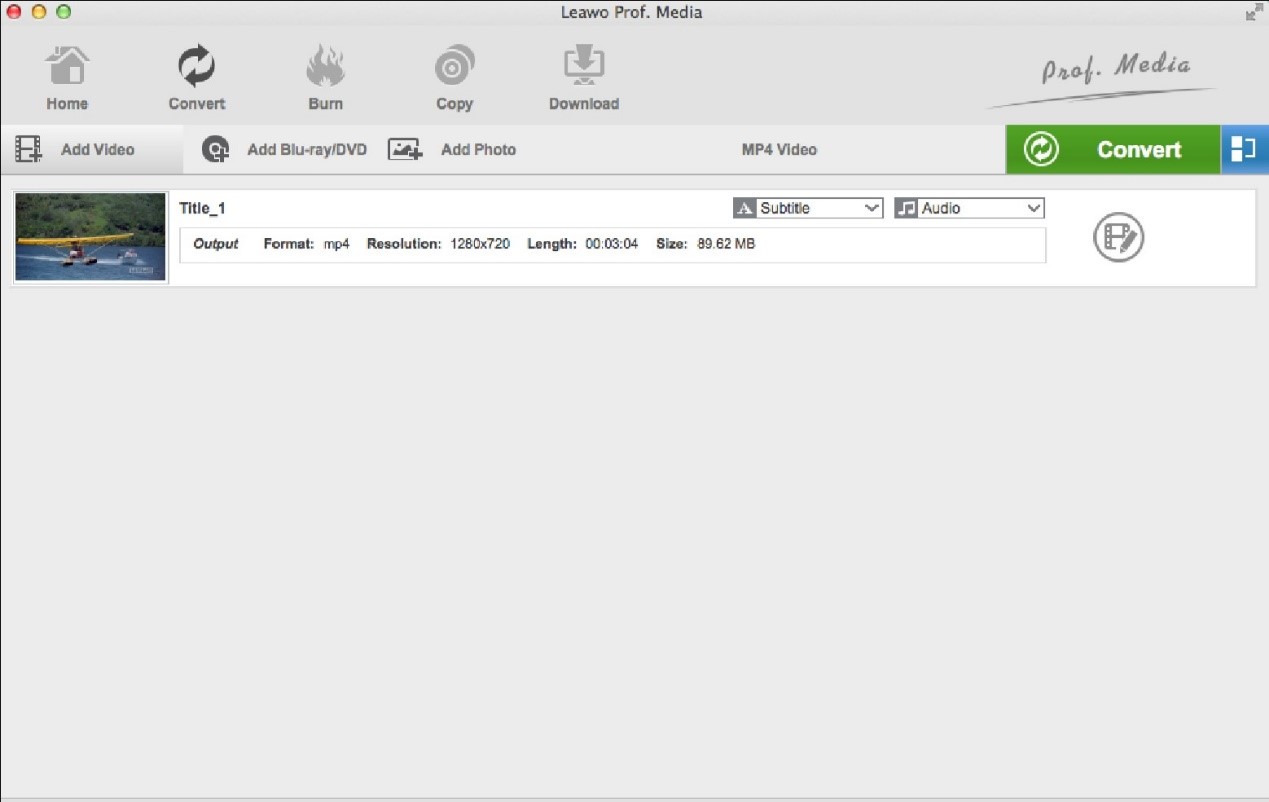
After importing source video files, click the drop-down box before the big green "Convert" button and then select "Change" option to enter the Profile window for output format setting. To convert video to MP4, you need to open "Format > Common Video" group to select MP4 as output format.
Optional: If you’re not satisfied with the video and audio parameters of preset output format like video codec, bit rate, aspect ratio, quality, frame rate, audio codec, audio quality, audio bit rate, sample rate and channel, you could reset them. After setting output format, re-open the drop-down box and then select "Edit" option to enter the Profile Settings panel. On the Profile Setting panel, you could freely set the parameters.
Step 3. Set Output Directory
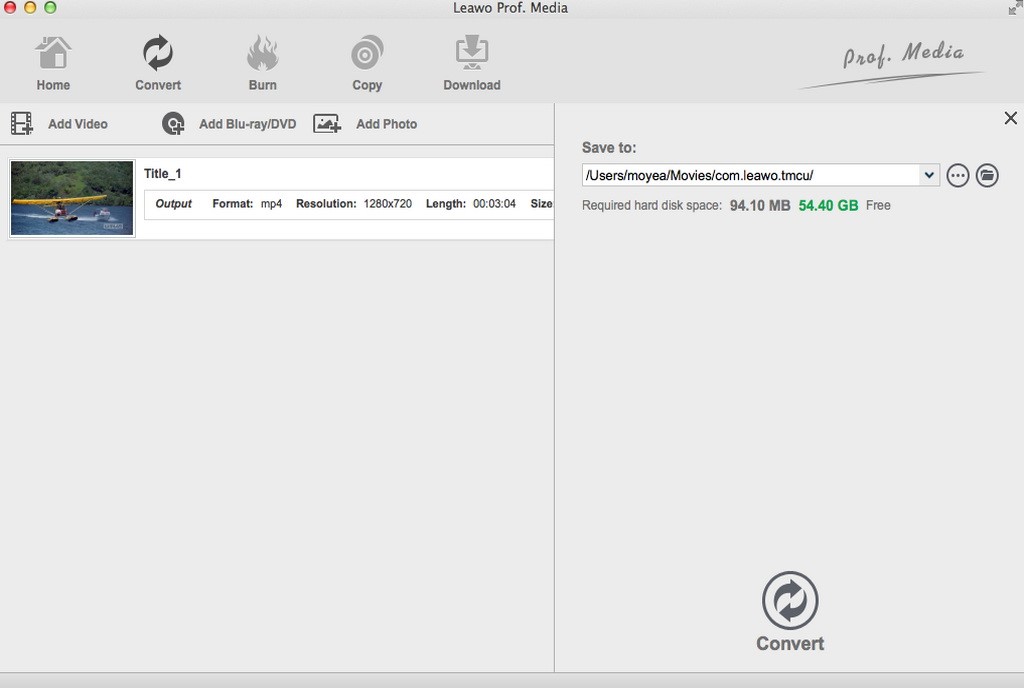
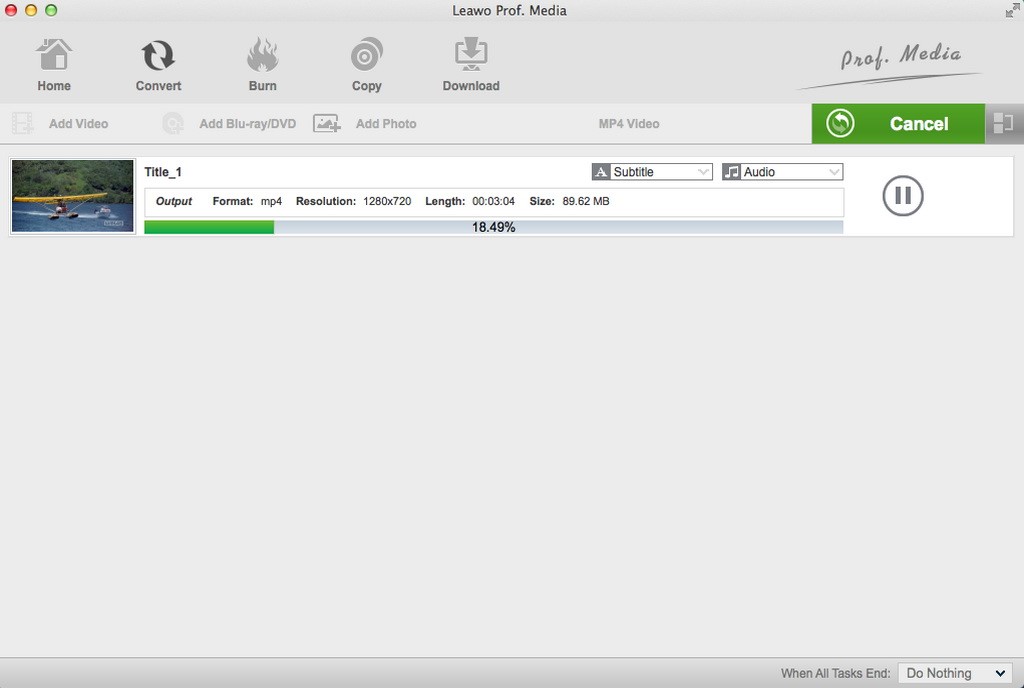
When all the format settings are finished, save the settings and return to the main interface. Click the big green "Convert" button on the main interface to set output directory on the popup sidebar. You could open "Save to" box to browse desired folder as output directory.
Step 4. Convert Video to MP4 on Mac
At last, start converting video to MP4 on Mac by clicking the bottom "Convert" button on the sidebar.
Note:
- Windows users, on the other hand, can switch to Leawo Video Converter to convert videos to MP4 videos on Windows 7/8/8.1/10/Vista/XP without quality loss.
- This guide is also applicable to converting MP4 videos to other formats like FLV, MOV, AVI, MKV, etc. on Mac.
Part 2: Convert Video to MP4 on Mac with Movavi Video Converter
Movavi Video Converter can help you quickly change the format of your video files, photos, and other digital media? Movavi Video Converter combines a smooth, user-friendly experience, eye-blink speed of conversion, and high quality of end results. Check out the guide below to convert video to MP4 on Mac with Movavi Video Converter.
Step 1. Add Source Video File
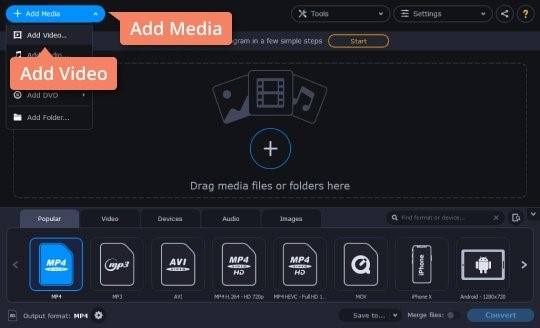
On the main interface of Movavi Video Converter, click "Add Media" button in the upper left corner and select the "Add Video" option to choose source video files for importing to the program.
Step 2. Choose MP4 as Output Format
Click "Video" tab to open the list of supported video formats, and then choose "MP4" as the output format.
Step 3. Start to Convert Video to MP4
Click "Convert" to start the operation. The app supports batch conversion so you can transcode multiple files simultaneously. When the conversion is complete, the folder containing the output files will open automatically.
Part 3: Convert Video to MP4 on Mac with QuickTime
QuickTime is the built-in video player of Mac system that multitasks and performs an array of other functions as well including video conversion. While using QuickTime, there is no need of downloading any software or program as it comes bundled with the system. The process of video conversion is simple and quick using this free Mac video converter. Check out the guide below to convert video files to MP4 format on Mac with QuickTime.
Step 1. Open Source Video File
QuickTime does not support batch conversion. Therefore, if you have multiple files, you need to convert them one by one. Locate your source video file, and then open it in QuickTime.
Step 2. Export File as MP4
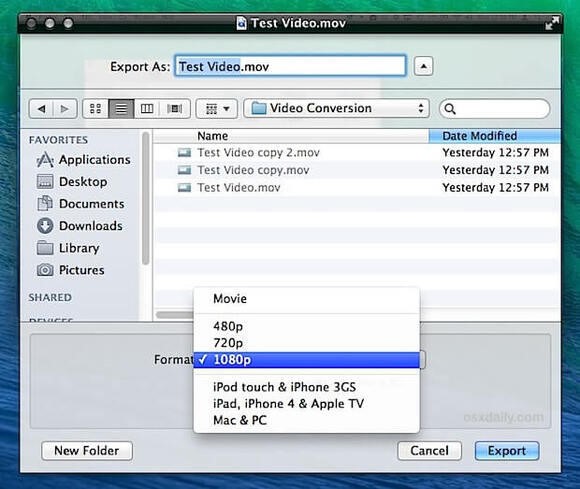
On the interface of QuickTime, you need to click "File", then "Export", and "Export as MP4". You can rename the video file, and at the same time, you can choose resolution for keeping in the output MP4 video file.
Step 3. Start to Export
Click the blue "Export" button to start to export source video as MP4 video.
Part 4: Convert Video to MP4 on Mac with iMovie
iMovie is a video editing tool that comes as a built-in application along with your Mac. You can use iMovie to easily change video format of your video file. So, let us see how you can use this integral editing software for video conversion.
Step 1. Add Source Video File
Click Finder, choose Applications, and click on iMovie icon from list of displayed apps. Click on File menu and opt for New Movie from shown drop-down list. Select Import Media option, and pick the source video that you wish to convert.
Step 2. Choose MP4 as Output Format
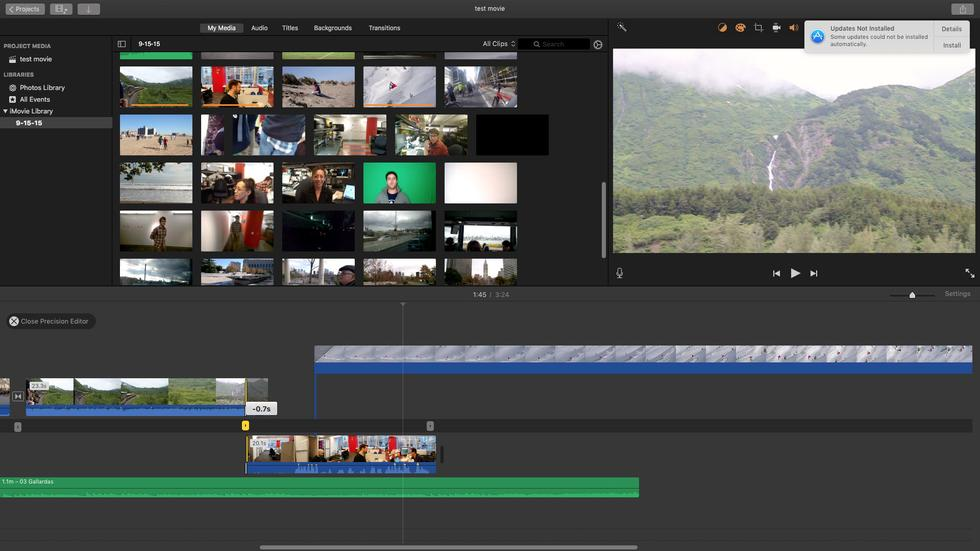
iMovie will open your selected MOV video as a new Project. Now, go to application toolbar, choose File then select Share option from the drop-down list. Now click on File button in the subsequent window and edit your preferences to choose MP4 as the output format.
Step 3. Save Output Video
Hit Next button, and in next window, mention the location to save the converted video file. Finally, click Save button to save video in MP4 format.
Part 5: Convert Video to MP4 on Mac with Aconvert
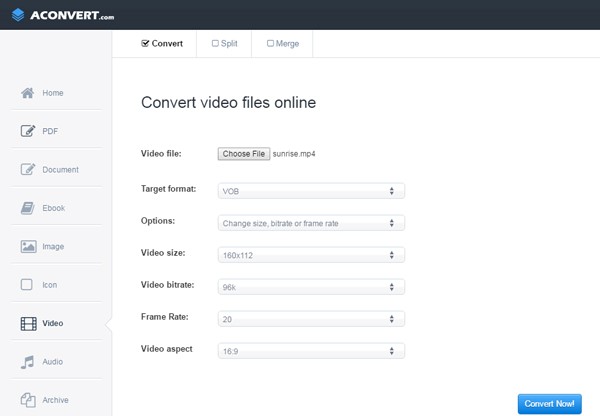
The fifthethod to convert video to MP4 is operated online with the help of Aconvert. The letter "A" in the name of Aconvert means "All", which means Aconvert supports and converts all kinds of document, ebook, image, icon, video, audio and archive files online for free. Therefore, we can use Aconvert to convert video online free of charge, and it supports MP4 output. It is easy to operate with Aconvert to convert video to MP4.
Step 1. Import Source Video File into Aconvert
Visit the official website of Aconvert, and choose "Video" on the left to enter the Aconvert video converting interface. First, we need to import source video file by clicking "Choose File".
Step 2. Choose Output Format
After importing source video file, we can choose a variety of formats as output. To convert video to MP4, you need to choose MP4 format under "Target format".
Step 3. Start Conversion Process
Click "Convert Now!" after output format is set. After a few seconds of transmission, the conversion will be complete. After conversion process is complete, you can download the converted result on your computer.
Part 6: Comparison Table of Video to MP4 Converters
|
|
Leawo Video Converter for Mac |
Movavi Video Converter |
QuickTime |
iMovie |
Aconvert |
|
Available on Windows |
Yes |
Yes |
Yes |
No, available on Mac only |
Yes |
|
Easy to use |
Yes |
Yes |
No, somehow difficult |
No, very difficult |
Yes |
|
Supported input file formats |
Audio: FLAC, AAC, AC3, AIFF, AMR, M4A, MP2, MP3, OGG, RA, AU, WAV, WMA, MKA |
3GP, 3G2, 3GP2, 3G2P, 3GPP, ASF, AVCHD, AVI, DivX, DVD, FLV, F4V, M2TS, TS, MTS, M2S, M2T, MKV, MKM, MOV, QT, MP4, M4V, MPG, MPEG, VOB, OGG, OGV, OGM, WMV, WTV, etc. |
QuickTime movie files (MOV), most MPEG-4 files (MP4, M4V, M4A, MP3), MPEG-2, DV Stream, Mpeg, and some audio files like WAV, AIFF, AAC. |
MPEG-4, QuickTime MOV, MPEG-2, AVCHD, DV (both standard and high-definition videos). |
all kinds of document, ebook, image, icon, video, audio and archive files |
|
Supported output file formats |
Audio: FLAC, AAC, AC3, AIFF, AMR, M4A, MP2, MP3, OGG, RA, AU, WAV, WMA, MKA |
3GP, 3G2, ASF, AVI, FLV, M2TS, MKV, MOV, MP4, M4V, MPG, VOB, MXF, OGV, SWF, WebM, WMV, etc. |
Same as input |
Same as input |
Same as input |
|
Customize output video and audio parameters |
Yes, users can adjust video and audio parameters like Video Frame Rate, Encoder, Bitrate; Audio Sample Rate, Channels, Encoder, Bitrate |
Yes |
Yes |
Yes |
No |
|
Internal video player |
Yes |
Yes |
Yes |
Yes |
No |
|
Internal video editor |
Yes, it allows users to merge video files, rotate video angle, trim video length, crop video size, add watermark, and adjust video effect |
Yes, you can rotate, crop, and stabilize your clips |
No |
Yes |
No |
|
Add 3D effects to 2D video |
Yes |
No |
No |
Yes |
No |
|
Add subtitles and choose audio tracks |
Yes |
Yes |
No |
Yes |
No |

 Nov. 08, 2013 by