If your iPhone is out of battery or you have forgotten taking your iPhone along with you, the voicemail from your iPhone is still can be checked remotely via another phone. Your iPhone voicemail can be checked in a direct way via another phone, you can forward, save or delete messages on voicemail through another phone. If you have made changes on the account of your voicemail via another phone, it still works once you access your iPhone voicemail again.
Part 1: How to check iPhone voicemail from another phone
For AT&T Users
1. Use another phone to dial the phone number of your iPhone. Once you hear the sound of voicemail greeting, tap on the option sign “Star” to stop it.
2. Type into the password of your voicemail account, then tap on the option key “1” for listening to the messages. When the playback of message stops, choose one option in the menu. To delete, reply or save the messages can be chosen in the options.
Tap on the key option “Star” to go back to the primary menu. Once it is finished, the call can be hung up.
For Verizon Wireless Users
1. Use another phone to dial the phone number of your iPhone. When you hear the sound of voicemail greeting, tap the option key “Pound” to stop it.
2. Type into the password of your voicemail, then tap on the key option “Pound” for listening to the messages of your voicemail.
3. Once you have finished the voicemail listening, tap on the key which is from the specified menu option accordingly. You also can choose to forward, save, delete and reply to your voicemail from the options.
Once it is finished, your calling can be hung up.
For Sprint Users
1. User another phone to dial the phone number of your iPhone. Once the sound of voicemail greeting can be heard, tap on the key option sign “Star” to stop it.
2. Type into the password of voicemail account to check your messages. Your messages can be listened to, the options of saving, erasing or forwarding also can be chosen according to your needs.
Part 2: How to access voicemail on your own iPhone
You can call your voicemail directly or use the option of visual voicemail on your iPhone to access voicemail. The following specific steps will guide you on how to check iPhone voicemail from another phone.
2.1 Call your Voicemail
1. Launch the app of your Phone. It is a green app with an icon of a white phone inside, which usually locates on the bottom left corner of iPhone home screen.
2. Tap on the icon of keypad. Keypad icon is made by nine blue dots, which is similar to the keypad of your phone and it is on right bottom of phone screen next to the voicemail icon.
3. By pressing and holding the option key “1”, you can dial voicemail on your phone. You may get a prompt to type into the password on the keypad if a password has been set to your voicemail.
4. Check your voicemail by following the given instructions. In line with your wireless carrier, the messages of your new voicemail will be played in an automatic way or you have to press on the numbers from the keypad. Listen to the given instructions and give a response via the keypad.
2.2 Visual Voicemail
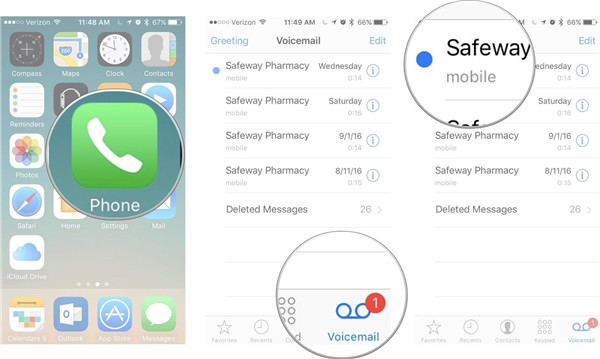
1. Launch Phone app on your iPhone. It is a green app with an icon of a white phone inside, which usually locates on the bottom left of your phone home screen.
2. Tap on the voicemail icon, which is similar to a cassette tape reel on the right bottom of phone screen.
3. Scroll and browse voicemail, you will find that a new voicemail is labeled with a blue dot beside the new voicemail.
4. Tap on the voicemail, then more options can be given to each message.
5. Tap on the button “Play” for listening to the message of your voicemail. By tapping on “Speaker”, the voicemail can be played from the spearkerphone. Once the voicemail has been played, the blue dot beside it will be not be labeled any longer. You can call back the sender by tapping on the option “Call Back” or remove the voicemail via tapping on “Delete”.
Bonus: How to back up voicemail to computer
To prevent any data loss of your voicemail, it is a good idea to back it up to your computer. Before backing up voicemail to your computer, you need to save the voicemail that you want to back up to notes or memos, then you can proceed with the next steps to back it up to the computer.
To save the voicemail to notes or voice memos, you can follow the instructions as below:
1. Run Phone app on the home screen of your iPhone.
2. Tap the tab of voicemail on the right bottom of the screen.
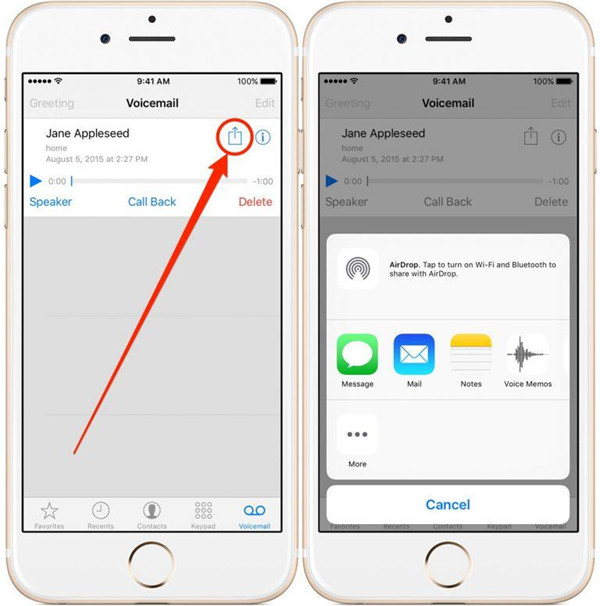
3. Select the voicemail messages that you want to back up and then hit the icon button “Share”.
4. Choose the options Notes or Voice Memos from the pop-up share menu. Your voicemail can be added to the existing note or a new note. You also can choose to save it to voice memos, which will help you get the audio file trimmed from the stock of Voice Memos app.
After you have saved the voice mail to Notes or Voice Memos, you can back up the voice mail to your computer in a simple way. Here we will recommend you two useful third-party tool to back up the voice mail to computer from Notes or Voice Memos.
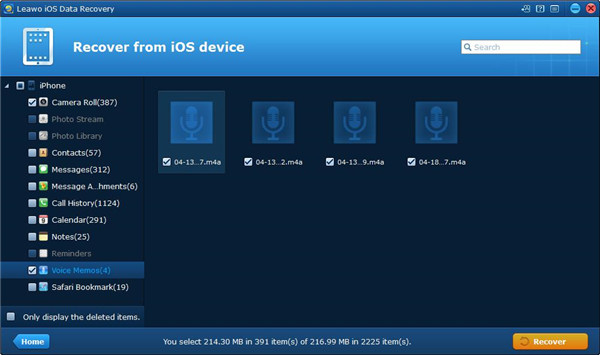
If the voice mail is saved to voice memos, you can back it up to your computer with iOS data recovery. Leawo iOS Data Recovery is an integrated software for data recovery, which is available for iOS devices like iPhone, iPad, and iPod. It is one of effective tools to help you back up the 14 kinds of data from iOS devices to computer. 100% safety, accuracy, and rapidness are guaranteed by Leawo iOS data recovery. Previewing and selecting are even allowed in order you can choose the data that you want to back up to your computer. Below, we will instruct you how to back up voicemail in the voice memos from your phone to the computer step by step.
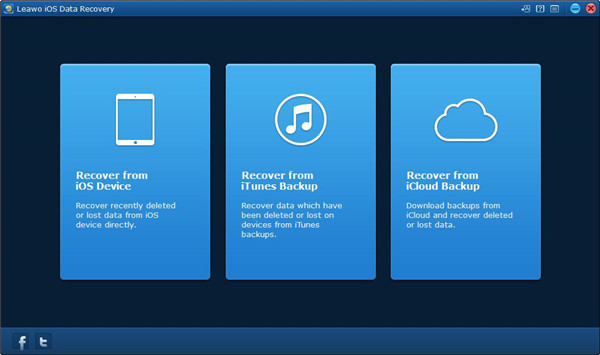
1. Launch Leawo iOS data recovery and then choose the first tab “Recover from iOS Device”.
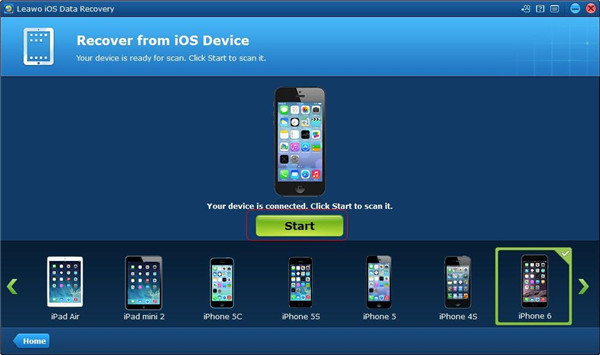
2. Connect your iPhone to the computer with the supported USB cable and then click on the “Start” button to begin scanning your iPhone.
3. Your iPhone will be scanned by Leawo iOS data recovery. Once the scanning is completed, you will see multiple kinds of data from your iPhone are listed on the left sidebar of the software window. Check the square box beside the voice memos, the specific content of it will be displayed on the right part of the window. Choose the voice memos that you would like to back up to your computer. Then click on the button “Recover” on the right bottom corner.
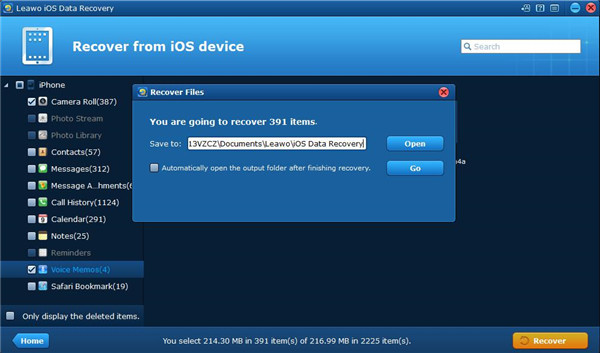
4. A dialog will pop up and requires you to choose a destination folder to save the voice memos that you want to back up. Then click on the button “Go” to begin backing up your voice memos to the computer from your iPhone.
If your voice mail is saved to Notes, using Leawo iTransfer to transfer the notes to the computer would be a good selection. Leawo iTransfer offers a great solution to transfer the data between iOS devices and computer. 12 kinds of data are supported by this software, such as apps, notes, music, videos and so on. Based on the advanced technology of scanning and transferring, this software is able to complete the transfer task in a rapid and safe way. Here we will guide you on how to transfer notes from iPhone to computer with Leawo iTransfer.
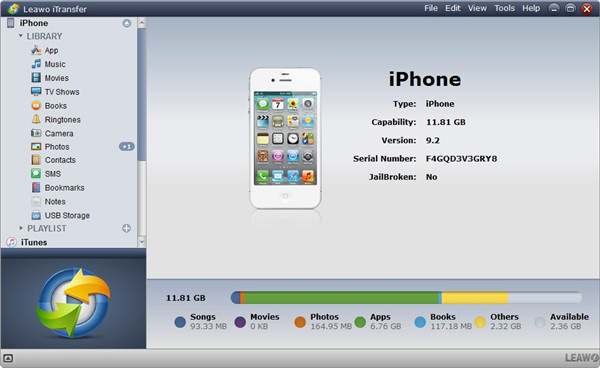
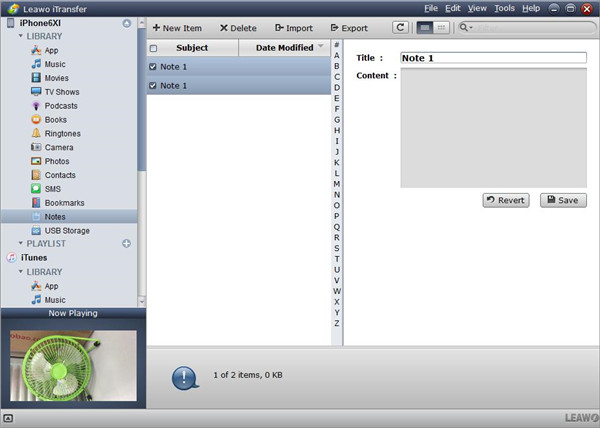
1. Launch Leawo iTransfer on your computer and then connect your iPhone to the computer with supported USB cable. Your iPhone will be recognized and detected by the software, and your iPhone library will be listed on the left sidebar of the window.
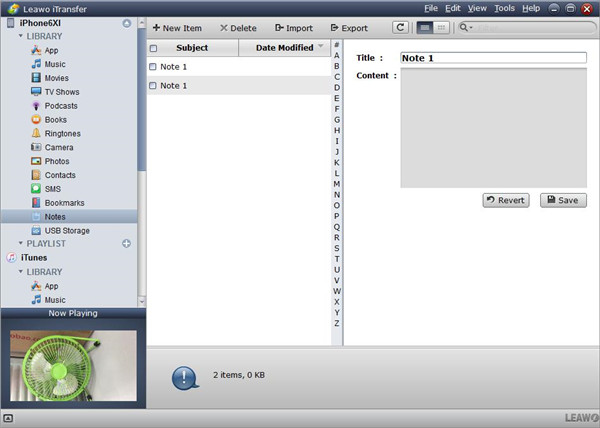
2. Choose “Notes” below library from the left column, then all notes from your iPhone can be viewed here. Choose the notes that you want to transfer to your computer from iPhone by checking the square box beside it.
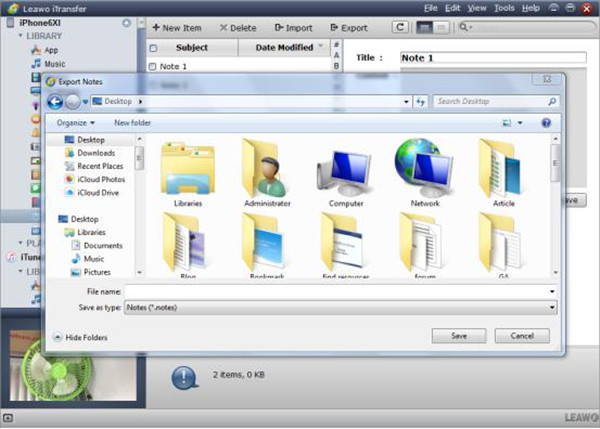
3. Once you have chosen the notes you would like to transfer from iPhone to computer, click on the button “Export” and choose an output directory to save the transferred notes on your computer.
4. Once you have selected the output directory for the transferred notes, click on the button “Save” to begin to transfer the notes from iPhone to computer by Leawo iTrasnfer. Then a dialog will pop up and show the transfer percentage to let you know the transfer progress of the notes. Once the transfer process is completed, you can go to the output directory that you just saved the notes in it to view the notes that you have backed up.

