It is quite common for people to sign up for a first or third-party subscription via Apple and forget about it. Whether you desire to cancel one subscription or just remember what services or applications you are using, you can read this guidance. Here I will tell you the easy trick to view and cancel Apple subscriptions.
Part 1: How to View Apple Subscriptions
If you want to check all your Apple subscriptions, you can make it on your iPhone or via iTunes. It is very convenient for you to do so with the help of the following contents in this part.
1.1 View Apple Subscriptions on iPhone
In order to view Apple subscriptions, you can use your iPhone to get this work done directly via Settings app.
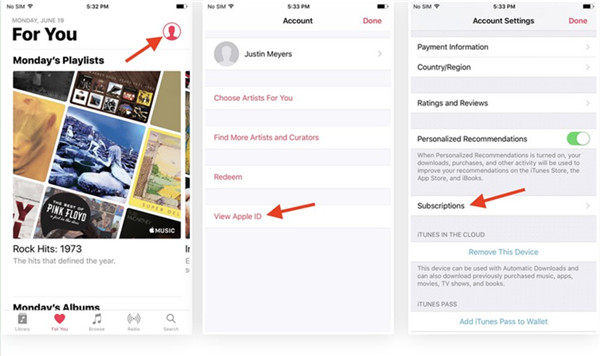
1. Run Settings app on iPhone and click on “Your Name” at the top of the list and then find the tab of “iTunes & App Store” in the menu of “Apple ID” to hit on.
2. Click on the entry labeled Apple ID with your email address beside it.
3. In the pop-up result, you need to click on the option of “View Apple ID”.
4. After that, you need to confirm your password or authenticate via Touch ID.
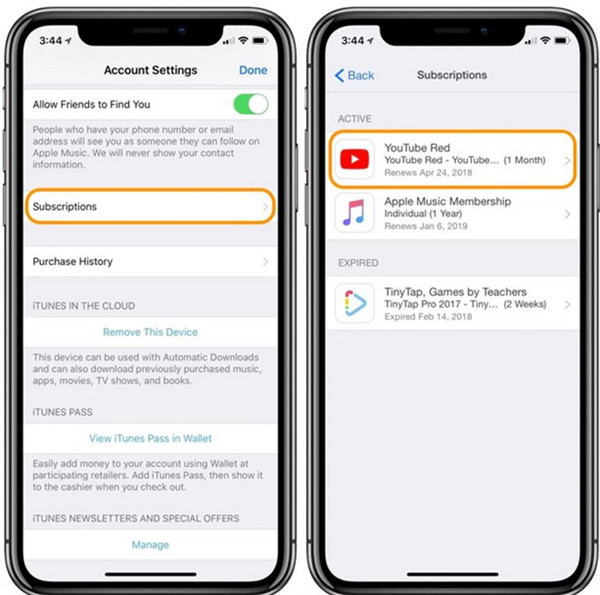
5. In the end, you need to click on “Subscriptions” to view all the subscriptions you have made.
1.2 View Apple Subscriptions via iTunes
iTunes can also be applied to view Apple subscriptions. For this aim, you can make use of the steps shown below.
1. On your computer, you need to start iTunes and make sure it is the latest version.
2. Navigate to the music library and then click on the “Store” tab.
3. Hit on the “Account” option at the right column. You may also need to sign in your own account if required.
4. Drag down to the area of “Settings” and then click on “Manage” tab next to the option of “Subscriptions”.
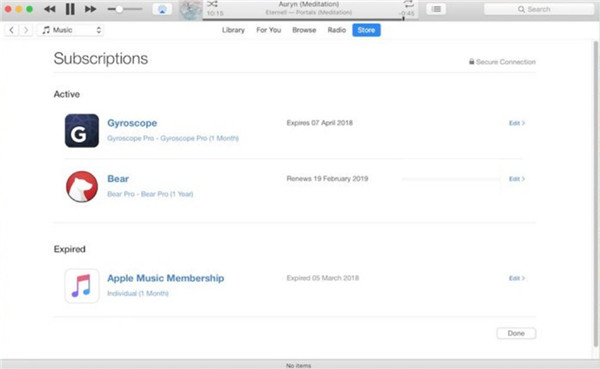
5. All your subscriptions will be shown like below in iTunes interface.
Part 2: How to Cancel Apple Music Subscription on iPhone/Android/Mac/PC/Apple TV
If you are just wondering “how do I cancel my Apple Music subscription on different devices”, you come to the right place. Most users are keen on subscribing to Apple Music on iPhone, Android, Mac and Apple TV, and when they want to cancel it, they have no idea. This part will introduce you how to cancel Apple Music subscription on your iPhone Android, Mac, and Apple TV respectively.
2.1 How to Cancel an Apple Music Subscription on iPhone
Once my brother asked me “how to cancel my Apple Music subscription on iPhone”, I just told him to finish this task with the following steps.
1. First, you need to refer to Part 1.1 to get to the “Subscriptions” area on your iPhone Settings app.
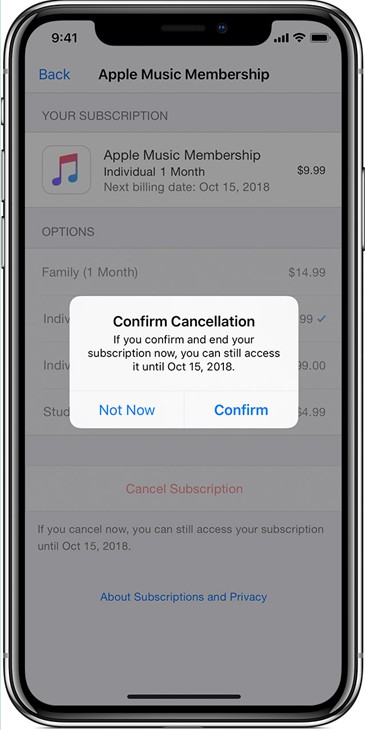
2. Click on “Apple Music Membership” in the list and then hit on “Cancel Subscription” option at the bottom of the interface.
3. When a panel pops up, you need to tap on the button of “Confirm” to confirm the cancellation of Apple Music subscription on your iPhone.
2.2 How to Cancel Your Apple Music Subscription on Android
If you inquire me “how do I cancel Apple Music subscription on Android”, I would like to reply to you with the steps shown below for your reference.
1. On your Android, start your Apple Music app from home screen and then click on the icon with three vertical dots.
2. Click on the option of “Account Settings”. If you fail to see this option, you need to hit on “Settings > Sign In” to log into it with your own Apple ID. Afterwards, you need to hit on the arrow icon and then click on the three-vertical-dot icon again.
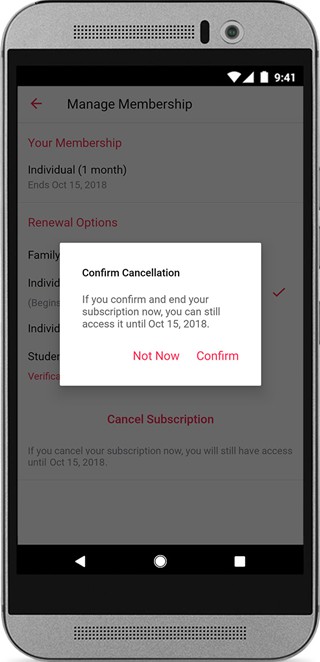
3. Hit on the tab of “Manage Membership”.
4. Click on the tab of “Cancel Subscription” and then hit on “Confirm” button on the panel that shows up. You can also turn off the “Automatic Renewal” to terminate your subscription at the end of the current billing cycle.
2.3 How to Cancel Apple Music Subscription on Mac/PC
If you do not understand how to cancel Apple Music subscription on Mac or PC, iTunes will be helpful for you to make it.
1. First, you need to navigate to the “Subscriptions” function area on iTunes by referring to the contents in Part 1.2.
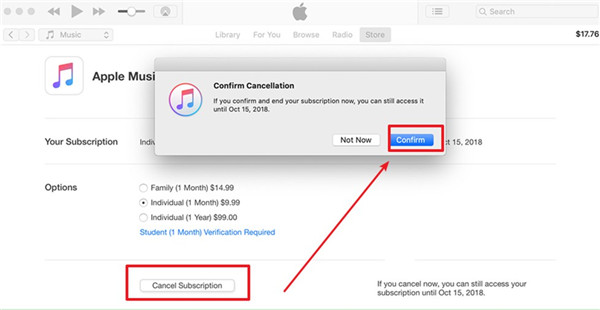
2. Hit on the “Edit” button next to the option of “Apple Music Membership” and then click on “Cancel Subscription” option at the bottom of the interface.
3. In the end, you need to confirm cancellation in the pop-up dialog.
2.4 How to Cancel Subscription to Apple Music on Apple TV
As for how to cancel subscription on Apple Music on Apple TV, the following steps will be useful for you to achieve your aim.
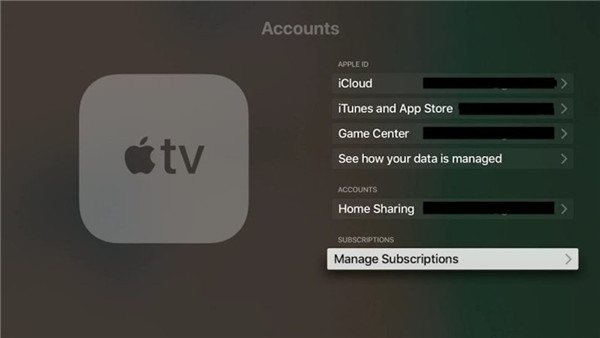
1. On your Apple TV, you need to kick off Settings app and then choose the tab of “Accounts” to click on.
2. Hit on the option of “Manage Subscriptions” to select “Apple Music Subscription” that you desire to terminate.
3. Tap on “Cancel Subscription” and then confirm your operation.
Now if someone asks you “how do you cancel Apple Music subscription”, you can use this guidance to tell them what to do to deal with this issue.
Part 3: How to Disable Automatic Subscription Following Apple Music Trial
It is a great thing to enjoy listening to Apple songs via Apple Music. However, you should know that the membership trial period for customers is only three months, and users can try this streaming music service without any payment at ease. The trail needs to be activated with a valid payment method associated with your iTunes account, like one credit card. You also should know that the Individual Plan and Family Plan subscriptions will renew automatically after the trial period is end, which is one default setting. If you do not want to pay after the trial, you can learn how to disable the automatic subscription following Apple Music trial. iPhone will be taken for instance in this part.
1. Start your Apple Music app on iPhone and then hit on the Account icon at the top-left corner of the interface.
2. Hit on the tab of “View Apple ID” to log into your iTunes Store account. Then you need to hit on the option of “Manage” under the menu of “Subscriptions”.
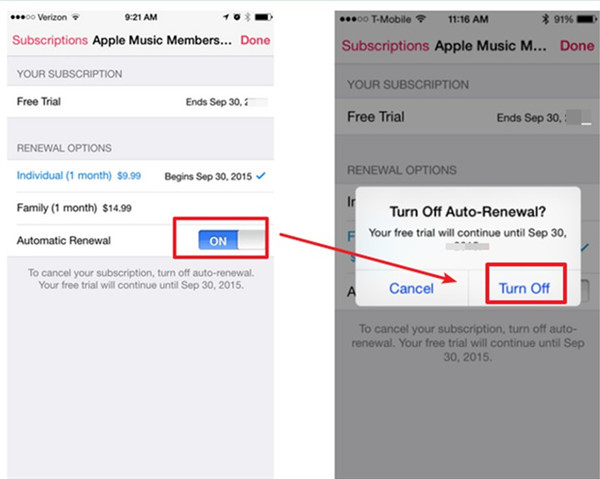
3. Click on “Apple Music Membership” tab and then move to the menu of “RENEWAL OPTIONS” to turn off “Automatic Renewal”.
4. Finally, you need to click on “Turn Off” button to confirm this action.
Bonus Tip: How to Manage Your Apple Music Efficiently
Have you ever thought that if there is one great tool to assist you to manage Apple music effectively? Actually, Leawo iTransfer is just the software that you really need. This program is good at transferring files among iTunes, iDevices and computers, which is quite powerful in managing files on iOS devices as well. Here I would like to set iPhone as an example to show you how to use this software to manage your Apple music.
Step 1. Connect iPhone to Computer
Run the software on your computer and then connect iPhone with PC with proper USB cord.
Step 2. iPhone Music Management on PC
This Apple music manager can assist you to manage iPhone songs on computer with less efforts. In the main interface, you can check out all iPhone music directly in the part. To do so, you only need to click on “iPhone name> LIBRARY > Music” tab successively.
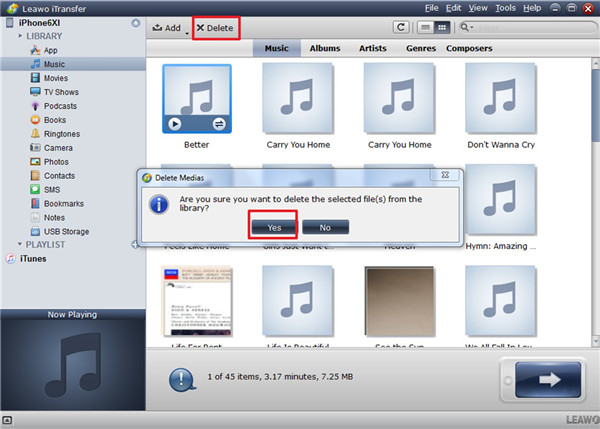
1. If you want to delete iPhone music, you can choose the songs in the right part of the window and then hit on the “Delete” button to remove them. A panel will show up and ask you whether you are sure to remove the chosen files from the library. Hit on the “Yes” button to confirm this action. Thus, the chosen songs will disappear from your iPhone immediately.
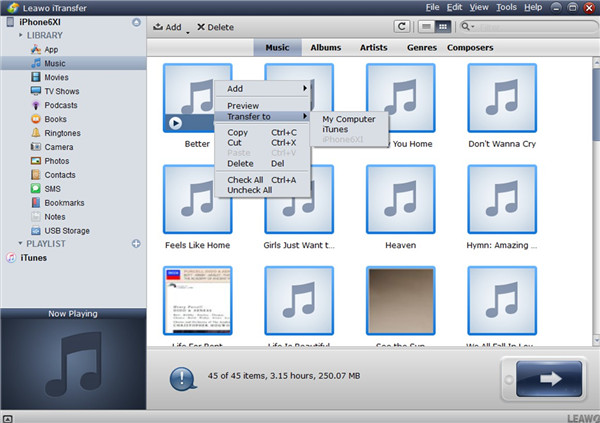
2. In order to transfer music to computer from iPhone, you can select the songs you would like to transfer and then right click on one of them to choose “Transfer to > My Computer”. In the pop-up panel, you need to check “Save to folder” and click on “Change” tab to select one proper folder to save the exported songs. After that, click on “Transfer Now” to initiate the transferring process. Wait for a while and you will be able to edit and view iPhone songs on computer easily.
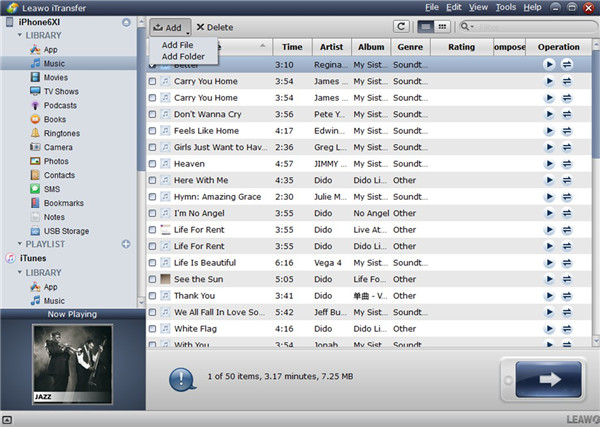
3. As for importing songs to iPhone from computer, you can click on “File > Add File” or “File > Add Folder” to add songs directly. When you choose the songs from computer and hit on the “Open” button, the software will begin to transfer songs to iPhone. This process will only take you a few seconds.
This tool can deal with your Apple music quite effectively and it really has a say on Apple music management. You can make use of this software to keep your Apple songs organized on your iDevices.

