Face ID is a facial recognition system designed and developed by Apple Inc. for the iPhone and iPad Pro. Well, this is an incredible feature that Apple has introduced to the world. Undoubtedly, Face ID is one of the most innovative features for Apple devices. In this post, we will give practical instructions on how to add face ID on your iPhone and by the way, have you heard that from iOS 12, adding another face ID has been possible, which means you can have two face IDs to your iPhone or iPad. With our tutorial guides, adding a face ID or a second face ID on your iPhone will be a piece of cake. Read on!
Part 1: How to create Face ID on iPhone
To start with, if you just upgrade your iOS to 12 or above, congratulations. Face ID will improve your efficiency significantly. As what Apple says, Face ID lets you securely unlock your iPhone or iPad, authenticate purchases, sign in to apps, and more — all with just a glance.
To create a face ID on iPhone, you may need to pay attention to the camera – make sure there isn't anything covering the TrueDepth camera or your face. For users who wear glasses and contacts, face ID is workable as well. Anyway, don’t stay too far away from your iPhone trying to use the face ID. This is because face ID works best when your iPhone or iPad is approximately an arm’s length or closer (10-20 inches) from your face.
Okay now it is turn to set up your face ID on iPhone.
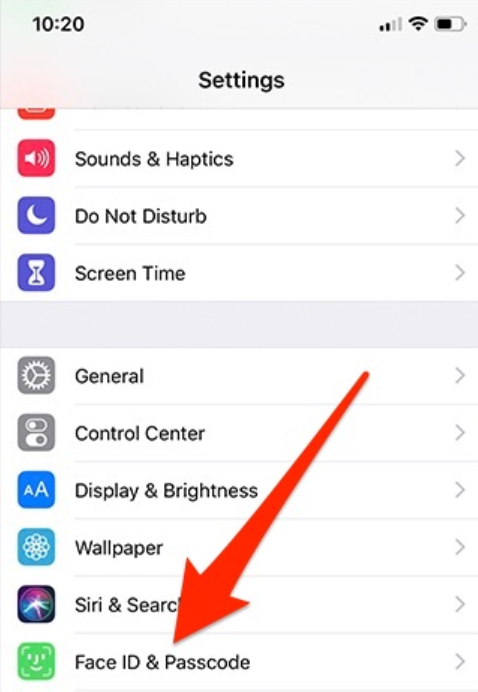
Step 1: Go to Settings > Face ID & Passcode. If asked, enter your passcode. But if you don’t have a passcode, you will need to create one. This is used as an alternate way to verify your identity.
Step 2: Tap Set Up Face ID. Make sure that you're holding your device in portrait orientation, position your face in front of your device, and tap Get Started.
Step 3: Position your face inside the frame and gently move your head to complete the circle. If you're unable to move your head, tap Accessibility Options.
Step 4: When you finish the first Face ID scan, tap Continue. Gently move your head to complete the circle for a second time.
Step 5: Tap Done. Now you can use face ID to unlock your iPhone without entering the passcode or touch ID. To do so, simply raise to wake or tap to wake your iPhone and then hold it in portrait orientation, then glance at it. When the lock icon on your screen animates from closed to open, swipe up from the bottom of the screen to unlock. This is pretty easy and efficient.
Part 2: How to add another Face ID on iPhone
Well, Apple always thinks of users who have special requirements like adding a second face ID for parents to reach their children’s iPhone (of course not violating privacy but just for reasonable behaviors) or enable spouses to access the same iPhone with face ID. In some cases, Apple calls this feature adding an “alternate appearance,” so technically, it’s aimed at users who potentially wear various headgear for their job throughout the day, like safety equipment. However, you can use it to add another person to your iPhone’s Face ID repertoire. Adding a second face ID is very helpful in certain circumstances and has been rated as one of the most-liked features among all Apple features.
Note the ability to add an additional face to Face ID authentication requires iOS 12 or later, earlier versions of iOS do not support this feature. Here is how to set an additional face ID on your iPhone.
Step 1: Go to Settings and scroll down to select Face ID &Passcode.
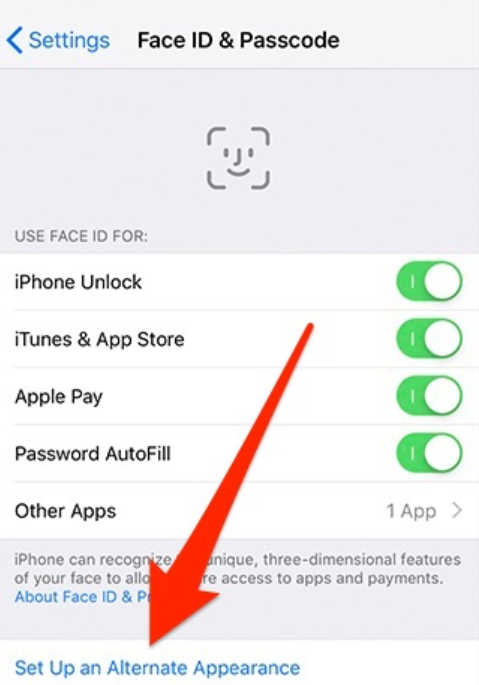
Step 2: Enter the passcode and tap Set Up an Alternate Appearance to proceed.
Step 3: Now you will be entering the process to create a new face ID. It is exactly like what you do for your first time to add a face ID.
When it is done, the second face ID will immediately take effect and the second person you added will immediately be able to unlock your phone using their face. Of course, even without their face added to Face ID, they can also still enter in your passcode if they know it.
Part 3: What to do if Face ID isn’t working
Knowing how to set up a face ID or add a second face ID on iPhone is easy to achieve, however, things sometimes will go wrong and you cannot activate your iPhone using face ID no matter how you try. There could be a couple of reasons. The iOS versions might not be the latest in which you need to update it to the latest version. Or your face ID settings and the features you want to use face ID with are all enabled correctly. Otherwise, face ID won’t work the way you intend to use. In addition, it is important not to cover your camera and you make sure nothing is covering your face when you try to unlock the screen with face ID. In the worst case, you can choose to power off your iPhone and restart it to see whether face ID becomes normal.
Otherwise you may reset your iPhone to resume factory settings. Heads up! Do take note that before you reset your iPhone, keep a copy or backup of your iPhone data in case you will get it lost after reset. Anyway, here we would recommend a very professional tool to you to back up your data from iPhone to computer. In fact, as a powerful iPod, iPad and iPhone transfer program, Leawo iTransfer provides perfect solutions for iPhone transfer, iPad transfer and iPod transfer issues. It’s quite nice to transfer 12 kinds of files, like apps, photos, music, videos, SMS, contacts, and so on between iOS devices. It can also back up iPhone, iPad and iPod (touch) files to computer.
Below is a step-by-step guide to transfer your iPhone data to computer with this powerful tool. (Let’s take transferring music as an example)
Step 1: Make sure you have installed the lightweight tool to your computer
Click the button below to download and install the tool to your PC.
Step 2: Connect the iPhone to the PC
Launch the app after installation completes and connect your iPhone to the PC using the USB cable. The app will automatically detect the device and click on the device to display the contents.
Step 3: Choose the data to transfer
Choose the data that you want to make a copy and transfer to PC for backup. Simply check the boxes in front of the files and click the Transfer icon at the lower right to proceed. Or right-click and select Transfer to > My Computer to proceed.
Step 4: Set a directory in PC to save the files
When a window pops up, you need to set a directory to save the files somewhere in the local drove. Then hit the Transfer Now button to start transferring the files to the local drive. The entire process will take some minutes depending on how many files to transfer.
Conclusion
Sometimes if face ID does not work, it might be various reasons. You may check the iOS and update it to the latest one or verify the face ID settings again to make sure all features are turned on. In some particular circumstances, you can restart or even reset the iPhone to resume normal. However, always bear in mind that keeping a backup of the original data on the iPhone is very necessary and important. With the backup, you can easily restore the original data back to the iPhone after reset. In this case, we recommend Leawo iTransfer, a powerful yet lightweight app to help transfer data between iOS devices and between iOS device and computer.
Hope this post helps and enjoy your face ID by the way.


