
Of all the audio and video streaming services, Apple is probably the one that comes to your mind as a popular music service provider. iTunes, a software developed by Apple Inc. is an all-inclusive application of media player, media library, and online radio broadcaster. With iTunes, you can play, download, and organize digital audio and video on personal computers. Your music can be accessed in one place, whether they are purchased from iTunes, ripped from CD or downloaded. iTunes allows you to enjoy the music service with a monthly based subscription or you can purchase media with copyright directly through iTunes stores. This is because the music from both the iTunes store and Apple Music comes with DRM protection, so to play the music out of Apple devices without iTunes or Apple Music installed is not permitted.
Outline
What do You Get with iTunes Subscription?
With the subscription, you can enjoy music streaming, download your favorite tracks, and play them offline while you are not connected. It also provides exclusive playlists, music recommendations, and live radio that you can listen to across all of your Apple devices.
That sounds really cool, right? At $9.99 per month for an individual account, you can enjoy music streaming up to 70 million and playlists created by experts via different devices. But what if that isn't everything you wanted? Maybe the monthly fee is a bit too expensive or you simply find you don’t use it that often to justify the cost? Or maybe after a three-month free trial, you come to a conclusion that you would like to try something else. Maybe Spotify? It sounds good as well. Whatever the reason it is, you can always choose to cancel your membership anytime, and it’s extremely easy. Here’s how to cancel the iTunes subscription with specific instructions.
How to Cancel iTunes Subscription on Apple Devices?
Apple offers a three-month free trial on iTunes subscription and many Apple users will be tempted. But after a free trial, some might want to cancel the membership before the lease automatically renews or some users just want to switch to the other APPs. In this case, you can cancel your subscription through your iPhone, iPad, iPod touch, your computer, and Apple TV. Here we go with the examples of Apple Music.
Cancel iTunes Subscription on iPhone, iPad, or iPod touch
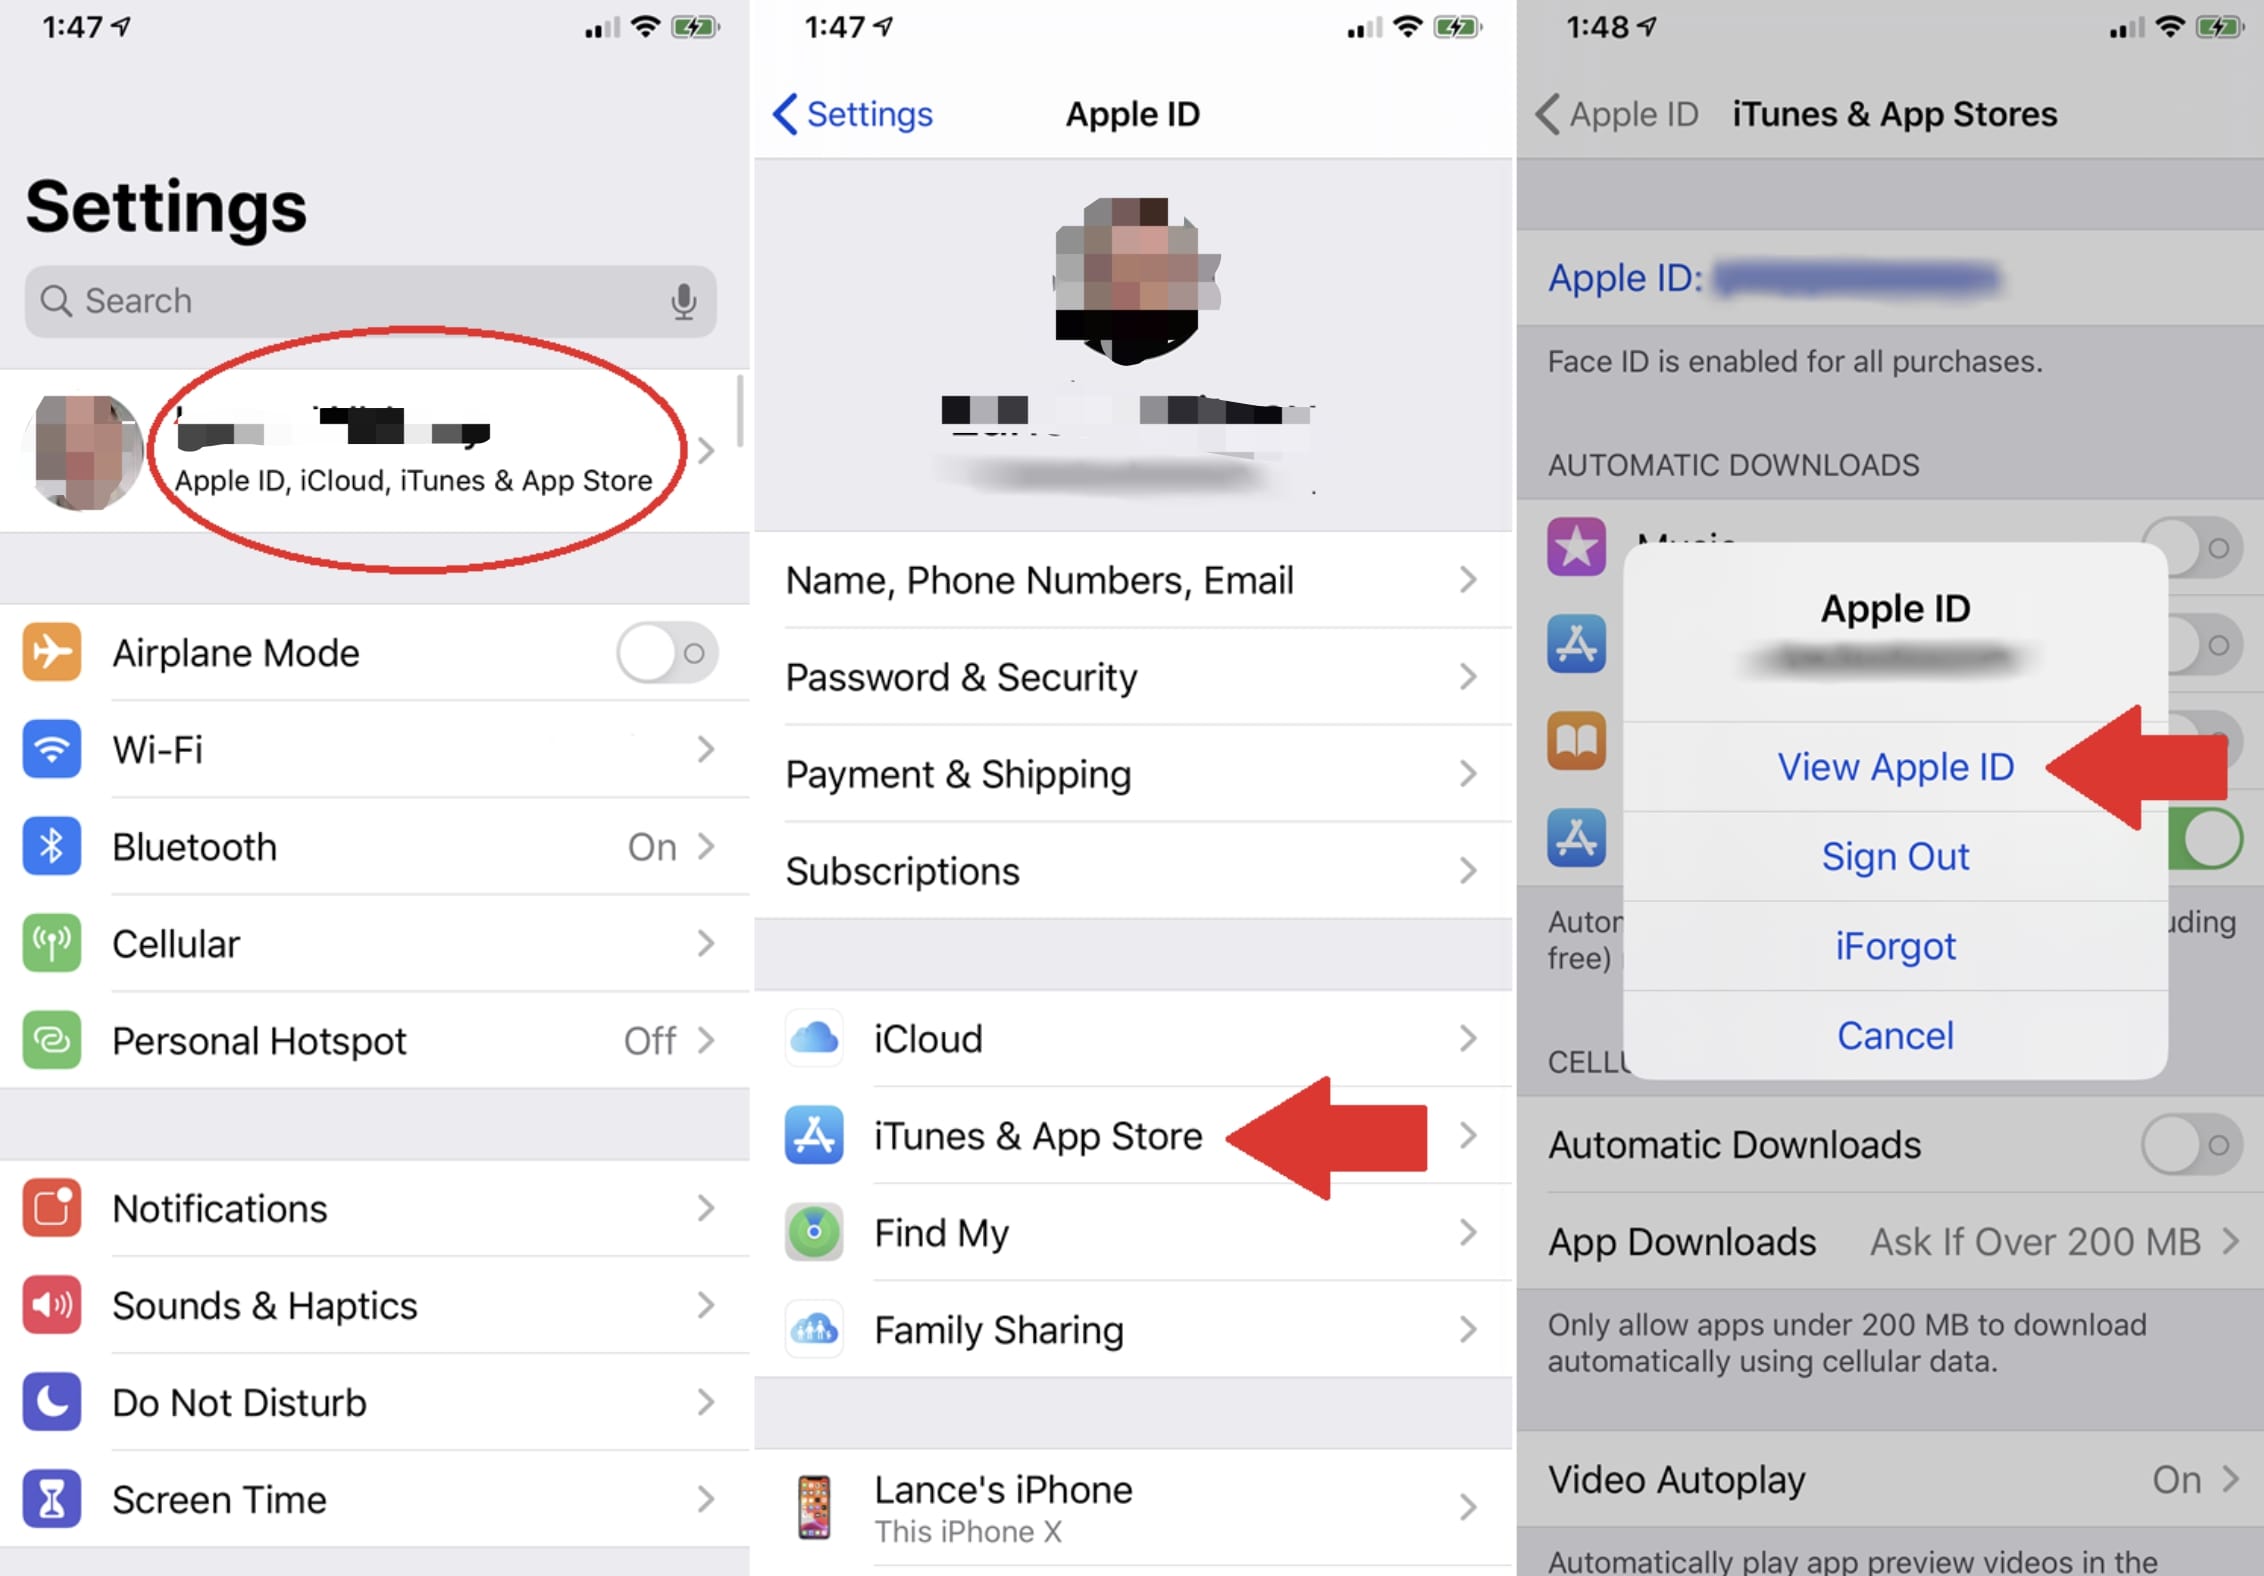
Step 1: Go to Settings and tap your name on top of the screen. Look for “iTunes & App Store”, tap your Apple ID and then tap the link to view Apple ID from the pop-up window. Login again to authenticate your account.
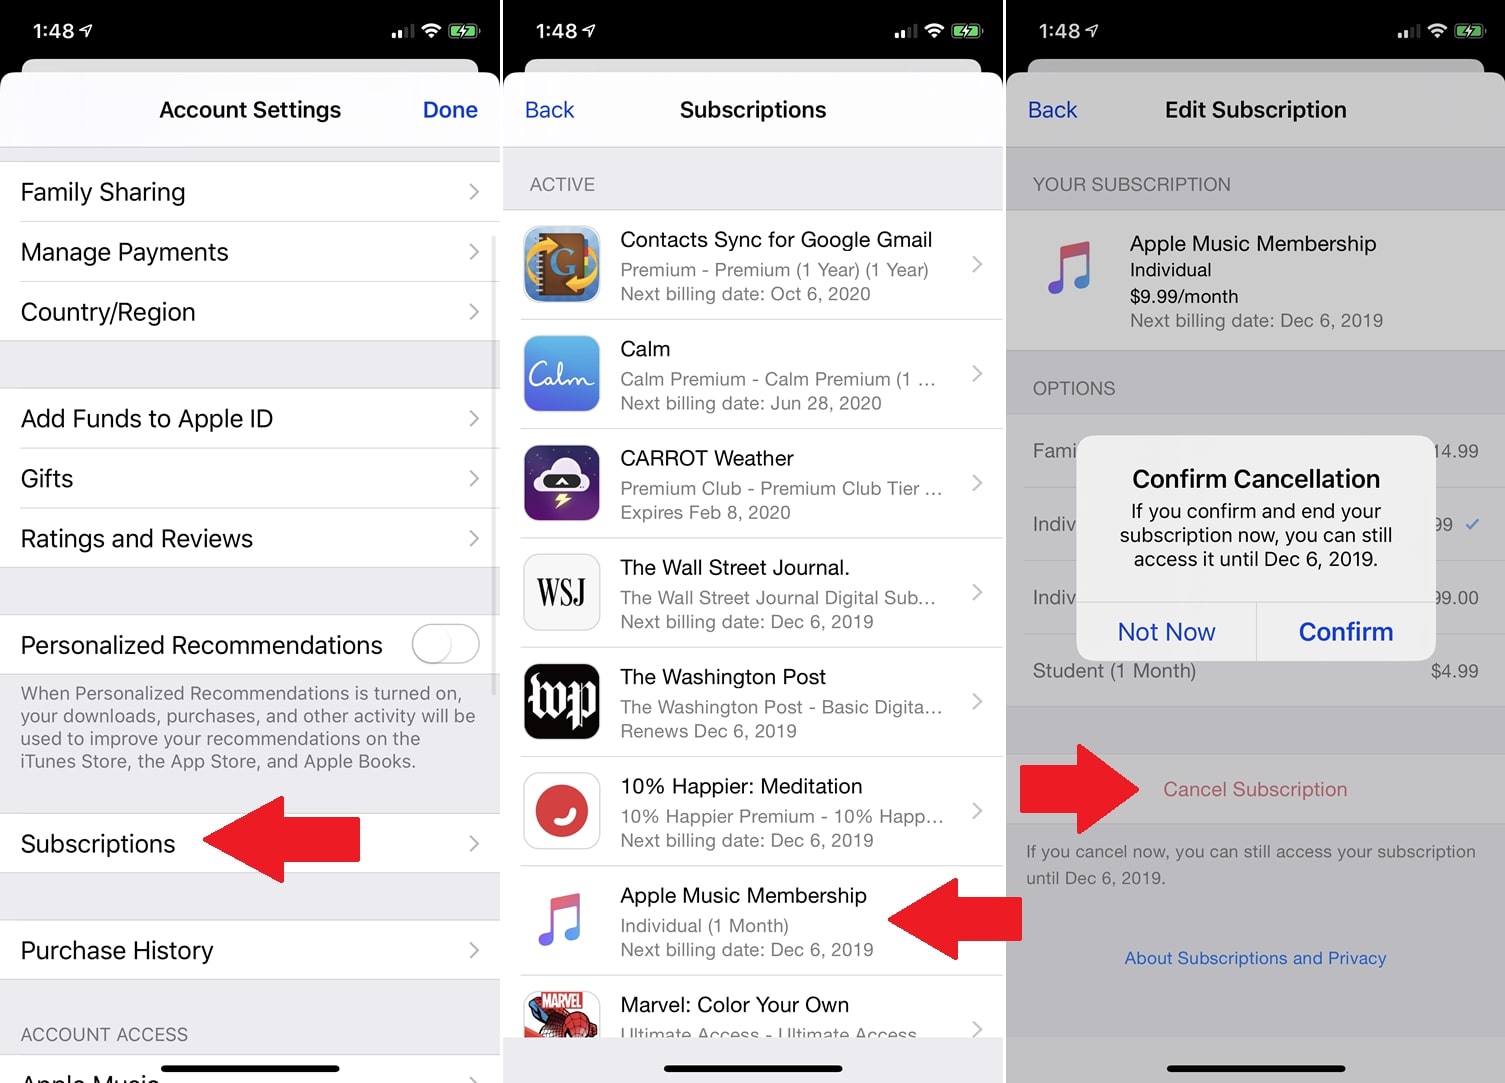
Step 2: Scroll a bit down and look for “Subscriptions”, Tap it to proceed and you’ll see all your subscriptions. Look for Apple Music membership and tap it. At the “Edit subscription” screen, tap the “Cancel Subscription” and confirm you would like to cancel the membership for sure.
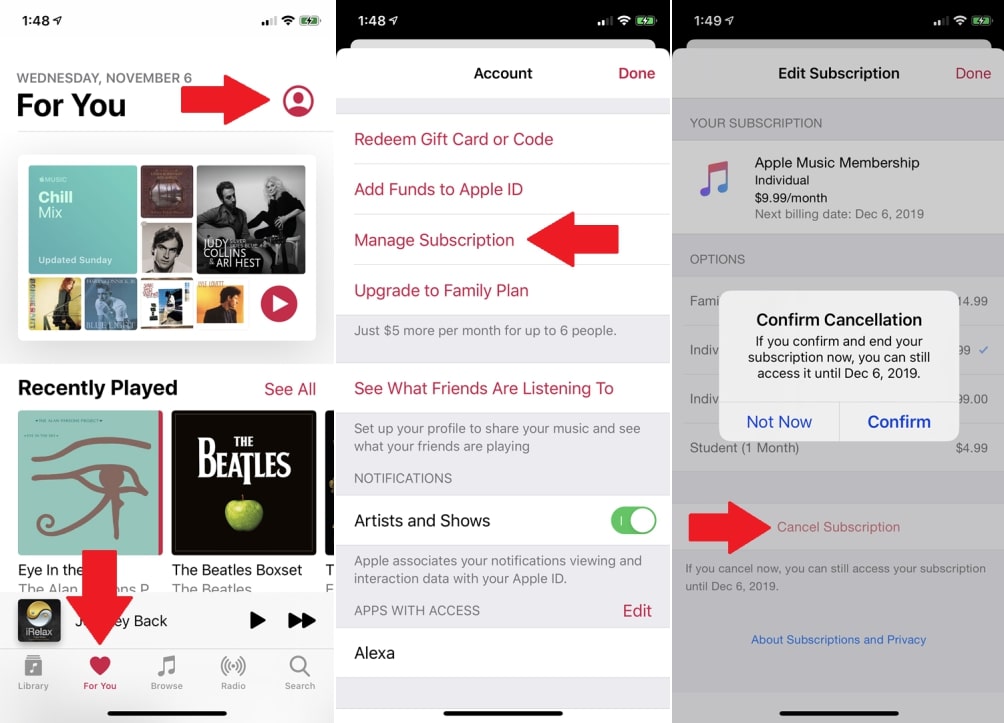
Or you can cancel the iTunes subscription through Apple Music APP. It’s very simple as well. Launch Apple Music app. Tap the “For You” icon and look for your profile icon in the upper right. You’ll be directed to the “Account” page, tap the link for “Manage Subscription” and cancel the membership from there. Confirm the cancellation then you have successfully unsubscribed from iTunes.
For free trials, it will end immediately as soon as you cancel the subscription. For a paid subscription, the membership will be valid until the end of your current billing cycle. You can resubscribe if you change your mind, but the new subscription will only start from the next billing day.
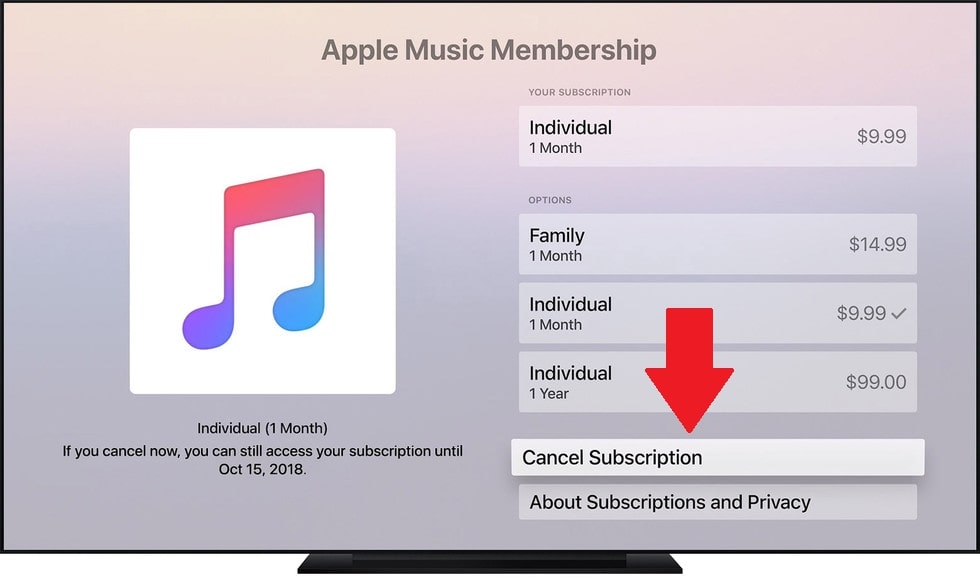
Cancel iTunes Subscription from Apple TV
Navigate to Settings and look for Users and Account. Go to your account name and find the “Subscriptions”. Enter Apple Music Membership and cancel it from there.
Cancel iTunes Subscription from Personal PC
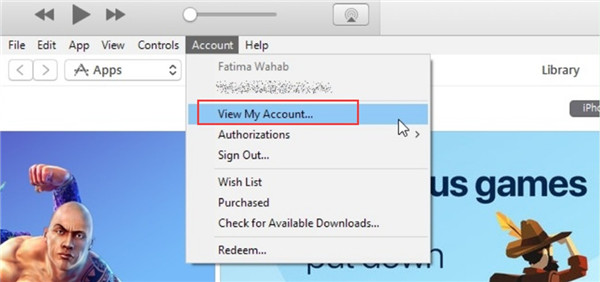
1. Launch iTunes and make sure it’s the latest version or it’ll remind you to update to the latest one. Click “Account” and choose “View My Account” from the drop-down menu. A pop-up window will ask you to login again for authorization. Log in and you can see your account information.
2. Scroll down and look for “Settings”, and click the “Manage” tab at the right of “Subscriptions”.
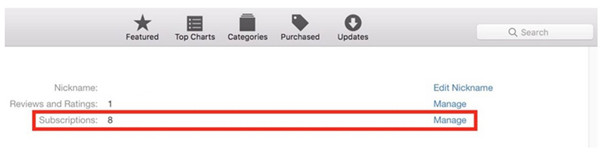
3. You will see a list of your subscriptions. Look for “Apple Music Membership” and click on the “Edit” button to its right.

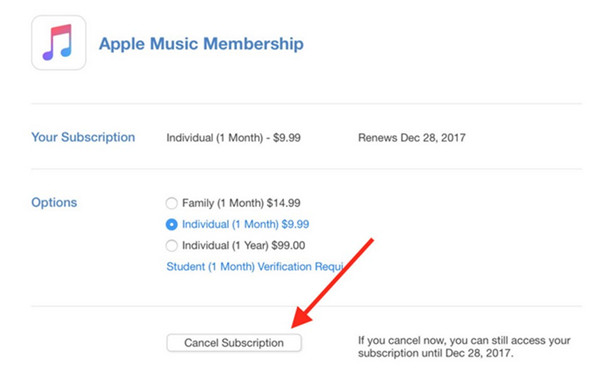
4. You’ll be directed to the “Apple Music Membership” page. Here you can see the subscription information and edit your subscription. Click “Cancel Subscription”. A pop-up window will ask you to confirm the cancellation and click “Confirm” to cancel your iTunes subscription.
What if I Cancel iTunes Subscription?
So, what happens when you cancel the iTunes subscription? What about the music downloaded to the library? Will the saved playlist be gone as well? After your subscription is over, you’ll still have access to Apple Music until the next billing day. But when the membership ends, your music downloaded will be removed from all your Apple devices. All playlists you saved and created will be completely wiped out after the cancellation. Of course, you can add your purchased music to the iCloud music library since iCloud Music Library allows you to access your entire iTunes library. However, you cannot access them until you re-subscribe to Apple Music.
Shame, right? So if you want to keep your music and playlists after leaving Apple Music, you have to figure out a way to save or transfer them to another device. We’re here to help, just read on.
How to Keep Apple Music Forever after Unsubscribing?
Introducing Leawo Prof. DRM! This is the most powerful and convenient software that can help you to keep your Apple Music after unsubscribing from iTunes. As an Apple Music user, you must have heard about M4P as a music form created by Apple for iTunes. All the music downloaded from iTunes are M4P files as they have been encoded using the Advanced Audio Codec (AAC). For the purpose of copy protection, Apple uses proprietary DRM technology to prevent M4P files from being played and copied on unauthorized devices.

-
Leawo Prof. DRM
- Convert iTunes DRM-protected M4V movie and TV show to DRM-Free MP4
- Remove DRM from M4B, AA, AAX files and convert any Audible AA, AAX file to MP3, even without iTunes authorization
- Convert iTunes DRM-Protected M4P and non-DRM iTunes M4A Music to MP3
- Remove DRM-protection on Spotify music and convert to Universal audio format for enjoying music offline on any devices
- Convert DRM-protected eBook from Kindle, Kobo, Adobe to DRM-free epub, mobi, azw3, txt, etc., format
Leawo Prof. DRM is capable of removing DRM from iTunes M4P music and then converting M4P to MP3. So you can enjoy the music in the future without a subscription to Apple Music. The converted music as MP3 is free to transfer and save in various music players and mobile devices. You can also set the sampling rates and bit rates for your output MP3 files based on personal preference. The conversion process is as fast as lightning, as Leawo Prof. DRM can remove iTunes DRM and convert M4P to MP3 at 50X higher speed, far faster than any other similar iTunes Music crackers in the market. Leawo Prof. DRM is the ultimate DRM Removal Program and DRM Media Converter, as it can also be applied in converting video, ebook from various kinds of platform.
Now let’s see how to turn your favorite Apple Music into local MP3 files with Leawo Prof. DRM.
Note:
-
You will need to sign in with your Apple ID in order to play the iTunes M4P music. Doing so, the Leawo Prof. DRM will ask you for authorization first. And please do not open iTunes during the entire DRM removal process.
Step 1: Import iTunes M4P (M4A) Music files
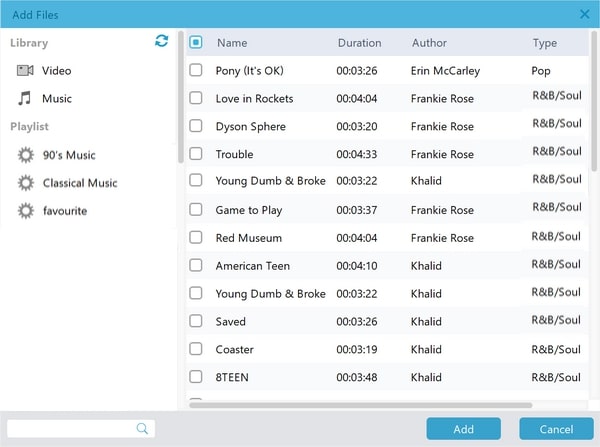
Launch Leawo Prof. DRM, click “Add File” and import one or multiple iTunes M4P music. Or you can simply just drag and drop the target iTunes music files here.
Step 2: Select Channel, Sampling Rate, and Bit Rate
When the music file importing is finished. You can find the files under the category “Music” with the music icon. Choose an M4P (or M4A) file, and click the “edit” button on the right to choose Channels, Sampling Rates, and Bit Rates for keeping in the output MP3 audio file.

Step 3: Set Output Directory
Return to the main screen and look for the “…” button at the bottom. Click it to set the output directory for your converted MP3 music.

Step 4: Start Removing DRM from M4B Music File and Convert M4P/M4A to MP3
Click the blue “Convert” button at the bottom to start removing DRM from M4P and converting M4P (or M4A) to MP3. The removal and conversion can usually be done very soon but also depends on the number of files you’d like to process.

IMPORTANT: You will be asked to authorize the computer for playing the iTunes music before conversion if you have not yet done so.
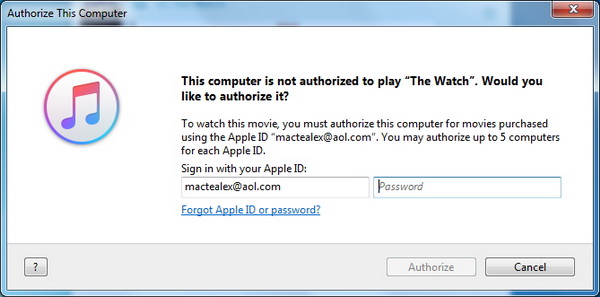
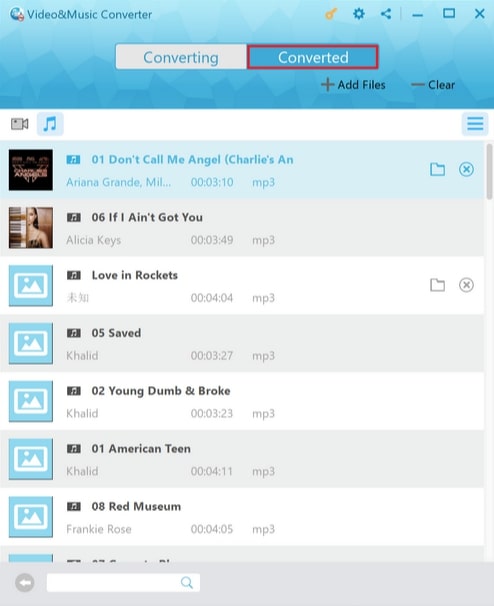
Step 5: Check Status of Conversion
Once the conversion is done, you can click the “Converted” tab to see all the converted MP3 files. And then you can click the “Open file” to play the output MP3 file.
That’s all for the music DRM removal and conversion from iTunes. As easy as pie! Just download the Leawo Prof. DRM now and learn how to save your Apple music forever!
Bonus Tip: Clean iTunes after Cancelling Subscriptions via Tunes Cleaner
Wondering how to sort out the iTunes messy duplicated soundtracks or fix the music information after canceling subscription? We’ve got you. Here comes Leawo Tunes Cleaner, a perfect assistant to help you to manage iTunes files effectively, including deleting duplicate files, editing info and etc. The instructions shown below will direct you to apply it to clean iTunes professionally.

-
Leawo Tunes Cleaner
- Clean up iTunes library by fixing music files
- One click to manage any music collection high-efficiently
- Delete duplicate songs in iTunes without limits
- Automatically find and add missing music information
- Manually fix mislabeled song information and music tags
- 100% accurate, safe and speedy

1.Launch Leawo Tunes Cleaner
Launch the software, and you will be welcomed by four big icons: “Scan to Clean iTunes”, “Open Music Files”, “Clean-up Duplicates”, and “Load Saved Result”. See screenshot below.

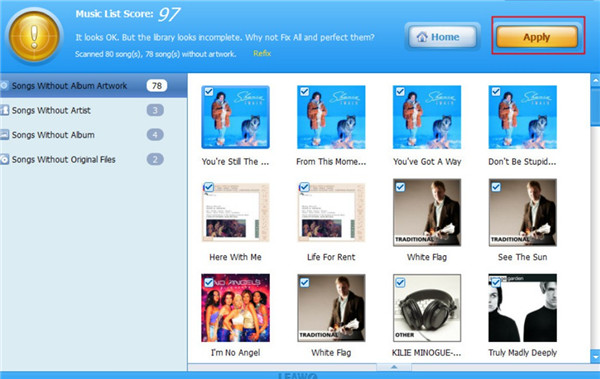
2. Clean iTunes
Click “Start to Clean iTunes'' and it’ll scan iTunes automatically. Click “Fix All” afterward to initiate the fixing process. It might take a while for the whole process. You can click the “Apply” button when it is finished.
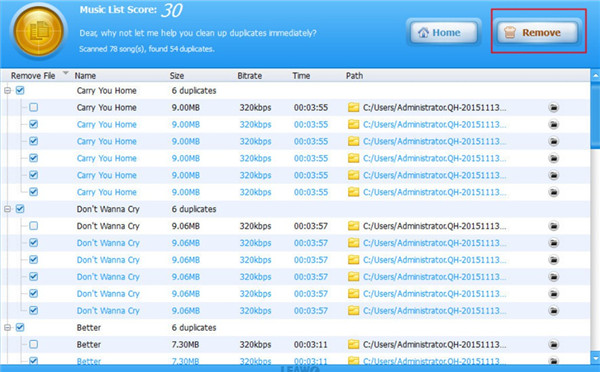
3.Remove Duplicated Pieces
Click “Clean-up Duplicates” at the welcome panel if you want to remove duplicated music. Click “Quick Scan> Scan iTunes” or “Deep Scan> Scan iTunes” successively, here a list of the duplicates will appear and you can just choose the ones you want to remove. Click the “Remove” button to proceed.
4. Info Fixing
You can manually fix the information of music with Leawo Tunes Cleaner. Just click the editing button and you’ll see the panel for info fixing. If you want to change or add tags to the music, here’s the place. Just click the “Apply” button to confirm your settings.

The whole process is quick and simple, might be just taking a few minutes for fixing and cleaning iTunes. Leawo Tunes Cleaner is no doubt the perfect software to help you manage iTunes library, you’ll be surely satisfied with it.
Note: The auto music tag adding feature of Leawo Tunes Cleaner has been discontinued. You could use it to add or edit music tags manually.
 Aug. 15, 2018 by


 Prof. Media
 Blu-ray Ripper
 Blu-ray Copy
 iOS Data Recovery
 [12/29/23] MAX Downloader V15.0.0
 10,000,000 people are using Leawo!
 All Transactions are protected!
 30-Day Money Back Guarantee!