
“What is the best video format to use for YouTube? I would like to upload some of my videos shot with my Canon camcorder to YouTube for sharing. I’m not sure whether or not I can directly upload these videos to YouTube. What is the best video format to use for uploading to YouTube? Or do I need to encode videos with proper video settings for uploading to YouTube? Please show me the detailed guide on uploading videos to YouTube and the proper video settings.”
Shooting videos has been a popular way in our daily life to memorize the happy moments. Nowadays, more and more mobile devices could help use shoot high quality videos to record our daily happiness. We can get camcorder, camera, smartphone, tablets, and others to do this. However, these devices all save video clips in different file formats. When we want to upload these videos to YouTube for sharing, some of our recordings might be failed to be accepted by YouTube. What is the best video format to use for YouTube uploading? What are the best video settings for YouTube uploading?
Well, in this guide, we are going to talk about these things and recommend you some effective tools to transcode videos of all kinds for easier uploading to YouTube. Just check the below content.
Part 1: Best video settings for YouTube uploading
Since you want to upload video files to YouTube, therefore firstly, let’s make sure what are the best video settings for YouTube uploading. We have collected the below video settings from Google support center. They are highly recommended upload encoding settings for your videos on YouTube.
|
Container: MP4 |
1.No Edit Lists (or the video might not get processed correctly) |
|
Audio codec: AAC-LC |
1.Channels: Stereo or Stereo + 5.1 |
|
Video codec: H.264 |
1.Progressive scan (no interlacing) |
|
Frame rate |
1.Content should be encoded and uploaded in the same frame rate it was recorded. |
|
Resolution and aspect ratio |
The standard aspect ratio for YouTube on a computer is 16:9. When uploading other aspect ratios (vertical, square, etc.), the player automatically adapts itself to the size of the video, giving the best viewing experience based on the aspect ratio and device. |
Recommended video bitrates for HDR uploads
|
Type |
Video Bitrate, Standard Frame Rate |
Video Bitrate, High Frame Rate |
|
2160p (4k) |
44-56 Mbps |
66-85 Mbps |
|
1440p (2k) |
20 Mbps |
30 Mbps |
|
1080p |
10 Mbps |
15 Mbps |
|
720p |
6.5 Mbps |
9.5 Mbps |
|
480p |
Not supported |
Not supported |
|
360p |
Not supported |
|
Recommended audio bitrates for uploads
|
Type |
Audio Bitrate |
|
Mono |
128 kbps |
|
Stereo |
384 kbps |
|
5.1 |
512 kbps |
These are the best video settings for your video to be uploaded to YouTube. Therefore, when you encode videos for uploading to YouTube, you could refer to these parameters to make your videos meet YouTube more.
Part 2: Encode video for upload to YouTube using iMovie
iMovie is a great Mac video editor for Mac users to edit videos on Mac. You could make use of iMovie to edit and encode videos for uploading to YouTube in clicks. But actually it can be tricky if you want to share iMovie videos to YouTube. In fact, YouTube upload from iMovie has been a common questions around Mad users.

These instructions below are designed to teach you how to encode and upload high quality videos from iMovie to YouTube.
- Get well prepared: You have transferred the video files from your camera to the computer. You have created a YouTube account. iMovie HD 7 is installed on your Mac OSX 10.6 computer.
- Open iMovie on your Mac computer.
- Click on Create New Project.
- Title your project: Under video format select DV Widescreen.
- Click "Create" button.
- Open the folder containing the raw video using a Finder window: Drag the file(s) into one of the gray tiles on the right side of the iMovie interface.
- Click on the editing option on the bottom right of the iMovie window.
- Click on the Titles box on the top right of the iMovie window.
- Choose a title appearance from the dialog box.
- Type your title into the text box.
- Click add located below the text box.
- Click on the share option at the very top of the screen.
- Select quicktime from the drop down menu.
- Select Expert Setting from the Compress Movie drop-down menu.
- Click Share button.
- Click on options in the Save exported file as. .. box.
- Click settings under the video menu.
- Click Size under the video menu.
- Click settings under the sound menu.
- Click OK under the movie settings menu.
- Log in the YouTube account and then click the"Upload" button to import the iMovie to YouTube.
-Set compression type to H.264
- Set frame rate to 30
- Set key frames to every 30 frames
- Set data rate to Restrict to 5000kbits /sec
- Set optimization for streaming
- Click ok
- Select 1280x720 HD
- Check the deinterlace source video box
- Click ok
- Set format to AAC
- Set channels to stereo
- Set rate to 44.100 kHZ
- Click on Show advanced settings
-Set quality to normal
-Set encoding strategy to average bit rate
- Set target bit rate to320 kbps
- Click OK
Note: By default, you can upload videos that are up to 15 minutes long. For uploading a video up to 15 minutes, you can should trim the video into parts in iMovie, or use the MP4 cutter to cut the exported iMovie video down. Alternatively, you should verify your account to upload videos longer than 15 minutes.
Part 3: Encode Video for upload to YouTube using Prof. Media
You could also encode video for upload to YouTube with Leawo Prof. Media, a comprehensive media converter suite that enables you to convert Blu-ray/DVD/video, burn video/images to Blu-ray/DVD, copy Blu-ray/DVD movies, download online videos, etc. Different from iMovie, Leawo Prof. Media helps you encode not only videos but also Blu-ray and DVD movies for uploading to YouTube. It could help you convert Blu-ray/DVD/videos for uploading to YouTube with the best video settings in an easier way than iMovie does.
Download and install Leawo Prof. Media on your computer. Then get source Blu-ray, DVD or video files ready for encoding for YouTube uploading.
![]()
![]()
Choose "Convert" in the top panel.
Step 1: Load source Blu-ray/DVD/video file
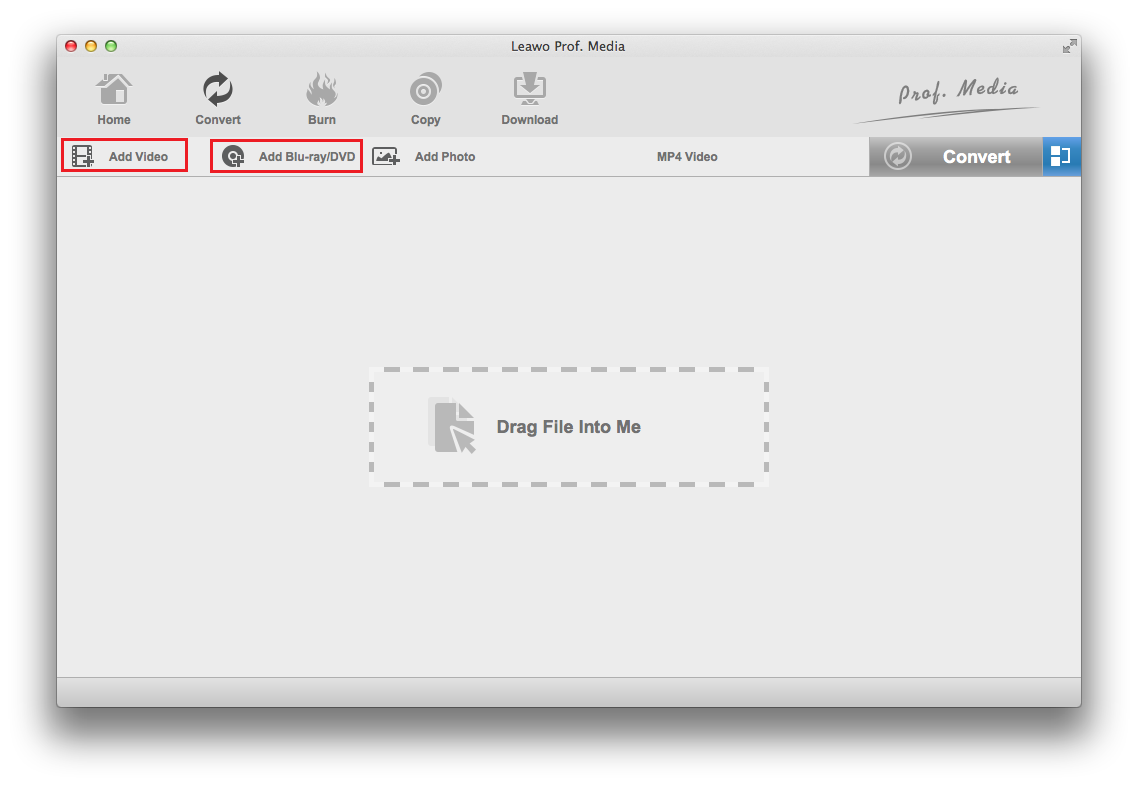
Kick off Leawo Prof. Media and then open the “Convert” module. You could see “Add Video” and "Add Blu-ray/DVD" buttons. Add source media file according to your needs.
Tip:
- If you are going to load Blu-ray/DVD movie, Leawo Prof. Media provides you 3 content loading modes to load all movie (Full Movie), movie only (Main Movie), or preferred titles (Custom Mode). Just select one according to your actual needs.
- Leawo Prof. Media allows you to select desired subtitles and audio tracks from source media files. You can open the drop-down boxes of "Subtitles" and "Audio tracks" in each loaded Blu-ray file to select subtitles and audio tracks, or even add external subtitles to loaded video files.
Step 2: Select output format
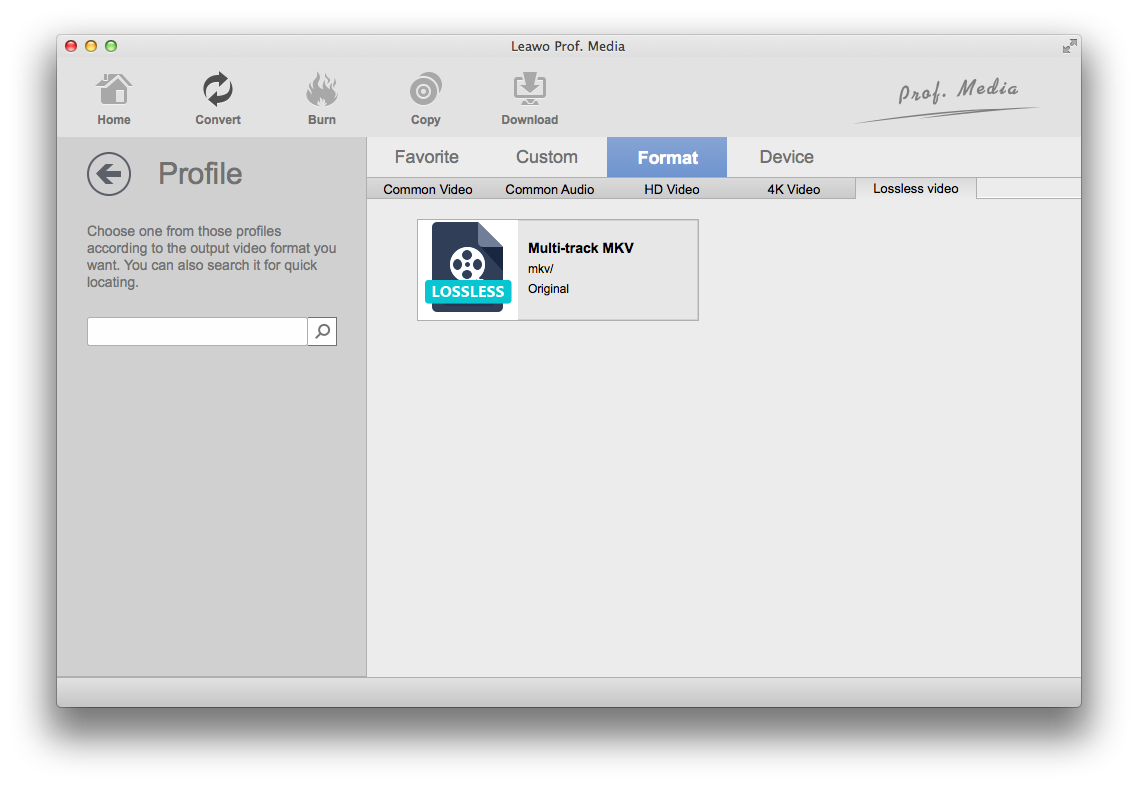
Click the drop-down list next to “Add Photo” button, and choose “Change” to enter Profile setting panel where you can freely set output format from “Format” or “Device” group. Since you need to upload videos to YouTube and the best video format for YouTube uploading is MP4 as mentioned above, choose “MP4 Video” from “Format > Common Video” group.
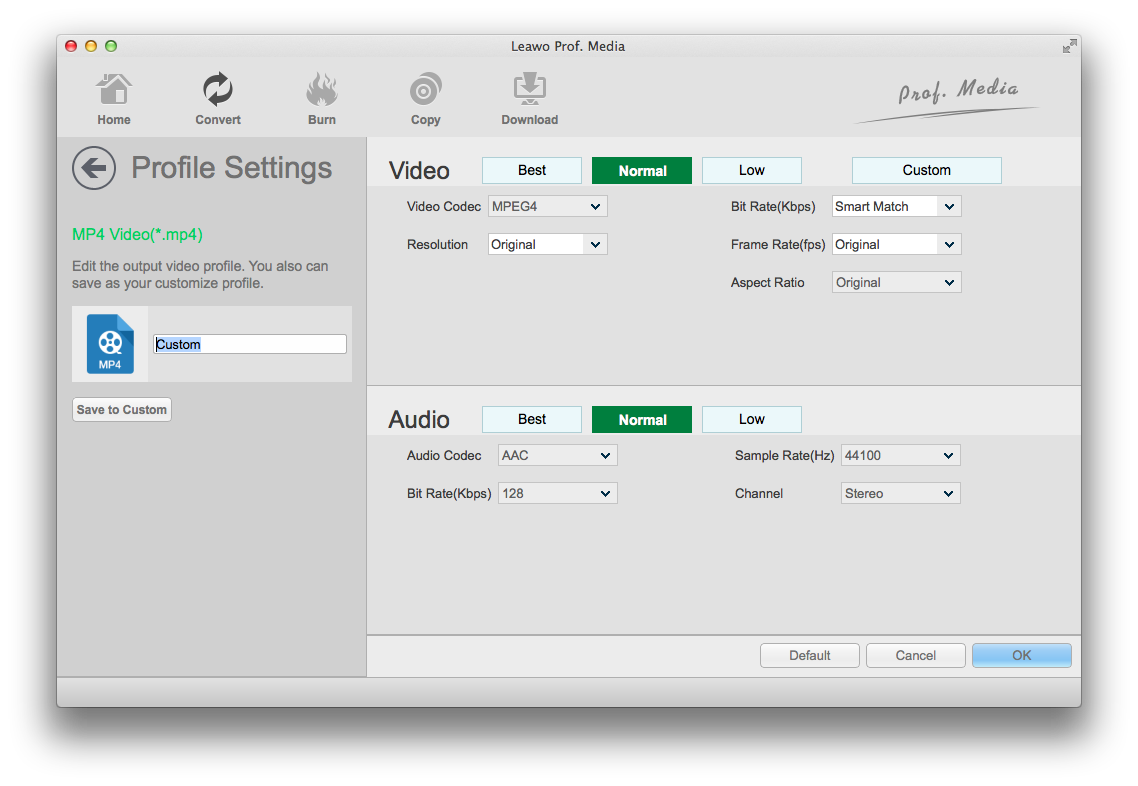
Leawo Prof. Media enables you to adjust the video and audio parameters of output files, including video codec, audio codec, bit rate, aspect ratio, frame rate, channel, etc. By adjusting these parameters according to the tables in Part 1, you can make output video file more suitable for YouTube uploading. To adjust these parameters, click the same drop-down list next to the “Add Photo” button and click "Edit" button.
Step 3: Edit video files (optional)
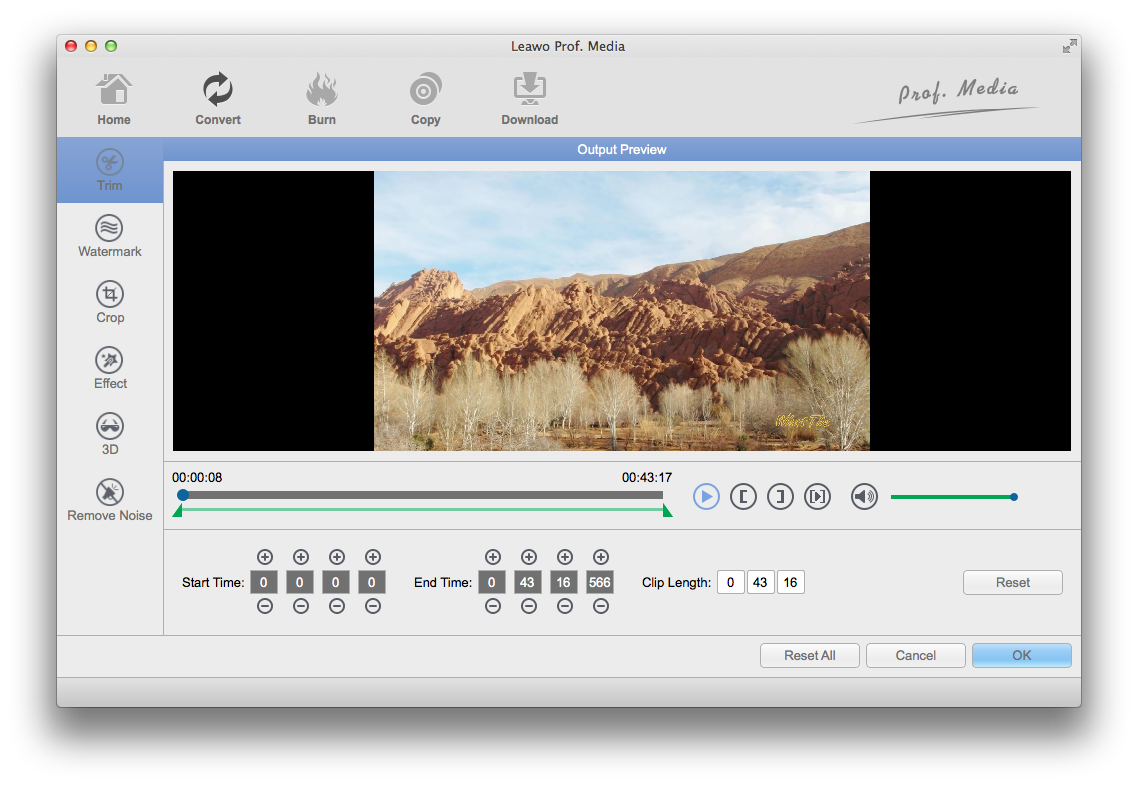
Optionally, you could enter the editing panel to edit videos before converting and encoding for YouTube: Trim, Watermark, Crop, Effect, 3D and Remove Noise. To edit videos, click the edit icon in each loaded title. For the detailed guide, please check how to edit Blu-ray/DVD/video.
Step 4: Encode Blu-ray/DVD/video for YouTube uploading
At last, return to the main interface and then click the big green "Convert" button. On the popup sidebar, set output directory in the “Save to” box.
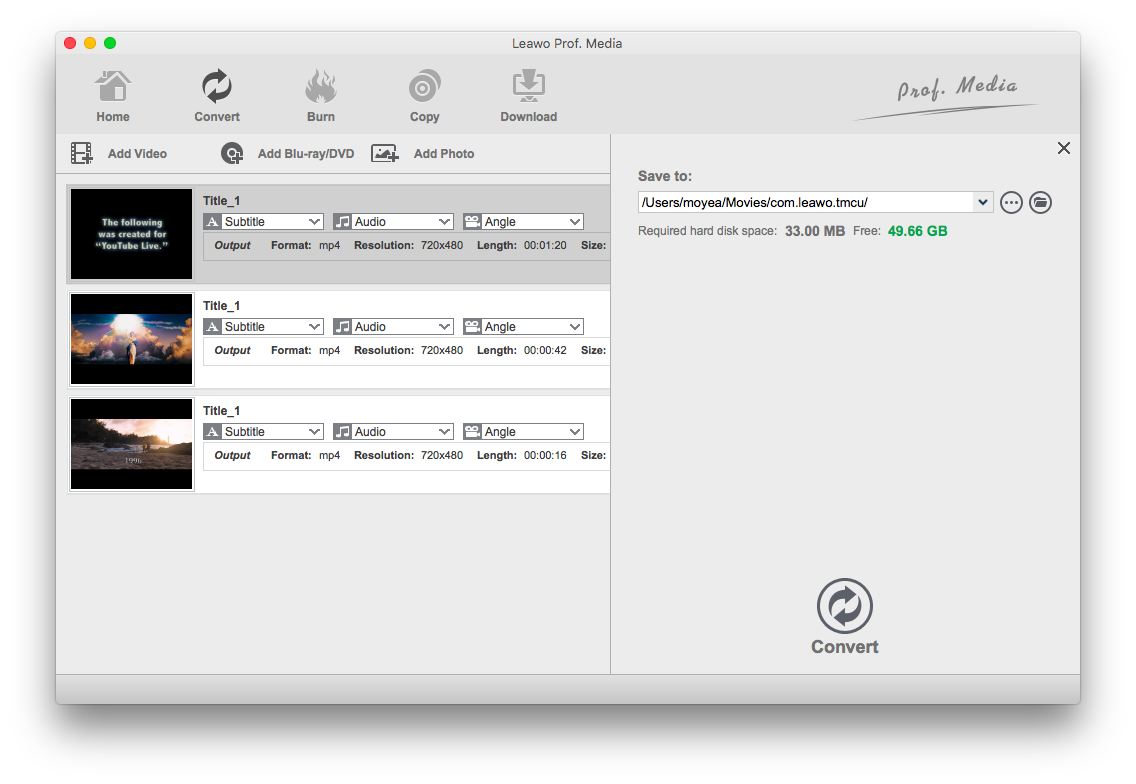
Afterwards, click the bottom “Convert” button to start to encode and convert Blu-ray/DVD/video files for uploading to YouTube.
Part 4: Comparison and Conclusion
Want to know the differences between iMovie and Leawo Prof. Media in encoding videos for YouTube? Check the below table.
|
|
iMovie |
Leawo Prof. Media |
|
Encode video file for YouTube |
Yes |
Yes |
|
Encode Blu-ray/DVD for YouTube |
No |
Yes |
|
Convert copy protected Blu-ray/DVD |
No |
Yes |
|
Convert photos into photo slideshow video |
Yes |
Yes |
|
Burn photos to Blu-ray/DVD photo slideshow |
No |
Yes |
|
Apply 3D effect |
No |
Yes |
|
Copy and back up Blu-ray/DVD |
No |
Yes |
|
Download online videos |
No |
Yes |
|
Burn videos to Blu-ray/DVD |
No |
Yes |
|
Adjust video parameters |
Yes |
Yes |
|
Availability |
Mac only |
Windows and Mac |
It’s quite clear that iMovie is a professional video editor tool to help edit and encode video files for various ends, while Leawo Prof. Media offers you total media conversion solutions upon Blu-ray, DVD, regular video, image and audio files. An important thing to note is that iMovie is only available in Mac while Leawo Prof. Media has both Windows and Mac versions.
note is that iMovie is only available in Mac while Leawo Prof. Media has both Windows and Mac versions.
 Jan. 16, 2020 by


 Prof. Media
 Blu-ray Ripper
 Blu-ray Copy
 iOS Data Recovery
 [12/29/23] MAX Downloader V15.0.0
 10,000,000 people are using Leawo!
 All Transactions are protected!
 30-Day Money Back Guarantee!