
Since VLC has been designed as one of the handiest media players in this world, users are taking advantage of its universal features to play any media files on the computers. Besides the smooth support, the VLC player can also function as many other tools such as a DVD burner, even a decent video converter.
To be more specific, while it is used as an international multimedia player, it is supposed to help individuals with the need to alter audio track. Thus, the main purpose of this post is to teach you how to change the audio language in VLC player.
Part 1: How to Change Audio Language in VLC Player
Step 1. Install the VLC and run the program.
Double click the VLC icon to open this software. The main interface will pop up without any media file opened.
Step 2. Find the preference setting.
Right under the title banner, there is a menu bar starting with "Media". Look for the "Tools" option in the same line of this media player. When you click on this item, there will be a dropdown box coming up.
The Tools menu usually puts the "Preferences" as the last option. Just choose the "Preferences" to reach the next panel. There is another way to call out the Preferences settings panel, which is to use the hotkeys on your keyboard. Keep Ctrl and P at the same time to enter the settings.
Step 3. Find the "Simple settings".
After the "Preferences" panel window pops up, you can observe the settings from either simple settings mode or all settings. The window is split up into two mainframes. Beneath the left column, there is a "Simple" option and make sure this one is chosen. In general, the Simple mode will be set as default.

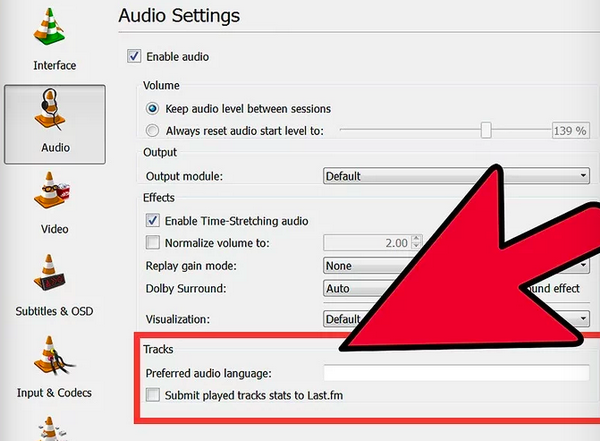
Step 4. Input the audio language
The "Audio" is placed above the "Video" label and with the headphone on the cone. Look to the right of the "Audio" label, there will be many choices for audio settings. At the bottom of the expansion, the "Tracks" title will be sitting there with the "Preferred audio language" option. You can type in the desired language code in the blank strip next to the header.
You may be confused about what is the language code. No need to worry about this problem, since the codes are listed in an open-source link. You can find the reference here: http://www.loc.gov/standards/iso639-2/php/code_list.php
A tip for the best chance to make it work is inputting the 639-2 codes at the beginning. If this category is not working, then go for the 639-1 codes.
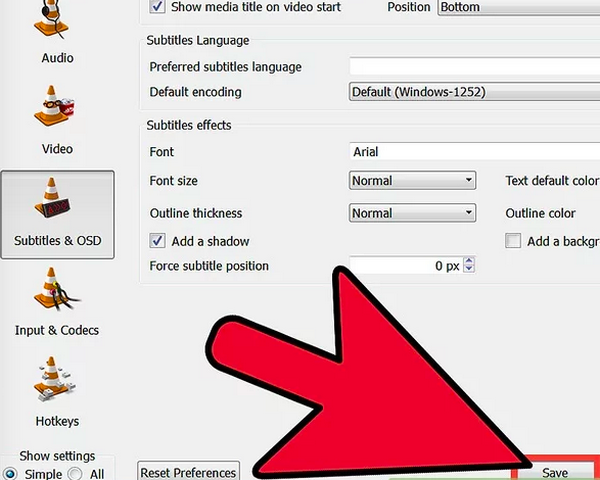
Step 5. Customize the subtitle settings and apply the configuration.
There is a label for it named the "Subtitles & OSD" under the "Audio" icon. So just look back to the left side of the preference window and click on the "Subtitles & OSD". Fulfill the "Preferred subtitles language" area and with your desired language code. The code can be found at the same link as the previous step.
Look down to the right corner of the screen, you can see the "Save" button. Tab this to confirm your settings.
Step 6. Reboot the VLC.
The modifications usually carry out by restarting the program. Shut down the whole process.
Step 7. Turn on the "All" settings mode.
If the audio language is not showing up, this is to make adjustments from the advanced level. Reopen the VLC player and access the "Preferences" panel again. This time, tick the "All" option next to the "Simple" one.

Step 8. Choose the Inputs/Codecs title.
There will be more headers on the left section than the simple mode. Slide down to the "Inputs/Codecs".
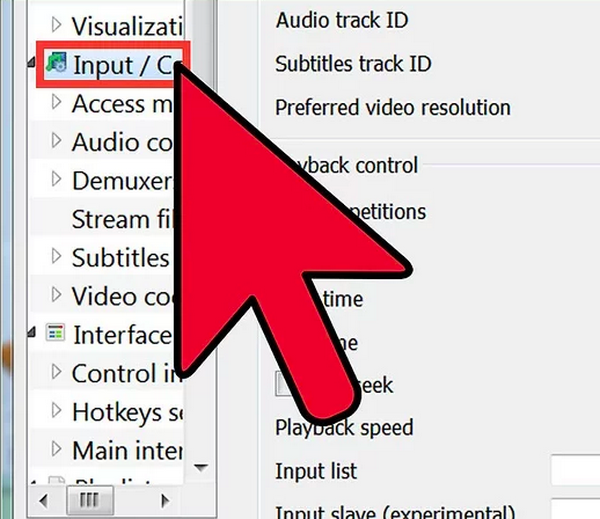
Step 9. Switch the audio track number and enter the language code.
As you click on the "Inputs/Codecs", the track settings will be listed on the right frame. Within this page, you need to tweak the audio track from 0 and 1. In most cases, 0 will be input as the automatic track. While there could be another track, the number 1 should be the extra one. You should try out different numbers to get the correct choice.

Besides numbers, there is also an additional "Audio Language." Repeat the language code and put it into the bar.
Step 10. Modify the subtitles track number
This option also comes with numbers between -1, 0, and 1. Have a try with each value into the subtitles track box.

Step 11. Confirm how to change audio language.
Likewise, click the "Save" button to make the changes work for your media file. Then close the VLC window and open it to import video files from your computer.
Part 2: Another Tool to Change Audio Language
As a matter of fact, the procedure for how to change audio language in VLC player could be confusing to many people who just start to learn about media player. Since tons of parameters could be very intensive for finding out a simple option, there is a more effective way to alter another audio language. Using the best VLC alternative tool to achieve the goal is highly recommended.
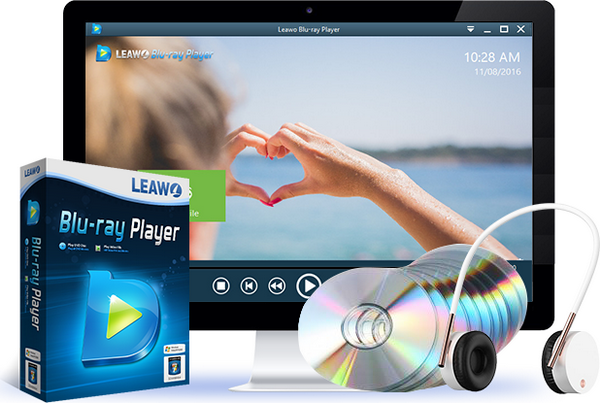
Leawo Blu-ray Player is functioning as a multitasking tool to change audio language. The basic solutions allow you import any videos like AVI, MPEG, WMV, FLV, QuickTime, MP4, RealMedia, NSV, DVR-MS and WTV. It has the ability to apply stereo audio such as Dolby, DTS, AAC, TrueHD, DTS-HD (including 5.1, 7.1 channels), etc.
The powerful program can easily handle the audio language output from multiple tracks. Implanted with cutting-edge technology that decodes all the media files with no quality loss, users can enjoy the original image and audio content for movies and homemade videos including 4K and HD.
In addition, this tool can help playback all the discs from Blu-ray to DVD and CD, regardless of the region code or other protection. Not only does it simply control the audio language but also with a number of handy parameters to personalize your own player program. If you are a novice, the friendly interface is very intuitive to navigate. Besides, there are many toolkits helping your power management, catching a quick screenshot, designing skins and themes, and so on. There is an extra performance that enables the conversion from Blu-ray to MKV format files. Overall, you will find it extremely wonderful while looking for the method of how to change audio language in VLC player.
![]()
![]()
Part 3: How to Change Audio Language in Leawo Blu-ray Player
This manual instruction is not as complicated as VLC while some settings will directly take you to the desired effect.
Step 1. Download and install.
Choose the Version of Leawo Blu-ray Player based on your computer system, Windows and Mac are available at the same time.
Step 2. Launch program and load file.
The interface will tell you the button of "Open File". You can browse the local folders and choose the video for how to change audio language in VLC player alternative.

Step 3. Get to Playback setting.
Look down to the right corner of the playback areas, there is gear button for accessing the system setting page. Just click on the wheel icon and the below window will pop up. The whole window is divided into two parts, the left side is the menu while the right section is for the full parameters.
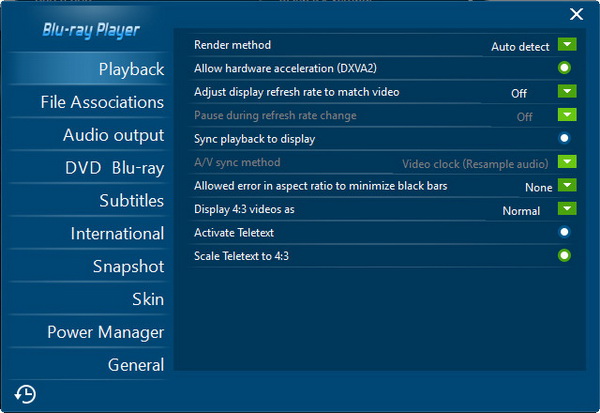
Step 4. Change audio language.
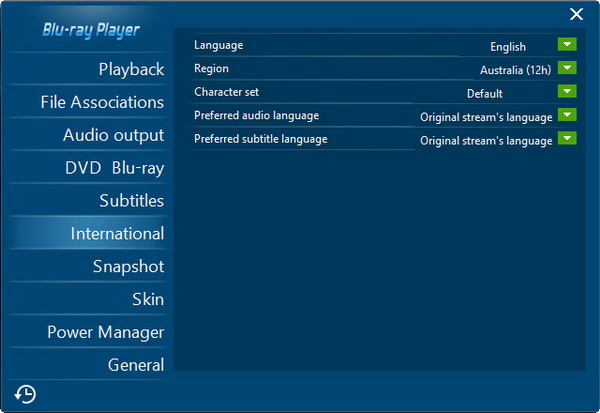
Navigate down to the "International" theme and press the label to view the right board. The first one is the language settings which is set to English as default. Under the "Character set", you will see the "Preferred audio language". It is very easy to swap to other audio language by pushing the dropdown button next to the option.
Part 4: Conclusion
It could be meaningless if someone watches a movie without understanding what it says. That is why we have to know the method for how to change audio language in VLC player. Since the VLC player program owns a massive number of fans worldwide, it can provide assistance when your computer just has one. The detailed steps are listed in the first part.
However, you can see that though VLC is quite universal and you find a lot of functions on it, it is not user-friendly for beginners and it is not quite easy to change the audio language. If you are looking for a simple solution to switch the audio track to another recognizable language, then I would like to push the Leawo Blu-ray Player, which is much easier to change audio language with many other settings. It is accessible to change and remove audio track from MKV as well.
 Nov. 12, 2019 by


 Prof. Media
 Blu-ray Ripper
 Blu-ray Copy
 iOS Data Recovery
 [12/29/23] MAX Downloader V15.0.0
 10,000,000 people are using Leawo!
 All Transactions are protected!
 30-Day Money Back Guarantee!