
As a Wii hardcore gamer, have you ever encounter the following occasions: some few adult games, weak online community, and lack of DVD movie collections playback on the Wii console? Your Wii discs get some serious scratches, totally damaged or lost? Is it possible that we can burn Nintendo Wii games to DVD discs? Yes, we can do it perfectly if you just have read this post. The Nintendo Wii can be modified to play copies of games that have been burned onto a DVD on a computer. The modification does not require opening up the Wii and so, while it voids the warranty, it can be reversed at a later time without incident. No special skills are needed, although you will have to first download some programs. Below we will show you some programs that can help burn Nintendo Wii Game to DVD, Brasero, InfraRecorder and Leawo DVD Creator.
Part 1: Preparation
At first, as we are supposed to burn and back up Nintendo Wii games and play a burned games or movies, what we need is to install a backup manager software.
1. DVDs (or an external hard disk)
2. Some kinds of DVD Creator(Brasero, InfraRecorder and Leawo DVD Creator)
Part 2: Burn Xbox Nintendo Wii Games Using Brasero
Brasero is an application to burn CD/DVD for the Gnome Desktop, which is designed to be as simple as possible and has some unique features to enable users to create their discs easily and quickly. It is reported that it supports multiple backends: cdrtools, growisofs and libburn (optional). This maximizes hardware compatibility with a large range of different writing devices. Check out below how to burn Xbox Nintendo Wii Games using Brasero.
In general, if you are using the GNOME desktop, Brasero would be installed by default. Just go to Applications > Sound & Video, then you cannot miss the Brasero Disc Burner entry. If not, you will have to install the application. This is simple if you follow these steps:
Step 1. Open up your package manager (i.e. Synaptic, gnome-packagekit, Ubuntu Software Center, etc), search for “brasero”, mark the resulting Brasero entry for installation. Next, just hit Apply to start the installation.
Step 2. Now you can insert a blank disc, either a Nautilus or Brasero window will open. Not long later, you will get a complete menu (as opposed to when you just insert a blank CD/DVD – more on that later). From this menu, you can create audio, data, and video CDs as well as copy discs.
Step 3. From the main window, you can click the Data Project Button, which will open a data project-specific window where you can begin to add your files. Generally, there are two ways to add files to your project. First, you can click the “+” button, navigate to your files (or directories), and click Add in the navigation window. The other method is to open a Nautilus window, navigate to where your files are held, and drag and drop said files/directories into the Brasero window.
Step 4. Name your disc by replacing the text with the desired name. Just erase that text and add your data-specific text.
Step 5. When you are done with this window, you can just click the Burn button and Brasero will begin the burn process. Depending upon the size of your burn and the speed of your hardware, the burn process time will vary.
Part 3: Burn Nintendo Wii Games Using InfraRecorder
As a free CD/DVD burning solution for Microsoft Windows, InfraRecorder is able to create custom data, audio and mixed-mode projects and record them to physical discs as well as disc images. Besides, it could import session data from multi-session discs and add more sessions to them. And it will save audio and data tracks to files (.wav, .wma, .ogg, .mp3 and .iso). If you don’t feel safe using the default Windows recorder or if its options are just not enough, InfraRecorder is a free application you should try. Let’s learn how to burn Nintendo Wii Games using InfraRecorder.
Step 1. Download and install InfraRecorder on your computer.
Step 2. When you launch the application, it gives you all the options that you will need: burn a Data Disc, Audio Disc, Video Disc, Write Image, Copy Disc, and creating an image from a disc.
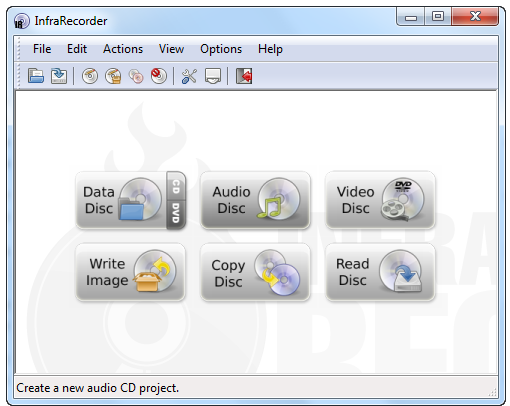
Step 3. Click on the kind of disc you want to make, drag and drop all files in place, find the buttons menu and click the third icon from the left to > Burn the current compilation to a physical compact disc.
Step 4. There are different options to use this program. Under "Options >Configuration" you can configure many options such as startup screen options, advanced burning settings, etc. The software comes with multilingual support as well. It even offers Windows context menu support that enables you to right click on image files to burn them right from Windows explorer.
Step 5. When you’re ready to burn, click > OK. The burning process in progress is demonstrated in the screenshot below.
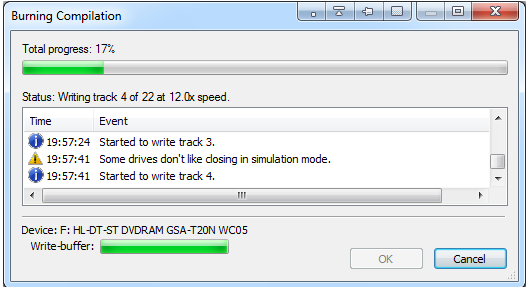
Infrarecorder is simple to use and even has some advanced options for expert users. However, quick as it may be, we have encountered some problems such as errors while burning and at times some files fail to get burned without any discernable reason, although these issues may be due to some kind of CD/DVD or file problems on our end.
Part 4: Burn Nintendo Wii Games Using Leawo DVD Creator
Leawo DVD Creator is a powerful DVD burning program with an intuitive user interface that allows you to create DVDs with videos in different formats easily. You can make DVD out of videos in formats like MKV, MP4, MOV and AVI, etc. Leawo DVD Creator is capable of burning video to DVD(DVD-9/DVD-5), converting video to DVD folder and/or ISO image file. What is more, for DIY enthusiasts, this is the perfect DVD Creator to convert video to DVD as it gives users the power to change their disc menu templates and the items on the disc menu. Learn the steps to burn Nintendo Wii Games using Leawo DVD Creator.
![]()
![]()
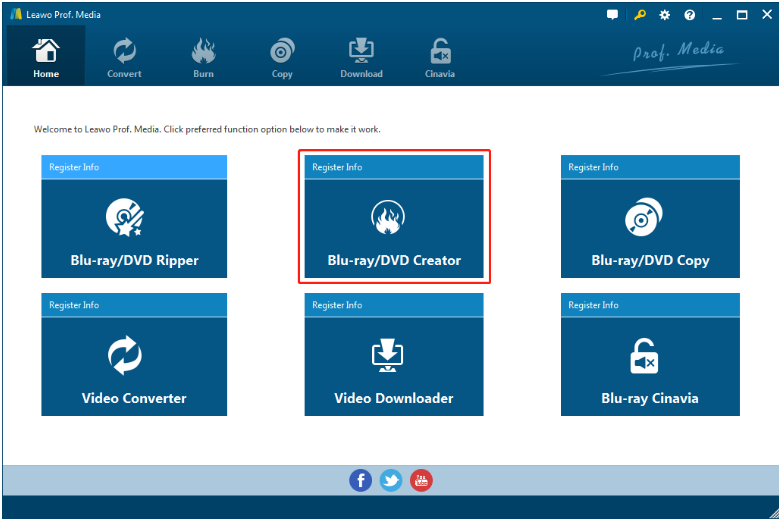
Step 1. Launch Leawo Prof. Media and click "Blu-ray/DVD Creator" or you can click Burn tab on the top to enter the DVD creator module.
Step 2. After going to the home page of Leawo DVD Creator, you can import the targeted file that you desire to burn to DVD. Leawo DVD Creator allows users to directly drag and drop the video file into the program or click Add Video > Add Video/Add Video Folder to import the source file.

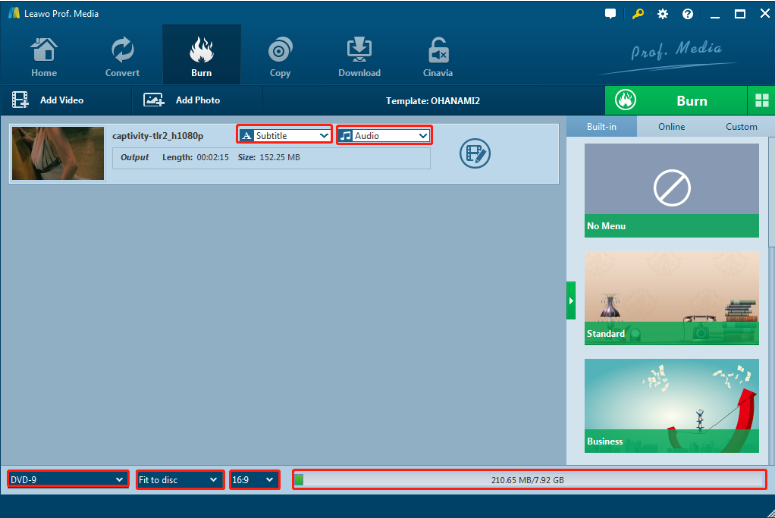
Step 3. Select subtitle and audio track from the source video or even import subtitle from local files by clicking the drop-down menus of "Subtitle" and "Audio". Besides, you can reset DVD movie parameters, like video output format (DVD-5 or DVD-9), the video resolution and aspect ratio (16:9 or 4:3) at the bottom.
Step 4. If need, you can also edit video by clicking the edit button to the right of the "Audio" drop-down menus. After entering the video editor, you can see 6 editing video functions that Leawo DVD Creator provides, like trimming or cropping videos, adding watermark to videos, making 3D movies, removing noise from the source movies and so on. According to your own needs, you can use these editing tools to edit videos. Finally, click the "OK" button to save the changes.
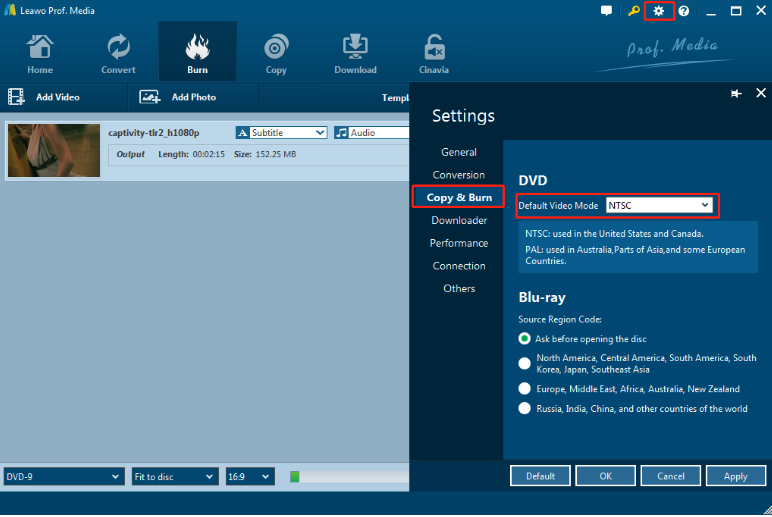
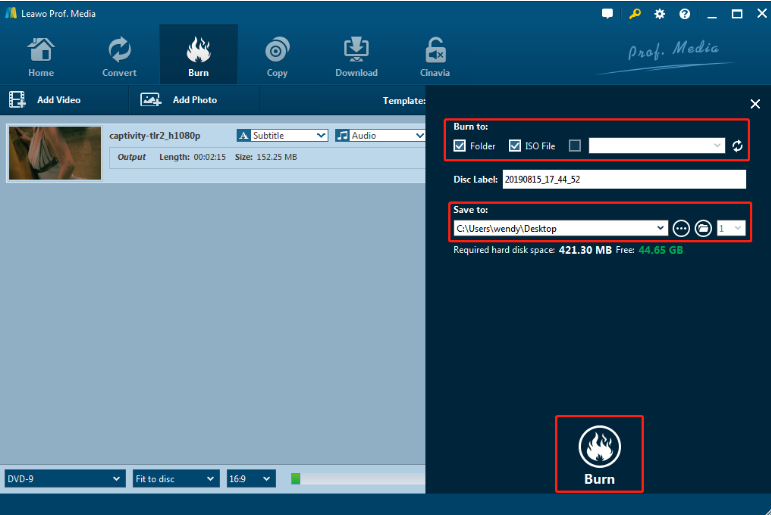
Step 5. Click the green Burn button on the interface to call out a sidebar. In the Burn to options, you are able to create DVD folder, DVD ISO image and then save them to your computer hard drive or even burn the file into a disc after inserting a blank writable disc into the DVD-ROM. Also, you are allowed to rename disc label and set the output path. Finally, click the Burn button at the bottom of the sidebar to start burning the video to the blank disc.
Part 5: Comparison and Conclusion
Below, we have make some comparison of Brasero, InfraRecorder and Leawo DVD Creator.
| Programs |
Brasero |
InfraRecorder |
Leawo DVD Creator |
|
OS |
only available for Linux or Unix related operating systems |
Windows |
Windows and Mac version |
|
Main Features |
1.Supports multiple backends: cdrtools, growisofs and libburn(optional). |
1.Create custom data, audio and mixed-mode projects and record them to physical discs as well as disc images. |
1.Burn DVD from any Video and Photos |
In conclusion, we find Leawo DVD Creator works better, for it is powerful, stable and reliable. Besides, if you need, you could even create photo slideshow video and burn it to disc. Come an have a try!
 Jan. 20, 2020 by


 Prof. Media
 Blu-ray Ripper
 Blu-ray Copy
 iOS Data Recovery
 [12/29/23] MAX Downloader V15.0.0
 10,000,000 people are using Leawo!
 All Transactions are protected!
 30-Day Money Back Guarantee!