
“How do I burn photos taken with Nikon camera to DVD on my Windows computer? I just went for a short trip and have taken quite a lot of pictures with my Nikon camera. I would like to save some of these precious photos onto DVD disc but there seems to be no method for that. Do you know how to burn Nikon camera photos to DVD disc? What kind of DVD burners should I use to burn Nikon camera photos to DVD disc? Please help me with this.”
Taking photos in our daily life has been a wonderful way to record the happy moments and precious memories. As one of the most popular camera brands, Nikon camera has been seen around the world. Many Nikon camera owners try to burn photos taken with Nikon camera to DVD disc but have no idea how to do this. If you also have this question. This guide would be helpful to you. We will show you how to burn Nikon camera photos to DVD on Windows/Mac with different DVD burner tools.
Part 1: Download Photos from Nikon Camera to PC
It’s known to all that to burn DSLR photos/videos to DVD disc, the first thing you need to do is download photos from Nikon camera to your computer. there are 3 different ways to help you transfer and download photos from Nikon camera to PC/Mac:
- Connect the camera to the computer via a USB cable.
- Use a memory card reader. With a card reader, you simply pop the memory card out of your camera and into the card reader instead of hooking the camera to the computer. Many computers and printers now have card readers, and you also can buy standalone readers.
- Invest in Eye-Fi memory cards and transfer images via a wireless network. You can find out more about these special memory cards and how to set up the card to connect with your computer at the manufacturer’s website. Your computer must be connected to a wireless network for the transfer technology to work.
Follow the below steps to learn how to transfer and download photos from Nikon camera to PC/Mac:
- Connect your Nikon camera to computer via USB cable or put the SM card of your Nikon camera to card reader before you connect the card reader to computer.
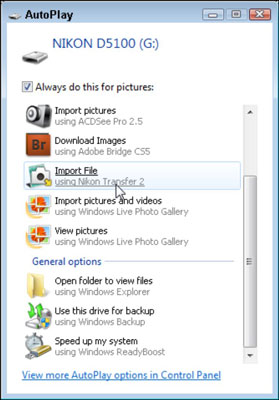
- On your computer, there will pop up a window showing as below:
- 3. Click the “Import File” option to download files from Nikon camera, or the “Import pictures and videos” option to only download photos and videos from Nikon camera to PC.
- If the “Auto Play” window doesn’t show up, just open the Nikon camera drive and then copy and past the pictures from Nikon camera folder to your computer.
- After downloading, disconnect your Nikon camera or card reader from your computer.
Now, you have successfully downloaded photos from Nikon camera to computer. Then follow the below guide to learn how to burn pictures from Nikon camera to DVD.
Part 2: Burn Nikon Camera Photos to DVD With Burn to Disc Feature
Microsoft offers you a Burn to Disc feature that enables you to directly burn videos and pictures to DVD disc. read the following guide to learn the detailed operation:
- Insert a blank CD or DVD into the CD/DVD burner drive of your PC.
- Open Windows Explorer. (File Explorer in Windows 10)
- Go to the folder that saves all the pictures downloaded from your Nikon camera.
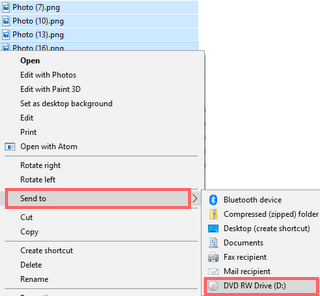
- Select the pictures for burning to DVD disc.
- Right-click on the selected photos or folders, move your mouse cursor to “Send to” and then click on your CD/DVD burner drive as target.
A “Burn a Disc” window will appear. Give the DVD content a name in the “Disc title” field.
- Select With a CD/DVD player and then click on the “Next” button to proceed.
- Your photos will now be copied to the DVD burner drive of your PC.
- When the copying process completes, you will see the CD/DVD burner drive of your computer in a second Windows Explorer window. Here you will see your images or folders ready to be written to a disc.
- When you're ready, you click on “Manage” button at the top of the Windows Explorer window.
- Click on “Finish burning” button and then eject your DVD disc from your computer.
Now, you have successfully burned pictures from Nikon camera to DVD disc by using the Burn to Disc feature on your Windows computer.
Part 3: Burn Nikon Camera Photos to DVD With Windows Media Player
We all know that Windows Media Player is a media player pre-installed on Windows computers by Microsoft. It could play back nearly all media files including DVD, video and audio files. Actually, you could also use Windows Media Player to burn Nikon camera photos and other photos to DVD disc.
Follow the below steps to learn how to burn Nikon camera photos to DVD disc with the help of Windows Media Player:
Step 1. Make sure you have Windows Media Player installed on your computer and source picture files ready.
Step 2. Insert a blank CD or DVD into the CD/DVD burner drive of your computer.
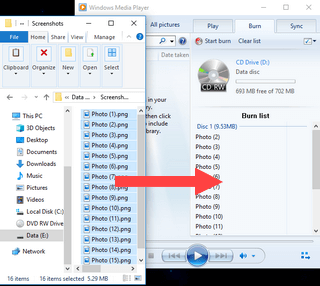
Step 3. Open Windows Media Player, and then click the “Burn” tab at the top right corner.
Step 4. Click on the “burn options” button and then click on “Data CD or DVD”.
Step 5. Click on “Pictures” in the left sidebar of Windows Media Player and then drag the pictures to the “Burn” list. Or, you could go to your photos and then drag the photos from Windows Explorer to the “Burn” list in Windows Media Player.
Step 6. You could then view the required size and remaining size on your DVD disc.
Step 7. Click on the “Start Burn” button.
Windows Media Player would then start to burn photos to DVD disc immediately. You only need to wait for it to complete.
Part 4: Best Nikon Camera Photos to DVD Burner - Leawo DVD Creator
Both Windows Media Player and Burn to Disc features are free to use. However, you need to know that Windows Media Player and Burn to Disc feature only creates data DVD content, which means you can’t not directly play back the DVD discs created with these 2 features on standalone DVD players. What’s more, they are for Windows users only. Mac users have no such tool. Therefore, you need a professional DVD burner tool that could help you burn Nikon camera photos to DVD disc playable on DVD players for both Mac and Windows users. Leawo DVD Creator is the one you need.
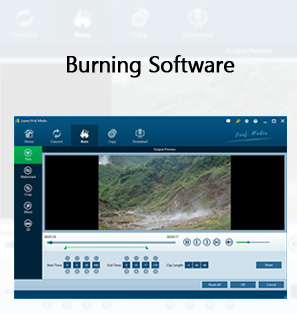
Leawo DVD Creator is the best DVD burner software you could find online. As a professional DVD burner software program, Leawo DVD Creator could not only convert video to DVD from various formats including AVI, MKV, MP4, WMV, Xvid, MOV, etc. to DVD-9/ DVD-5 disc, folder and/or ISO image file, but also help you turn photos in png, bmp, jpg, or jpeg format to DVD easily.
Download and install Leawo DVD Creator on your computer. Then follow the below steps to learn how to convert and burn Nikon camera photos to DVD with Leawo DVD Creator.
![]()
![]()
Note: Leawo DVD Creator has been built into Leawo Prof. Media as a module.
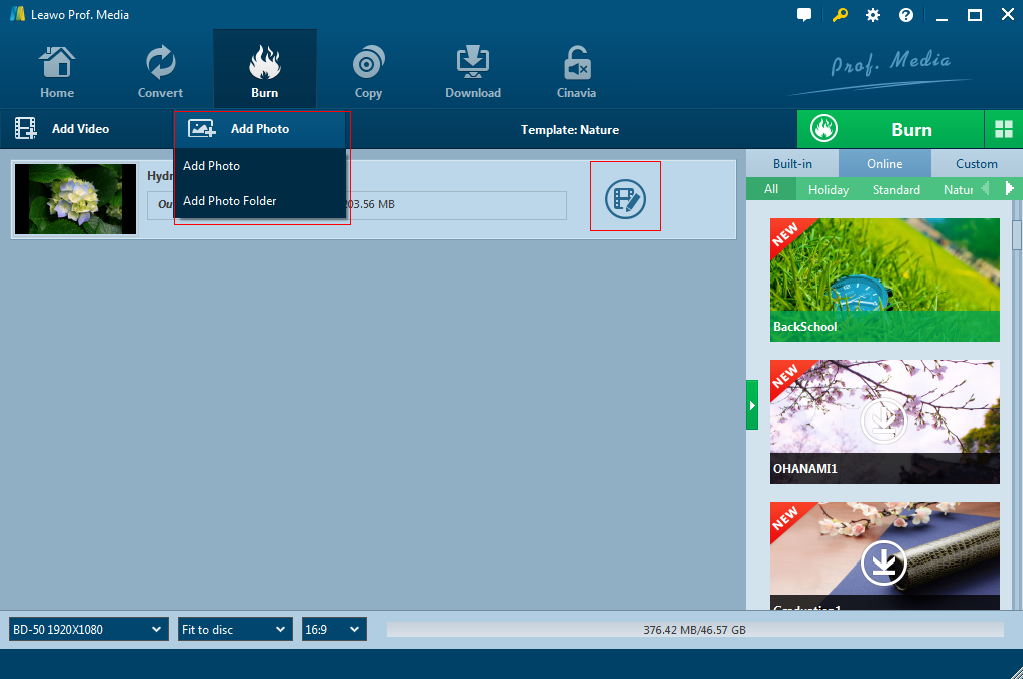
Step 1: Add Nikon camera photos
Fire up Leawo Prof. Media and then open the “Burn” module. Click the “Add Photo” button to browse and load Nikon camera photos. Photos will be automatically generated into photo slideshow. After loading source photos, set output disc type, aspect ratio and bit rate at the bottom.
Step 2: Edit the slideshow video
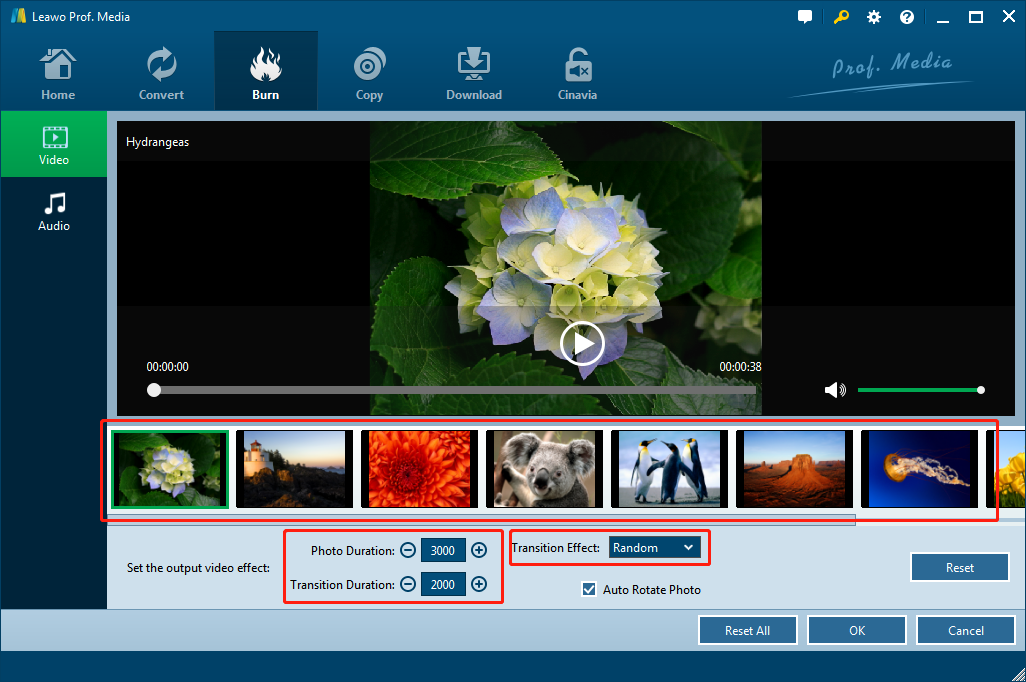
Click the edit icon in generated slideshow title to edit video and audio of generated photo slideshow. You could add/remove/reposition photos, set photo duration and transition duration, adjust transition effect, add background music, etc.
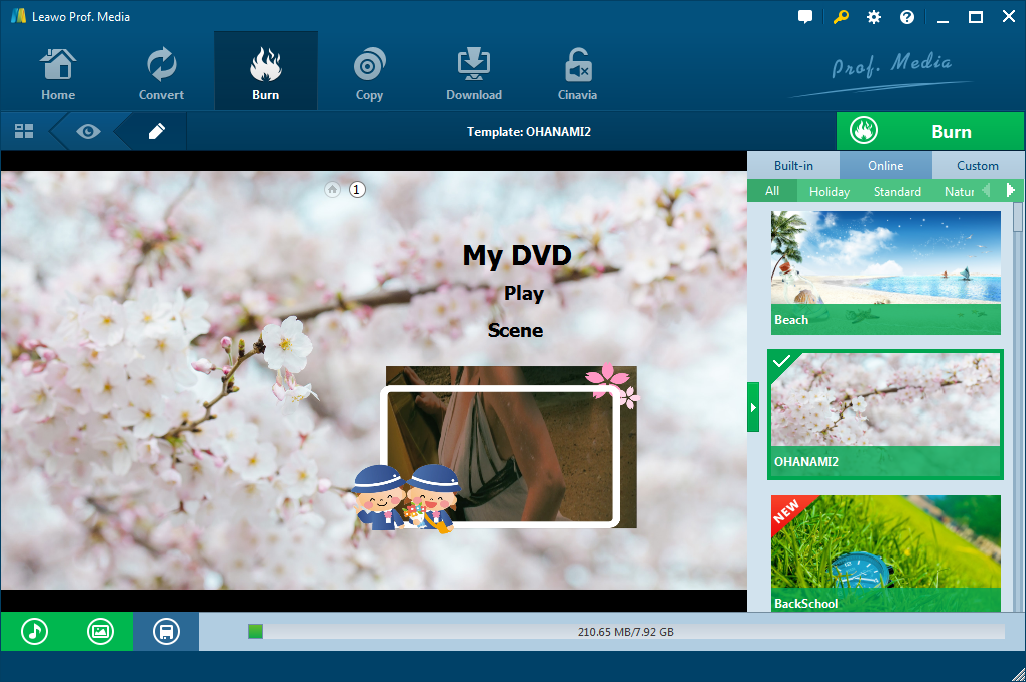
Step 3: Set disc menu
Leawo DVD Creator allows you to add disc menu to output DVD photo slidshow. Choose one from the right sidebar and click the middle of it to preview disc menu. In addition, you can design the disc menu on the disc menu preview panel by clicking the pencil icon, like adding background music/image/video, changing title position/size/font/color, etc.
Step 4: Set DVD video mode
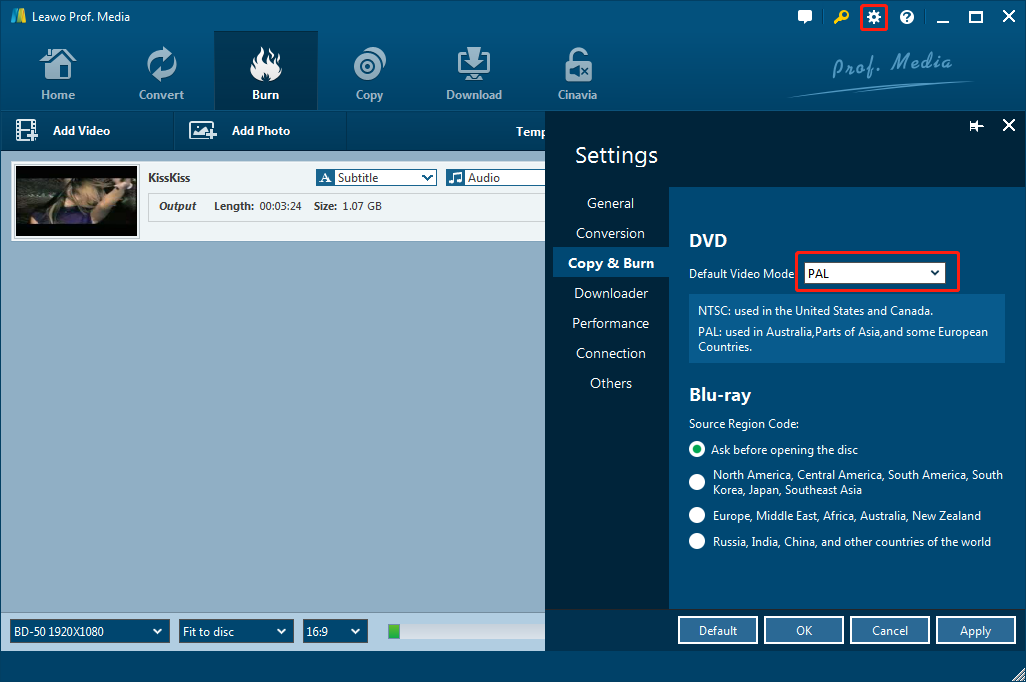
Click the wheel icon at the top right corner and then go to the “Copy & Burn” module to choose output DVD video mode from NTSC and PAL.
Step 5: DVD burning settings and start burning
After setting disc menu, click the big green “Burn” button to call out the burning settings panel, on which you need to figure out Burn to, Disc Label, and Save to options. “Save to” option allows multiple choices. If you want to burn Nikon camera photos to DVD disc, insert disc into disc recorder and choose it as output target here.
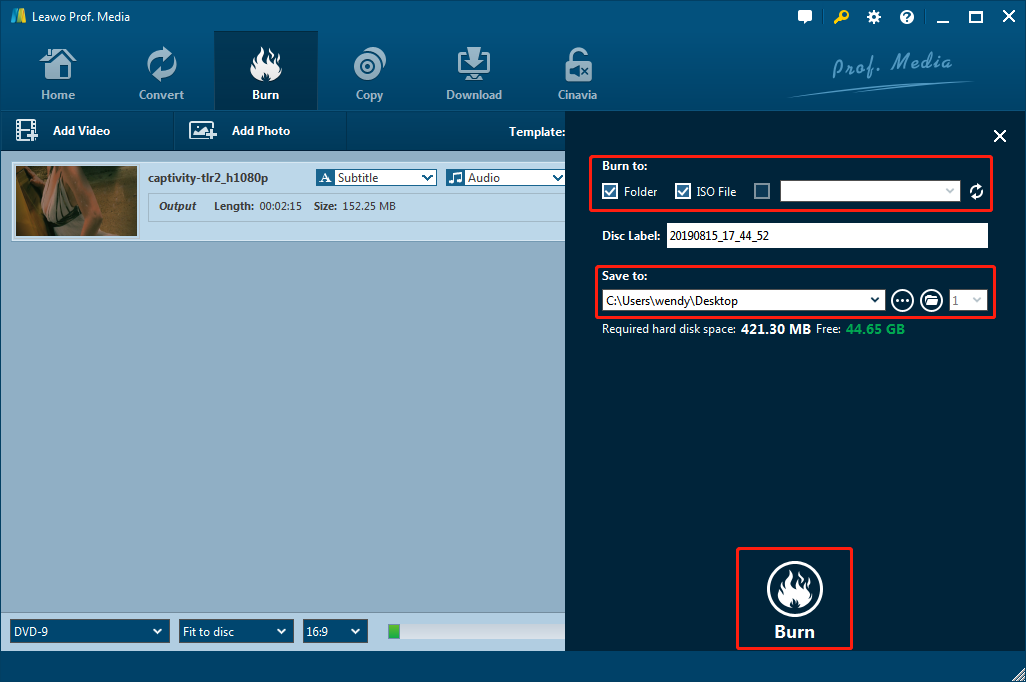
After that, click the “Burn” button at the bottom to start burning Nikon camera photos to DVD within Leawo DVD Creator.
Part 5: Comparison and Conclusion
Check the below comparison table to learn the differences between Leawo DVD Creator, Windows Media Player and Burn to Disc feature.
|
|
Leawo DVD Creator |
Burn to Disc feature |
Windows Media Player |
|
Burn video to DVD disc |
Yes |
Yes |
Yes |
|
Burn videos to DVD folder |
Yes |
No |
No |
|
Burn videos to DVD ISO file |
Yes |
No |
No |
|
Burn photos to DVD |
Yes |
Yes |
Yes |
|
Create playable video DVD |
Yes |
No |
No |
|
Select subtitles and audio tracks |
Yes |
No |
No |
|
Add external subtitles |
Yes |
No |
No |
|
Edit video files |
Yes. Trim, crop, adjust effect, rotate, merge files, add image/text watermark, apply 3D effect |
No |
No |
|
Edit photos for photo slideshow |
Yes |
No |
No |
|
Play back source videos |
Yes |
No |
Yes |
|
Set output DVD video mode |
Yes. NTSC or PAL |
NA |
NA |
|
Availability |
Windows and Mac |
Windows |
Windows |
As mentioned above, Windows Media Player and Burn to Disc feature only create data video DVD content, but Leawo DVD Creator creates playable DVD content that could directly play back on standalone DVD players. Meanwhile, Leawo DVD Creator has both Windows and Mac versions.
 May. 18, 2020 by


 Prof. Media
 Blu-ray Ripper
 Blu-ray Copy
 iOS Data Recovery
 [12/29/23] MAX Downloader V15.0.0
 10,000,000 people are using Leawo!
 All Transactions are protected!
 30-Day Money Back Guarantee!