“What are the tips to optimize video for web online and offline? I have uploaded several videos to my blog and found that some of them cost much longer time for loading than others. Is there any tip that could help optimize a video for web loading?”
Watching videos online has been a wonderful way to get fun in our leisure life. For those people, especially those video bloggers, optimizing video for quick uploading and loading has been a main concern because the video loading would play an important role in attracting traffic and viewers. Then, the problem is, what are the tips to optimize video for web? How to optimize video for web online and offline? We here have collected 8 tips for you to optimize video for web online and offline.
Part 1: 8 tips to optimize video for web online (including video format,size)
One thing that bothers us most is the long loading time of online videos. How to optimize video for web to shorten its loading time and make sure the online video plays back smoothly? There are quite a few tips we could do. Here we have collected 8 tips for you to optimize video for quick online web loading.
1. Choose the most suitable video file format
We know that the web accepts quite a few video file formats including MP4, MOV, FLV, F4V, WebM, etc. Which file format is the best one for online videos?
as is known to all, MP4 and WebM have become the standard formats for platforms like YouTube and Vimeo. MP4, which performs better on mobile devices, is relatively more popular and accepted by all browsers, while WebM, which is lighter, is currently only fully supported by Chrome and Firefox. Therefore, make sure you have optimized your videos to be uploaded online saved in either webm or mp4 file format.
2. Use proper video compression tool
Generally speaking, smaller media files load faster. Therefore, you could choose proper video compression tools to compress video files before uploading to the Internet. There are quite a great number of video compression tools like Handbrake, Blazemp, etc.
3. Choose a proper encoding
Video encoding is the process of formatting the file for output. Different encoding methods will have different impact onto the final video size. However, you should also keep in mind that different encoding methods will influence the video quality.
4. Choose a proper transcoding method
This is the process of changing one form of digital encoding to another. This typically involves lossy compression. For example, you start with an H.264 file and convert it to MPEG4. When you are preparing video for the web, you will most likely be transcoding the file. Transcoding will also bring differences to the video size and quality.
5. Choose a proper resolution
Simply speaking, a video resolution defines the video size. The smaller the resolution is, the smaller your file size will be. Below are some common display resolutions for digital devices: 1920×1080, 1366×768, 1280×1024, 1280×800, and 1024×768.
6. Set a proper bitrate
Also known as “data rate”, the bitrate controls the file size. Higher quality files have a higher bitrate. Expressed in kilobytes per second Kbps, a lower bitrate means a lower file size.
7. Set a proper video length
Apparently, the video length would also be an important fact on video loading. Get the unwanted video clip cut to keep only what you want for uploading.
8. Remove unwanted audio
Sometimes we only need a muted video, or we need to add external audio as background audio. In such case, we could remove the original audio track to save space.
These above tips are for video optimization. Actually, you could even optimize your video page to get your videos quickly found by others. Of course, that’s about video SEO. That’s another topic. The below content would show you how to optimize video for web online with different tools.
Part 2: How to optimize video with Leawo Video Converter
As mentioned above, you could optimize video in multiple aspects like codec, transcoding, quality, bit rate, etc. All these could be done with 3rd-party video tools. Leawo Video Converter is such kind of video tools that could help you optimize your video for quick online loading. It could help you change the parameters like video codec, bit rate, aspect ratio, resolution, frame rate, etc., and cut video length, crop video size, etc. so as to help you optimize videos.
Download and install Leawo Video Converter on your computer according to your computer OS. Then, follow the below steps to learn how to optimize video for web with Leawo Video Converter.
Step 1: Add source video file(s)
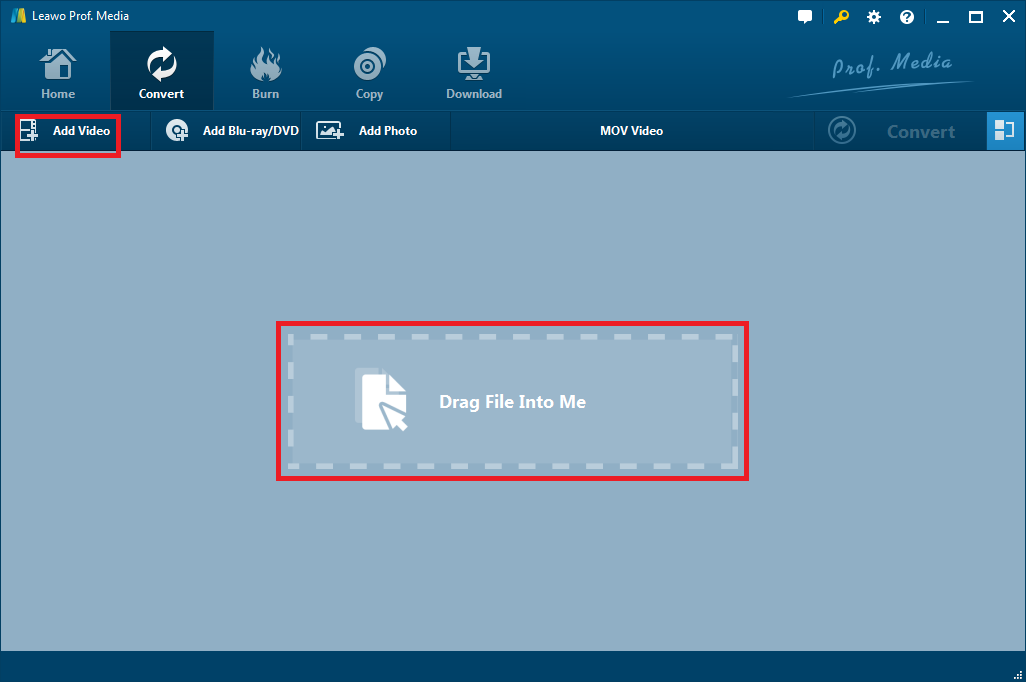
Launch Leawo Video Converter (it’s a module of Leawo Prof. Media) and then click the “Convert” module. Then, under the “Convert” module, click “Add Video” button to browse and add video files you want to optimize.
Step 2: Reduce video size
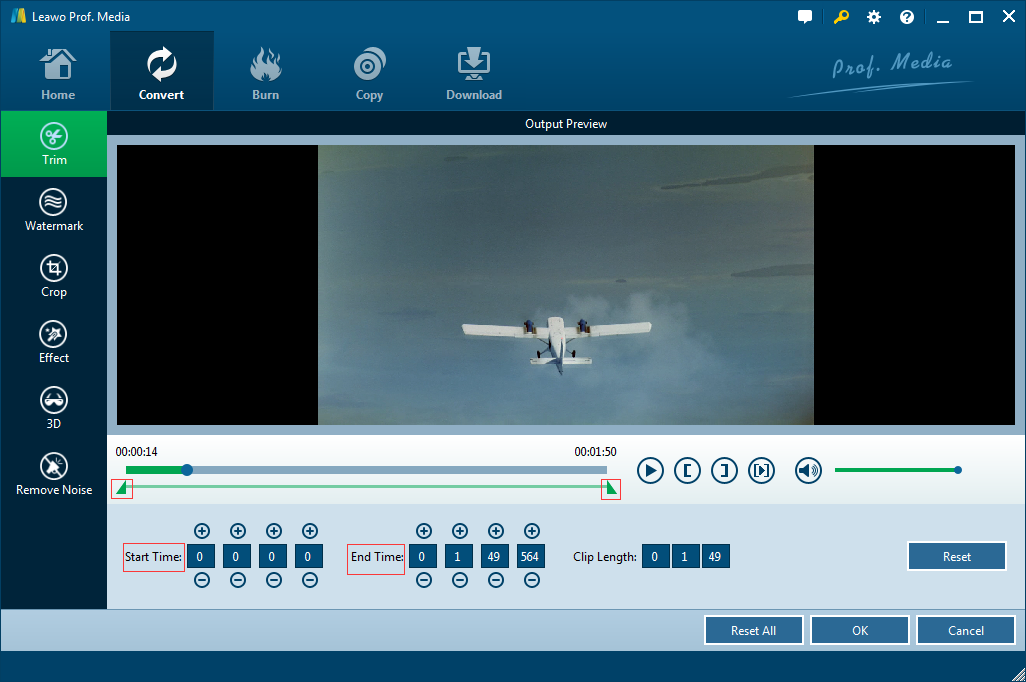
Leawo Video Converter has an internal video editor that could help you reduce video size by trimming video length and cropping video size. After loading source video file(s), click the edit button in each loaded video title to enter the editing panel.
On the Trim tab, you could trim video length to remove unwanted video clip by setting “Start Time” and “End Time” values.
On the Crop tab, you could crop video size by removing the black margin. Just set the Left and Top values to get black margins removed.
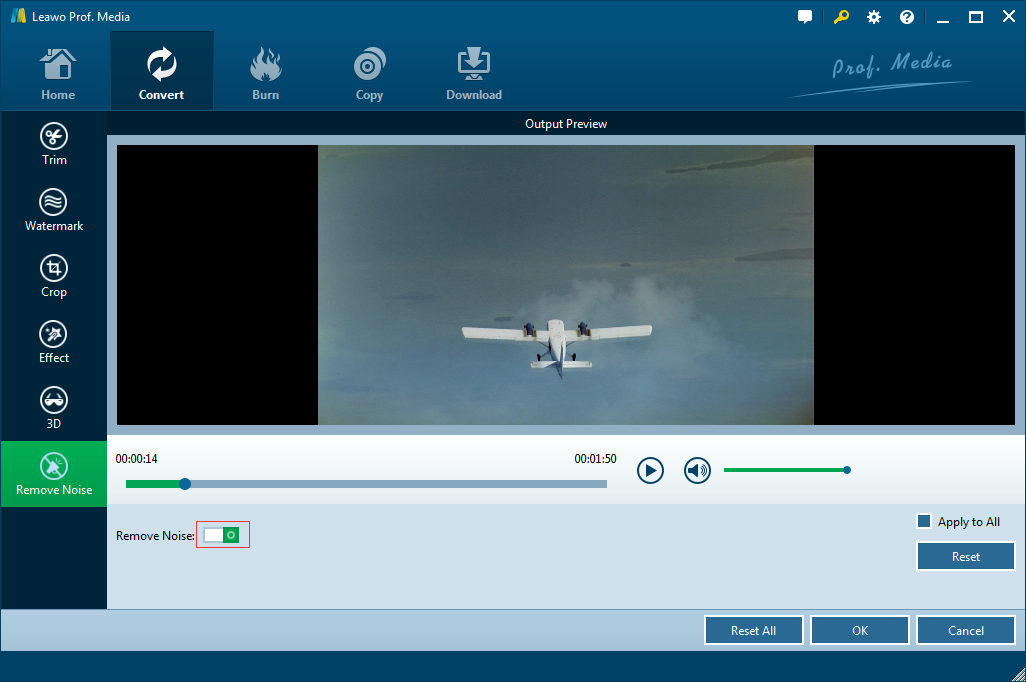
You could even remove the noise from source video by making use of the “Remove Noise” tab. Simply open the “Remove Noise” tab and then enable “Remove Noise” option to do this.
Step 3: Set output format
Now, click the drop-down box before the big green “Convert” button and then choose “Change” option. On the popup Profile panel, choose output format from either “Format” or “Device” group.
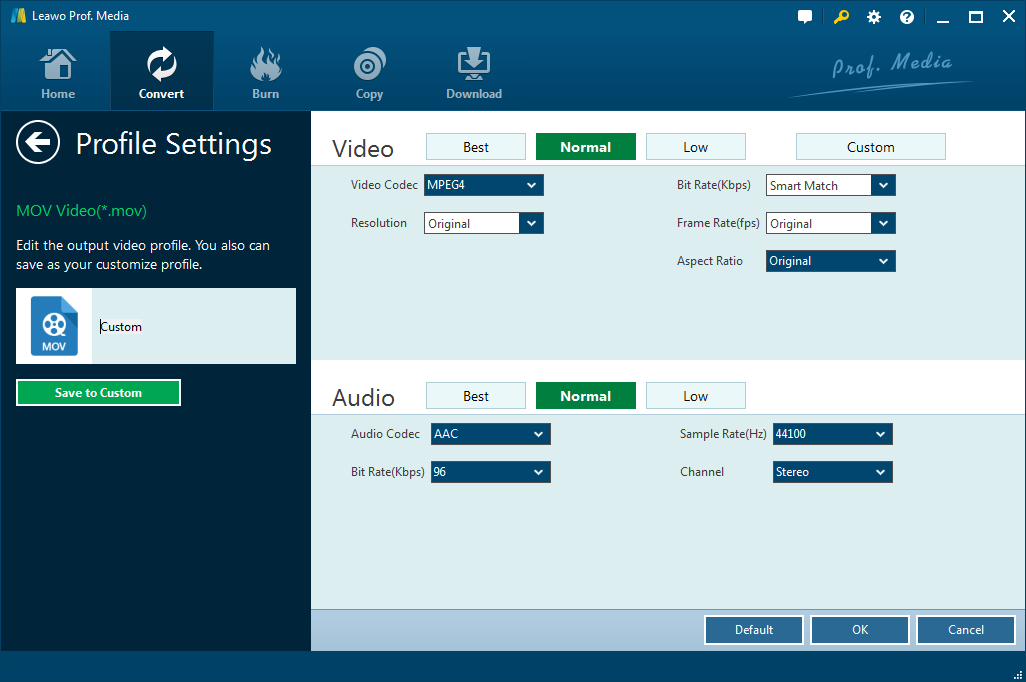
As mentioned above, Leawo Video Converter could help you adjust the output profile parameters so as to optimize output file, including video codec, bit rate, aspect ratio, frame rate, audio codec, channel, sample rate, etc. To change these, click the “Edit” option on the drop-down panel after setting output format.
Step 4: Set output directory
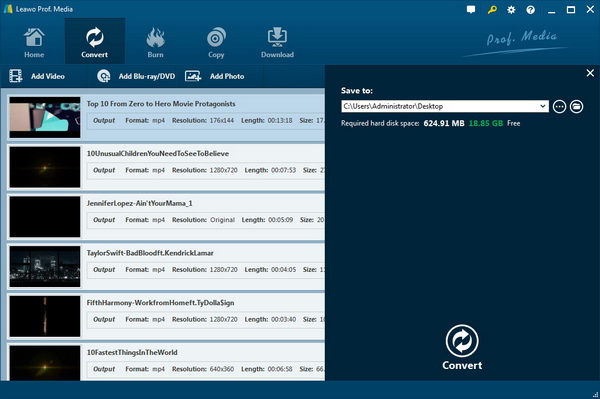
After setting output format, click the big green “Convert” button. Then, set output directory in the “Save to” box on the popup sidebar.
Step 5: Convert videos with optimizations
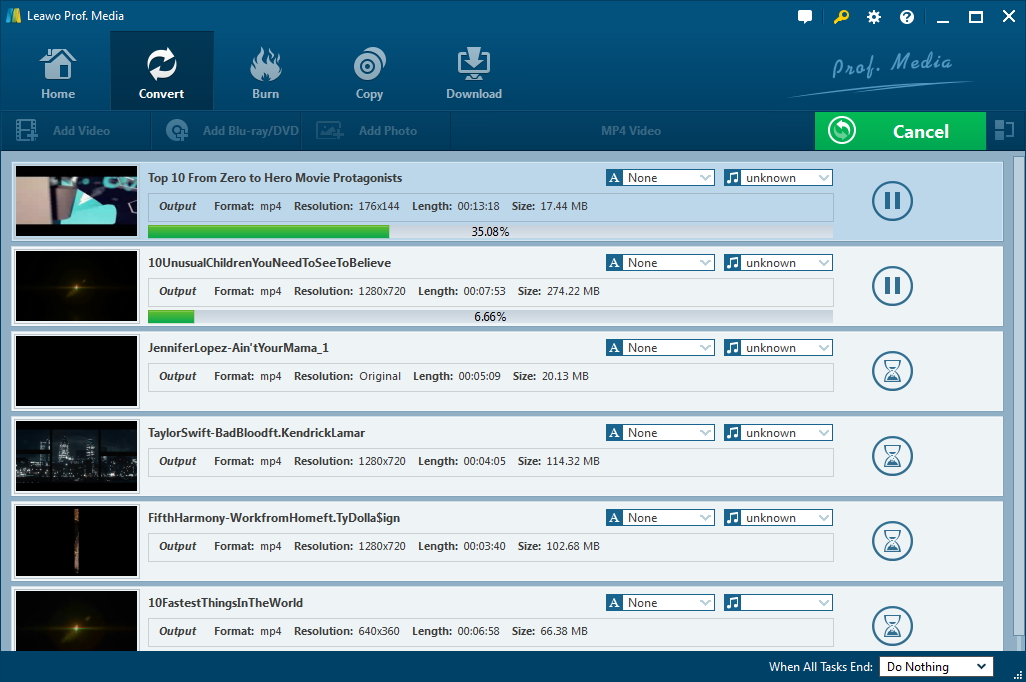
Finally, click the bottom “Convert” button to start converting videos. You could then view the whole converting process on the converting panel.
After converting, you could now freely upload your video files to the Internet for unlimited sharing.
Part 3: How to optimize video with Handbrake
Can Handbrake optimize video for web? Of course yes. As a free and open source video converter tool, Handbrake, similar to Leawo Video Converter in some aspects, could help you optimize video size easily.
The below steps would show you how to optimize video size with Handbrake in detail:
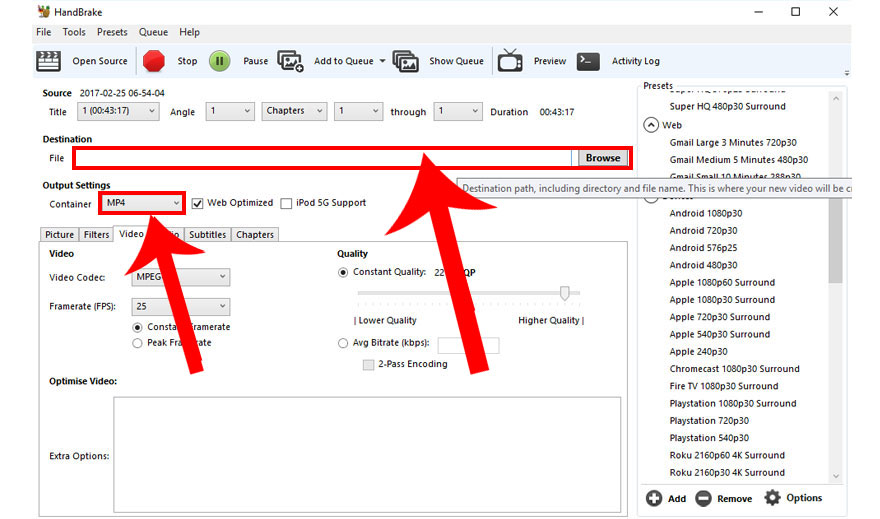
1. Open HandBrake, and then click the “Open a single video file” option to add source video file for optimizing.
2. Click the “Browse” box under the “Destination” tab to set an output directory.
3. Under the “Output Settings” tab, set output video codec, bitrate, aspect ratio, frame rate, resolution, etc. according to your needs.
4. Finally, click the “Start Encode” button to start to encoding your video for optimization.
Obviously, you could see that Handbrake, compared to Leawo Video Converter, couldn’t cut video length and remove video black margin in video optimization.
Part 4: How to optimize video with ffmpeg
You can also reorganize an existing video to optimize it for web streaming with FFMpeg, which could reorganize the structure of the MP4 file to place the moov atom at the start. Unlike the initial encoding of the video which is very time consuming and CPU intensive, reorganizing the file is an easier operation. And, it will not alter the quality of the original video in any way. The resulting video is named output.mp4.
1. Input the command: ffmpeg -i input.mp4 -movflags fastart -acodec copy output.mp4
2. Then the -movflags fastart will tell the FFMpeg to record MP4 video atoms so that the moov file is at the start.
ffmpeg could also copy the video and audio data instead of re-encoding them, so nothing gets altered.
Part 5: A comparison of above solutions
The below comparison table would show you the differences between the above-mentioned solutions. You could check the table to learn more about these tools.
|
|
Leawo Video Converter |
Handbrake and FFMpeg |
|
Adjust video size |
Yes |
Yes |
|
Adjust video resolution |
Yes |
Yes |
|
Adjust video codec |
Yes |
Yes |
|
Adjust video bit rate |
Yes |
Yes |
|
Adjust audio codec |
Yes |
Yes |
|
Adjust audio bit rate |
Yes |
Yes |
|
Adjust video and audio quality |
Yes |
No |
|
Trim video length |
Yes |
No |
|
Crop video size |
Yes |
No |
|
Remove noise |
Yes |
No |
|
Add watermark to video |
Yes |
No |
|
Apply 3D effect |
Yes |
No |
|
Adjust video effect |
Yes |
No |
|
Convert video and audio files |
Yes |
Yes |
|
Turn photos into slideshow video |
Yes |
No |
|
Add external subtitles to video |
Yes |
No |
|
Choose subtitles and audio tracks |
Yes |
No |
|
Batch conversion |
Yes |
No |
|
Play back videos |
Yes |
No |
|
Merge video files into one |
Yes |
No |
|
Cost |
Free trial and paid |
Free |


