
Thanks to Apple ecosystem, you can easily post-edit photos taken by iPhone on your iPad or Mac. With a larger screen, you can adjust and edit photos more easily and precisely. However, over time, the iPad storage will be more and more limited. In addition to backing up photos to iCloud or computer, it is also suggested to transfer photos from iPad to USB memory stick for backup. If you plan to transfer photos from iPad to a USB flash drive but don’t know how to make it, this guide may provide you with some help.
Related reading:
4 Ways to Transfer Photos from iPad to Windows 10
How to Transfer Photos from iPad to iMac Computer
How to Transfer Files from iPad to iPhone
- Part 1: How to Transfer Photos from iPad to USB Flash Drive via Leawo iTransfer?
- Part 2: How to Transfer Photos from iPad to USB Flash Drive via Windows Explorer?
- Part 3: How to Transfer Photos from iPad to USB Flash Drive with iPhoto on Mac?
- Part 4: How to Transfer Photos from iPad to USB Flash Drive for iPad?
- Part 5: How to Transfer Photos from iPad to USB Flash Drive Without a USB Cable?
Part 1: How to Transfer Photos from iPad to USB Flash Drive via Leawo iTransfer?
The first three methods all require a USB cable. If you don't have one, then you can read the last two methods. Leawo iTransfer, available for Windows and Mac, is a powerful iOS transfer tool to transfer files and data between iDevices, computer and iTunes. It supports up to 12 kinds of file transfers, including photos, videos, music, ringtones, eBooks, and more. To transfer photos from iPad to USB flash drive using Leawo iTransfer, read the following steps.
Step 1: Download Leawo iTransfer
Click either download button below according to your computer system. Then, follow the onscreen instruction to install and launch it on your computer.

-
Leawo iTransfer
- Transfer files among iOS devices, iTunes and PCs with ease.
- 6x faster than iTunes
- Transfer up to 14 kinds of data and files without iTunes.
- Support the latest iOS devices like iPhone 12, iPhone 12 Pro, etc.
- Play back, view, and delete data and files on iOS devices.
- Support Windows & Mac OS
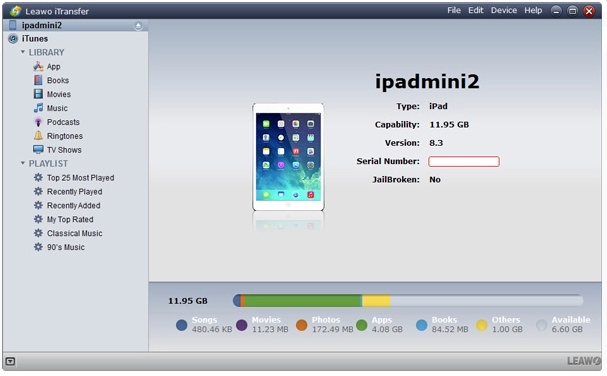
Step 2: Connect your iPad and USB memory stick to computer
Connect your iPad and USB flash drive to computer. The software will recognize your iPad immediately.
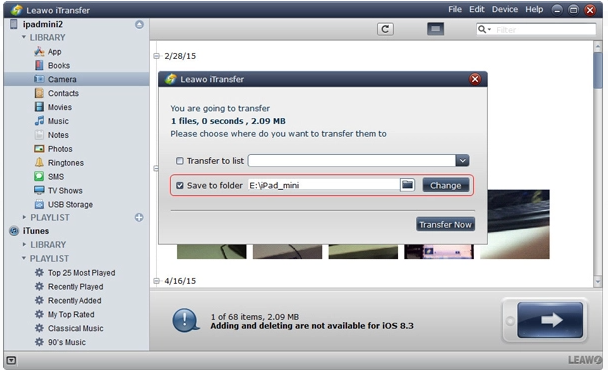
Step 3: Start to transfer photos from iPad to USB flash drive
Go to “[your iPad] > LIBRARY > Photos” in the left column, and all photos on your iPad will be displayed in the right panel. Select target photos and right-click on them, then choose “Transfer to > My Computer” in the drop-down menu. In the pop-up window, click Change button to set your USB flash drive as the output directory. Finally, click Transfer Now to transfer photos from iPad to USB flash drive.
Part 2: How to Transfer Photos from iPad to USB Flash Drive via Windows Explorer?
Actually, if you have a PC, you can directly transfer photos from iPad to USB flash drive using the built-in Windows Explorer. Windows Explorer is the file manager, on Windows PC, allowing users to manage files, folders and network connections, as well as search for files and related components.
Steps:
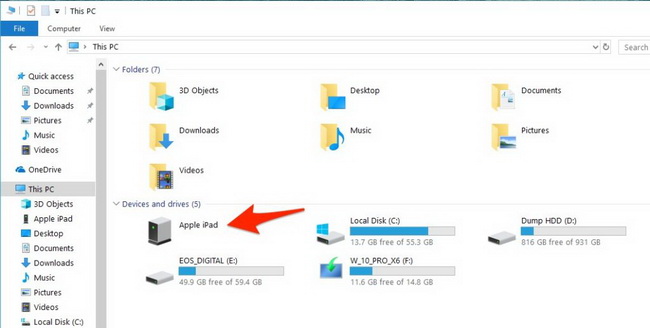
- Plug your iPad and USB flash drive to computer.
- Go to This PC or My Computer, and double-click the iPad icon.
- Go to Internal Storage > DCIM, where you can see all photos in your iPad Camera Roll.
- Copy and paste selected photos from iPad to the folder of USB flash drive.
Part 3: How to Transfer Photos from iPad to USB Flash Drive with iPhoto on Mac?
Although iPhotos app was initially missing features and buggy, crashy, and slow at times, many people preferred to view and take full control of their iOS photos on iPhotos app. In addition, iPhotos also delivers a function to transfer photos between iDevices and Mac with a USB cable. Read the following content to transfer photos from iPad to USB flash drive with iPhoto app on Mac.

Steps:
- Connect iPad and USB flash drive to your Mac computer, and iPhoto may open automatically. If not, open the app manually.
- The iPhoto app will come with an Import screen with all photos and videos on your iPad. If it doesn’t appear, click your device name in the sidebar.
- If asked, unlock your iPad and tap Trust in the pop-up prompt.
- Choose connected USB flash drive as output directory, and click Import All New Items in the top-right corner to transfer.
Part 4: How to Transfer Photos from iPad to USB Flash Drive for iPad?
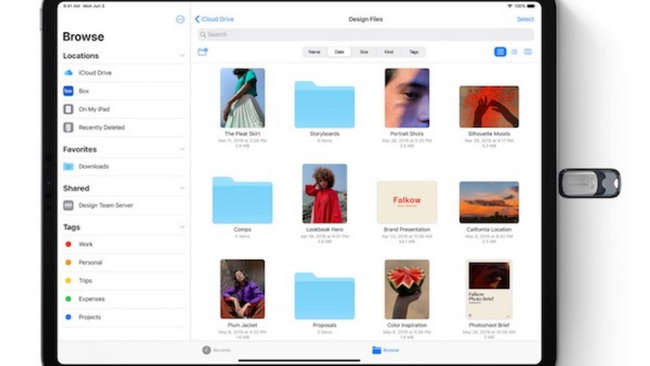
With the growth of Apple devices, there are more and more USB flash drive specially designed for iDevices, including iPhone and iPad. You can find a USB flash drive with a Lightning or USB-C port, or an adapter that can bridge between iPad and USB stick. What you need to do is connect and transfer using the built-in Files app. To learn more detailed steps, read the following.
Steps:
- Directly connect the USB flash drive for iPad or the adapter connected with a USB stick to iPad.
- Launch Photos app on your iPad. Then, long-press to select target photos.
- After selection, tap Share > Save to Files, and choose your USB flash drive as output folder.
Part 5: How to Transfer Photos from iPad to USB Flash Drive Without a USB Cable?
If you happen to not have a USB cable, and don’t want to invest in a USB flash drive for iPad or an adapter, then you can use iCloud to transfer photos from iPad to USB memory stick wirelessly. iCloud is Apple's cloud-based storage that can safely store your music, photos, videos, documents, etc. With iCloud, you can access your information on any device, as long as you have an iCloud account. Read the detailed steps below to transfer photos from iPad to USB flash drive without a USB cable.
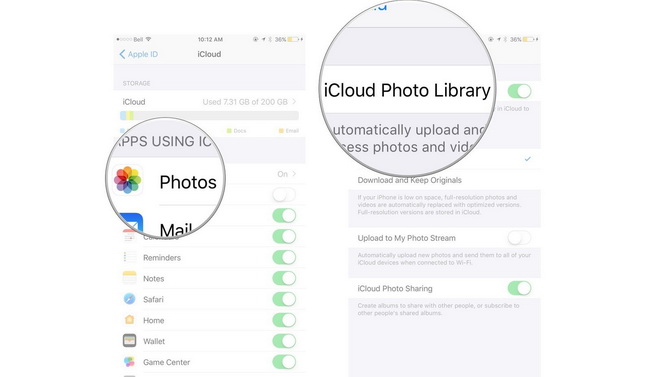
- Step 1: On your iPad, go to Settings > [your name] > iCloud > Photos & Camera.
- Step 2: Toggle on iCloud Photo Library option, and all photos on your iPad will be uploaded to iCloud as long as your iPad connected to Wi-Fi.
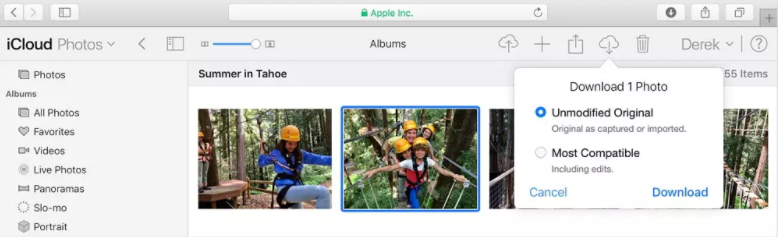
- Step 3: Plug the USB stick to computer, and open iCloud on the browser of your computer.
- Step 4: After login, click Photos on the Home screen, and all photos on your iPad will be shown.
- Step 5: Choose one or more photos you would like to transfer.
- Step 6: Hover over your mouse to the download button in the top-right corner. Then, click Download button in the pop-up window. Set your USB stick as the output directory, and it will start to transfer photos from iPad to USB flash drive immediately.
 Sep. 08, 2021 by


 Prof. Media
 Blu-ray Ripper
 Blu-ray Copy
 iOS Data Recovery
 [12/29/23] MAX Downloader V15.0.0
 10,000,000 people are using Leawo!
 All Transactions are protected!
 30-Day Money Back Guarantee!