
"I want to put an ISO image file onto my USB drive, but have no idea how to do it. Could I just directly copy and paste the ISO image file to my USB? Or need I use some special ISO to USB burner tools?"
USB drives are data storage devices that have flash memory and a universal serial bus (USB) interface, which is a standard interface that is used in most computers and many other electronic devices. It is important to know some of the differences between flash drives and hard drives.
Many people may have the same question. Some people may want to burn ISO to bootable USB while some others only want to copy ISO to USB for storage. Therefore, the situation varies upon different needs. This post would show you how to burn an ISO to USB drive or/and copy ISO to USB flash drive for data storage only, rather than creating ISO to bootable USB flash drive. Hence, you may need to make clear before you decide to continue reading it.
Part 1: Burn ISO to USB Drive with ISO to USB
So, you have an ISO file that you want to burn it onto a USB flash drive or some other USB storage devices. What would you do to burn an ISO to USB or copy this ISO file to USB drive? Actually, burning ISO to USB drive is not difficult at all. You only need to make clear what you want to do – either burn ISO to USB hard drive or copy ISO to USB flash drive. Burning ISO to USB drive is quite similar to burning ISO to DVD disc, while copying ISO to USB flash drive is a little bit different. Firstly, we will show you how to burn ISO to USB drive with ISO to USB copier:
You could directly copy ISO to USB drive to save ISO image files on a USB drive or transfer ISO image file from one computer to another.

Follow the below steps to learn how to directly copy ISO file to USB drive:
- Plug USB flash drive into USB port. Computer would automatically detect it and install USB drive if it’s not installed. Make sure your USB flash drive gets enough space for storing ISO image file.
- Locate source ISO image file, right click it and then select “Send to” option to send it to removable disk.
- Or directly copy source ISO image file and then paste it to USB flash drive.
In this way, you could copy both video and data ISO image files to USB drive freely.
Part 2: Burn ISO to USB Drive with Leawo DVD Creator
If you have some video files and would like to burn video files to ISO image file for storing on USB drive, Leawo DVD Creator would be excellent for you. Leawo DVD Creator is a professional DVD burner software tool that could help you burn videos to DVD disc, folder and/or ISO image file easily. Leawo DVD Creator could help you convert and burn video files more than 180+ formats like MP4 to DVD, MKV to DVD, WMV to DVD, MOV to DVD, YouTube to DVD, etc. It enables you to create ISO image files from videos for storing on DVD disc, computer hard drive or USB drive according to your needs. It also enables you to burn photos into DVD slideshow in disc, folder and/or ISO image file. With tens of disc menu templates pre-installed, Leawo DVD Creator even allows you to select disc menu and design disc menu for output DVD content. What’s more, you could edit video files before burning to DVD content.
Download Leawo DVD Creator and install it on your computer. Follow the below steps to learn how to burn video files to ISO image files for USB drive.

-
Leawo DVD Creator
Create DVD-9/DVD-5 discs playable on various standalone DVD players and computers without region restriction.
Create DVD content in either NTSC or PAL for DVD players for various regions.
Convert and burn videos in 180+ file formats to DVD disc, folder and/or ISO image file.
Edit video files such as adding image/text watermark, trimming video length, cropping video size, adjusting video effect, applying 3D effect, etc.
Select disc menu for output DVD content, or even design disc menu with your own pictures and songs.
Burn photos to DVD photo slideshow with built-in photo slideshow editor.
Note: Leawo DVD Creator has been melted into Leawo Prof. Media as a module.
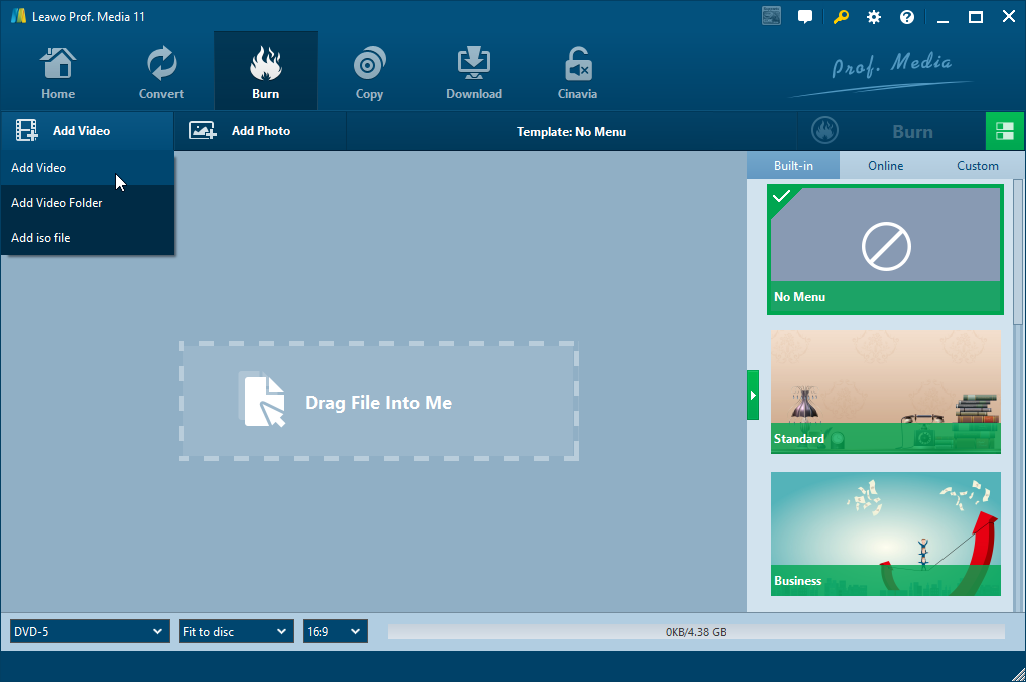
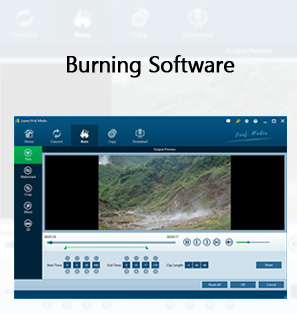
Step 1. Add source video files
Open Leawo Prof. Media and then open the “Burn” module. Add source video file by clicking “Add Video” on the main interface, or direct drag-and-drop.
Note:
- After importing source videos, set the output disc type (DVD-9/DVD-5 according to your needs), bit rate and aspect ratio at the bottom.
- After importing, you could also play back loaded videos, select subtitles and audio tracks, add external subtitles, etc.
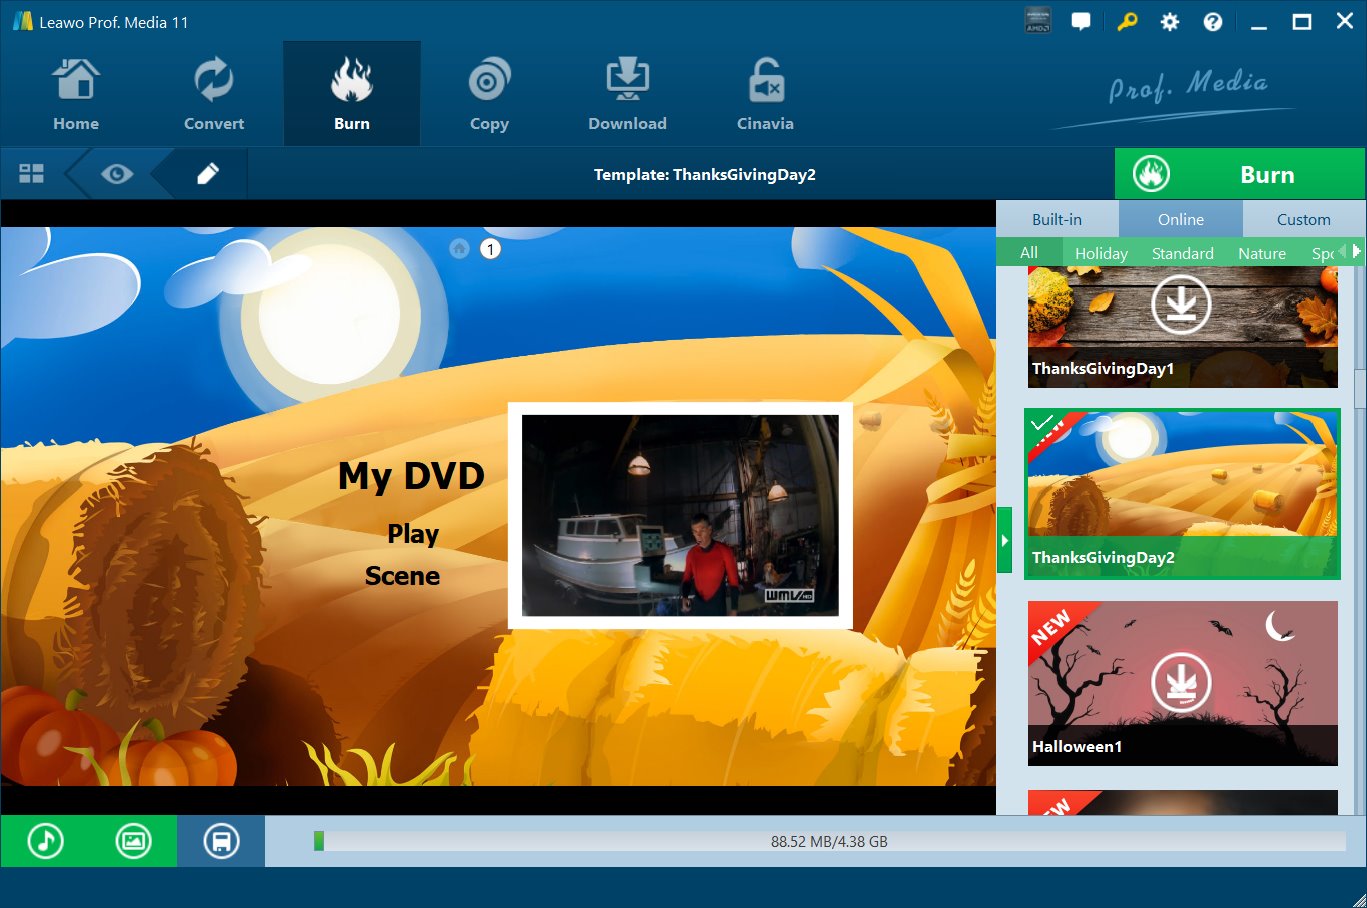
Step 2: Set disc menu (optional)
You could select disc menu from the preset free disc menu options on the right of the main program interface. Also, you could click the middle of the selected disc menu to preview selected disc menu template. If you don’t want to add a menu for output DVD files, you could just click "No Menu" button on the top of the right sidebar.
Note:
- On the disc menu preview panel, you could click the pencil-shaped icon to edit disc menu with personal preferences. You can add background music/image/video, change title position and content, adjust text color, font, size, etc.
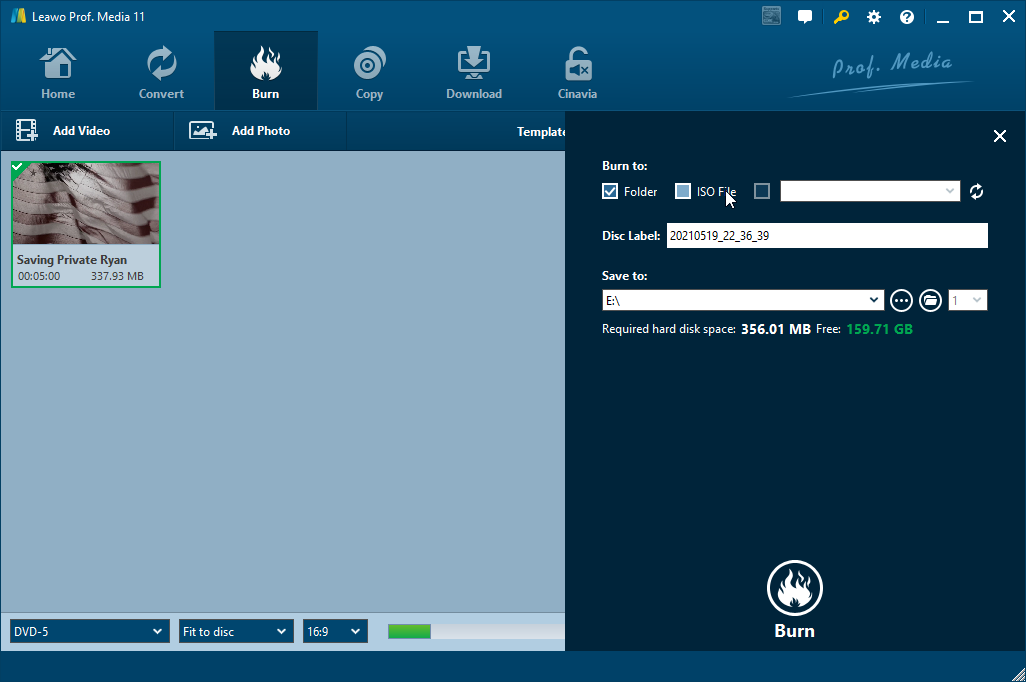
Step 3. Further DVD burning settings
Then, click big green "Burn" button on the main interface to enter the "Burning Setting" panel for more DVD burning settings: Burn to, Disc Label and Save to. To burn video files to ISO image file for USB drive, choose “ISO File” option under the “Burn to”.
Note:
- You could burn videos to DVD folder, DVD ISO image file, and/or DVD disc.
- You could also click the wheel icon on the top-right corner and then choose "Copy&Burn" option to set default DVD video mode from NTSC and PAL.
- To directly burn video files to ISO image file for USB drive, you could insert your USB drive into the computer and then try to choose it as target in the “Save to” box. If it can’t be chosen as target, choose another directory and copy and paste the created ISO file to USB drive after burning.
Step 4. Burn video to ISO file for USB
Hit the "Burn" button on the burning sidebar to start converting and burning videos to ISO image file for USB.
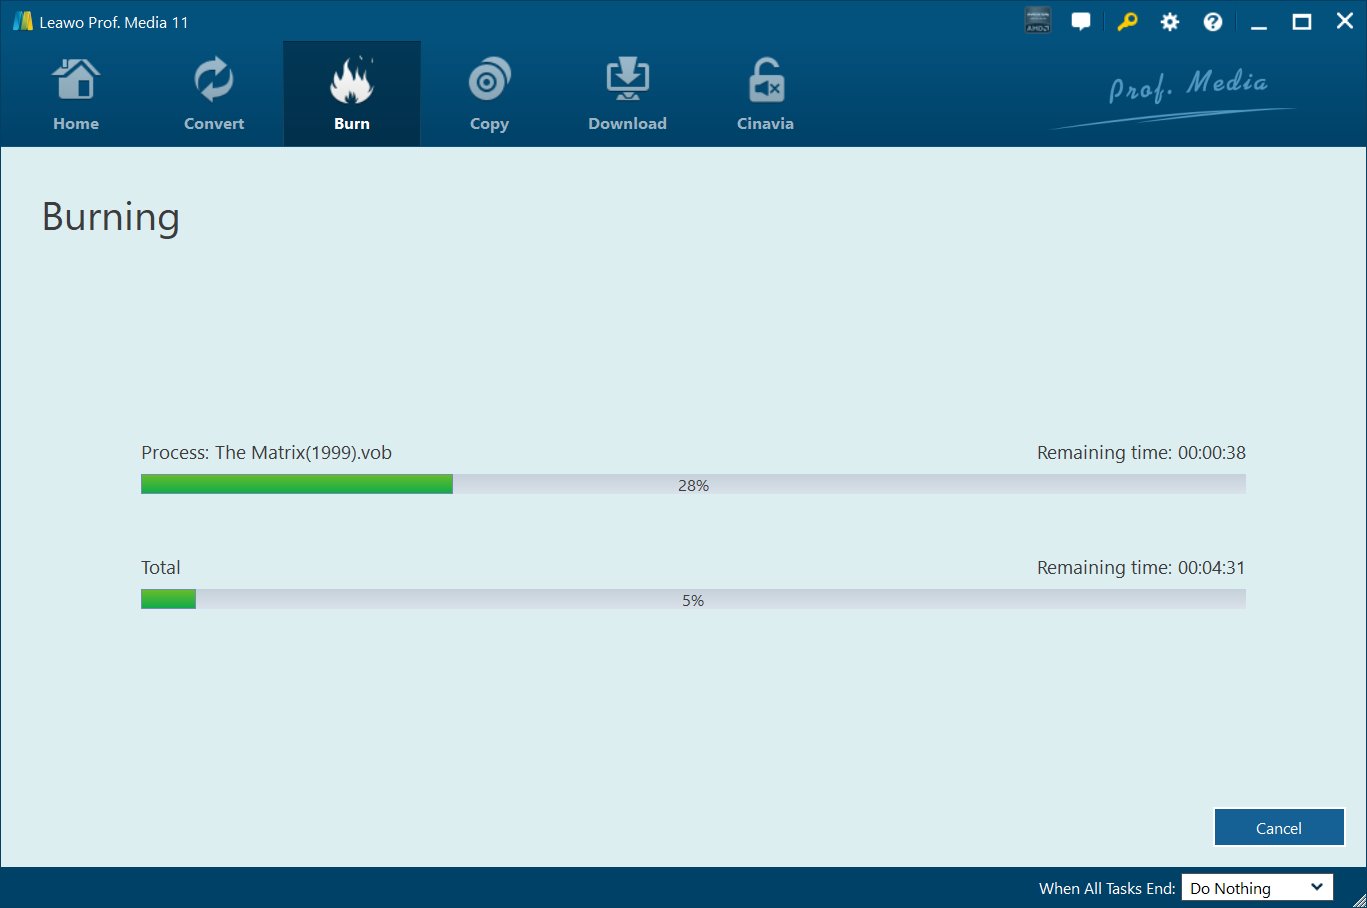
After the burning process completes, copy and paste the burned ISO image file to USB drive. As mentioned above, you could even use Leawo DVD Creator to convert and burn photos to DVD slideshow in disc, folder or ISO image file for storing on USB drive or other places.
Part 3: Burn ISO to USB Drive with Windows USB/DVD Download Tool
If you are going to burn ISO to USB bootable for Windows OS installation, Windows USB/DVD Download tool would be a wonderful choice. When you download Windows from Microsoft Store, you have two options: You can download a collection of compressed files, or you can download an ISO file. An ISO file combines all the Windows installation files into a single uncompressed file.
If you choose to download an ISO file so you can create a bootable file from a DVD or USB drive, copy the Windows ISO file onto your drive and then run the Windows USB/DVD Download Tool. Then simply install Windows onto your computer directly from your USB or DVD drive.
The below steps would show you how to burn ISO files to USB drive with Windows USB/DVD Download Tool:
- Download and install Windows USB/DVD Download Tool on your computer.
- Click the Windows START button, and click WINDOWS USB/DVD DOWNLOAD TOOL in the ALL PROGRAMS list to open the Windows USB/DVD Download Tool.
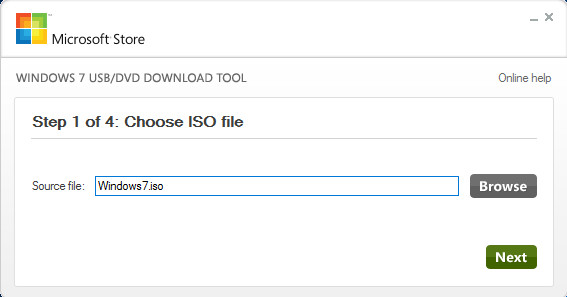
- In the SOURCE FILE box, type the name and path of your Windows ISO file, or click BROWSE and select the file from the OPEN dialog box. Click NEXT.
- Select USB DEVICE to create a copy on a USB flash drive or select DVD disk to create a copy on a DVD disk.
- If you are copying the file to a USB flash drive, select your USB device in the drop-down list and click BEGIN COPYING. If you are copying the file up to a DVD, click BEGIN BURNING.
When your Windows ISO file is copied to your drive, install Windows by moving to the root folder of your DVD or USB drive, and then double-click Setup.exe.
Part 4: Burn ISO to USB Drive with UltraISO
UltraISO is most commonly used for authoring CDs and DVDs, but it also provides some tools for USB discs, and is capable of creating a bootable Windows 7 disc from a regular flash drive unit. This is a very convenient way of carrying a Windows installation disc around with you in case of emergency.
The below steps would show you how burn ISO file to USB drive with UltraISO in detail:
- Download and install UltraISO on your computer. Get source ISO file ready.
- Run UltraISO trial version with admin rights. If you are prompted with “Register Now” screen, click “Continue to Try...” button to use the trial version.
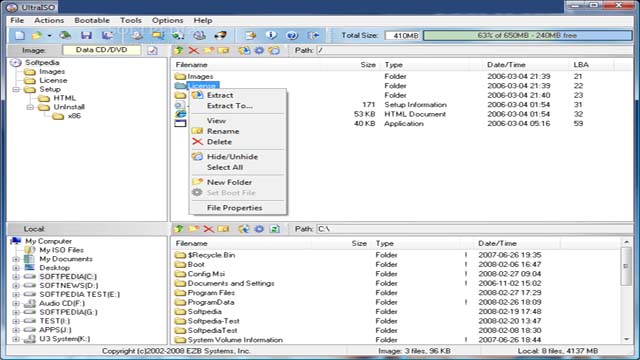
- In the home screen, click “File > Open” option to browse to your Windows 7 or Windows 8 ISO file you have downloaded.
- Next, in the home screen of UltraISO, click on “Bootable” menu and then click ”Write Disk Image” option to launch Write Disk Image dialog box.
- In the Write Disk Image dialog, select the Disk Drive as your USB flash drive, select the write method as USB-HDD before hitting the Format button. It will then launch Format Removable Disk dialog, where you need to simply click “Start” button to begin formatting the flash drive. Please backup all data from the USB device before hitting the ”Format” button.
- Once the format in done, click “Write” button and then click “Yes” for the warning prompt to start the process. When the writing is finished, you will see Burn Successful message event list.
Close UltraISO software and connect your USB to a machine to start installing Windows.
Part 5: Conclusion
If you want to burn video files to ISO image file for storing on USB drive, choose Leawo DVD Creator or directly copy and paste video files to USB drive. If you want to create bootable system ISO image file, try Windows USB/DVD Download Tool or UltraISO.
 Sep. 13, 2021 by


 Prof. Media
 Blu-ray Ripper
 Blu-ray Copy
 iOS Data Recovery
 [12/29/23] MAX Downloader V15.0.0
 10,000,000 people are using Leawo!
 All Transactions are protected!
 30-Day Money Back Guarantee!