If you don’t want your photo to be seen by someone, you can delete it on your iPad. But it still appears on your iPad next month. Trash on iPad is similar to “Recycle Bin” on Windows computer. Trash is a medium which is used to store the deleted files for the time being, it is the same as the Photos app, the files can be kept within 30 days. After that, they will be removed permanently. Regardless the files can be kept at least 30 days or longer, storing the files that you have decided to delete on your device would probably cause harm to your device. So, you will learn some tips on how to empty trash on iPad in this article.
Part 1: Where is Trash on iPad?
Have you tried to do something on your iPad? For example, you want to drag some files that you want to delete to “Recycle Bin”, or you want to recover some files that you have deleted and then look for the trash icon to get the deleted files back, which is similar to what you want to do on your laptop. However, it actually was not there. Maybe you thought that something has been missed by you. You may want to look for some methods to display the trash icon. Where on earth you can find the trash bin on your iPad? Frankly speaking, no trash bin can be found on the iPad. But, it doesn’t mean that your files cannot be deleted.
When you tap on each photo, a trash icon can be seen on the right corner bottom. Hit on the trash icon, two options are offered, that is “Delete Photo” or “Cancel”. You may usually think that you can recover what you have accidentally deleted on the trash icon. But you have to face the truth that no trash icon is existing on your iPad. It doesn’t like removing files or apps on the Windows computer, just go through dragging and dropping what you want to remove to Recycle Bin, then the deletion will be completed. You are not allowed to perform the operation like this on iPad. No one knows why there is no trash bin on iPad, maybe it is unnecessary.
Part 2: Empty Photos Trash on iPad 2/Air
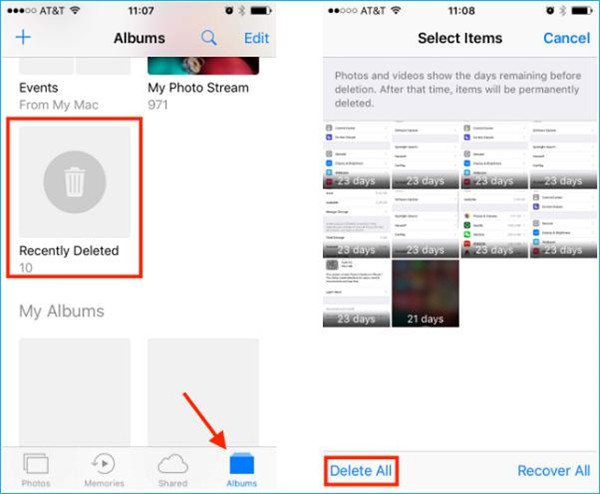
There are a large number of photos on your iPad, you can go through the trash folder called “Recently deleted photos” from Photo app on the iPad. You can imagine how much space has been taken up on your iPad by the deleted photos. Therefore, learning how to empty Photos on iPad is essential to release more space for your iPad. You can follow the simple steps as below.
1. Launch your photos app on iPad.
2. Open the albums list by tapping on Albums menu, then hit on the option “Recently Deleted”.
3. You will see the button “Delete All”, then tap on this button to make the photos trash empty on your iPad.
Part 3: Empty Notes Trash on iPad 2/Air
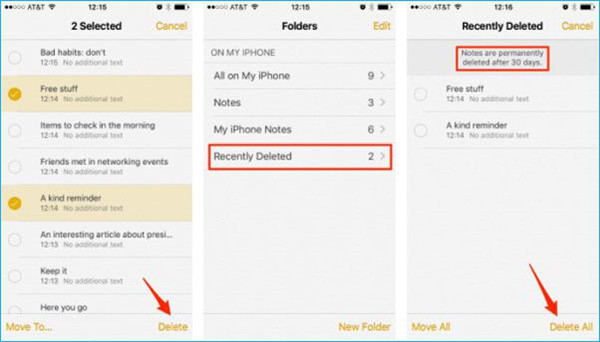
1. Run Notes app on your iPad. If the Notes app does not show up in the screen of Folders, tap on the button Back arrow on the top left corner on the screen till you can see it.
2. Tap on the option “Recently Deleted” and then tap on the option “Edit” on the top right corner.
3. Tap on the button “Delete All” on the right bottom corner, then tap on “Delete All” one more time in the pop-up dialog to get rid of notes from iPad memory.
Part 4: Empty Mail Trash on iPad 2/Air
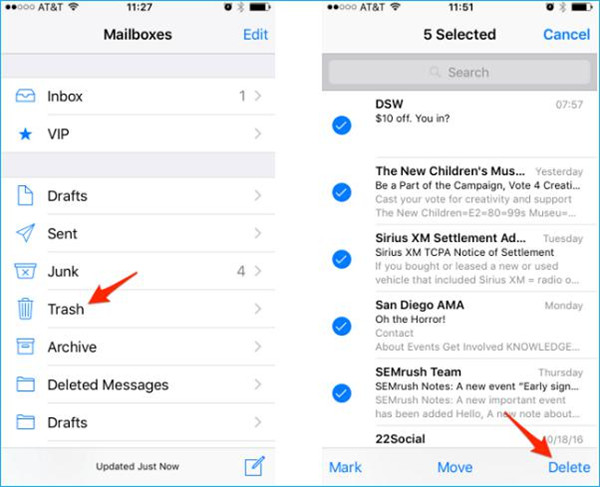
1. Open Mail app on your iPad. Choose the email account that you would like to make the mail trash empty.
2. Tap on “Mailboxes” on the top left corner, then tap on the option “Trash > Edit”.
3. Tap on the option “Delete All” on the right corner bottom and then confirm the option “Delete All”.
Part 5: Empty Whole Trash on iPad 2/Air through Erasing Device
Erasing all content on iPad is a great solution to empty whole iPad trash. The following tutorial will guide you on how to empty trash on iPad completely.
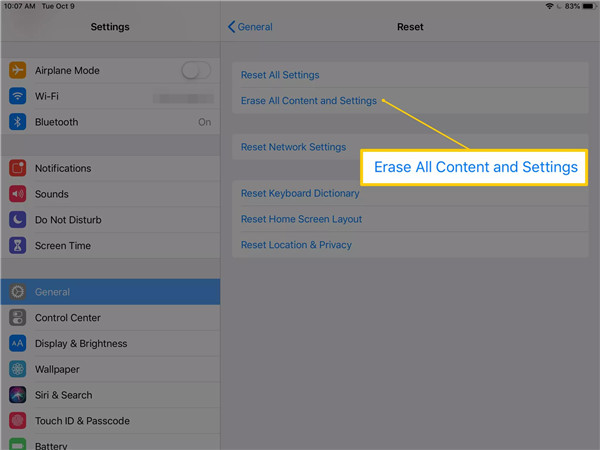
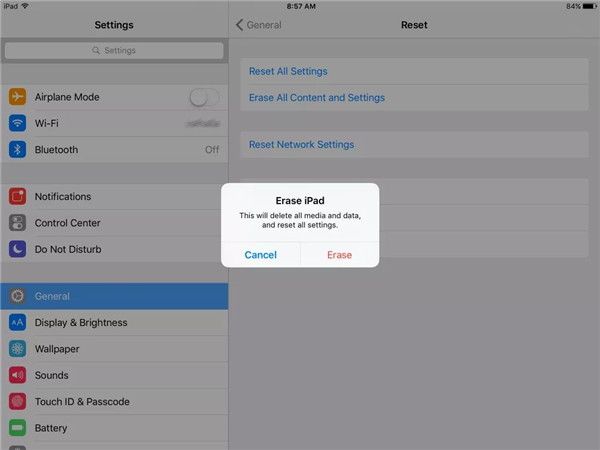
1. Run Setting app on your iPad, this app icon looks like a turning gear.
2. Tap on General on the left column of the screen.
3. Scroll down to the bottom of screen and then tap on Reset.
4. You will see several available options of resetting for your selection. Then choose the option Erase All Content and Settings, which is able to make all the data erased from your iPad including your iTunes account.
5. Then a dialog pops up and requires you to have a confirmation on your selection one more time. This operation will make your iPad recover to factory default. Once you have confirmed your selection, the data erasing process will begin on your iPad. After the erasing process is finished, all data on your iPad will be erased and your iPad will return to factory default, that means all trash on your iPad will be emptied completely.
Extra: How to Recover Accidentally Deleted Trashed Items on iPad 2/Air
To recover the accidentally deleted trash items on iPad 2/Air, you should ensure that the data on your iPad has been synced with iTunes prior to deleting the trashed items by accident.
You can follow the instructions to recover accidentally deleted trashed items step by step as below.
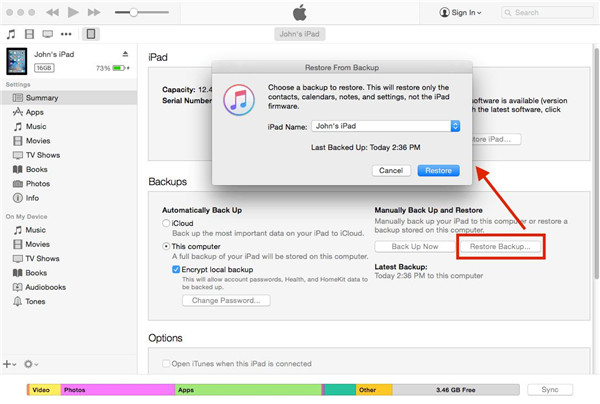
1. Associate your iPad with your computer. Launch iTunes on your computer and choose the device icon of your iPad on the upper left of iTunes window.
2. Choose the tab “Summary” in the left sidebar of the window, then a section named “Backups” can be seen from this tab. Hit on the option “Restore Backup” below the option Backups.
3. A dialog will pop up and requires you to select a backup for restoring. Choose the proper one and then click on the button “Restore”. If the option “Encrypt local backup” has been enabled, a password will be required to enter to go ahead.
4. Finally, press on the button “Done”, and then the accidentally deleted items will be restored immediately.
There is also another great solution to help you to recover accidentally deleted trashed items on iPad 2/Air, that is to use Leawo iOS data recovery.
Leawo iOS Data Recovery is a professional and powerful data recovery software which is applicable to iOS devices like iPhone, iPad and iPod. No matter what model of your iOS devices you own, this software is available to all kinds of iOS devices. More than 14 kinds of data like messages can be recovered by Leawo iOS data recovery in a simple way. This software not only is data recovery tool for iOS devices, but also it acts as a backup tool for the data on iOS devices as well. With the help of Leawo iOS data recovery, the accidentally deleted trash items can be recovered from iPad effectively and easily. No matter what reasons have caused the deleted data, the data can be recovered with 100% safety, accuracy and speediness. Additionally, you are allowed to preview and choose the data you want for recovering. Here we will teach you how to recover accidentally deleted trash items on iPad in specific steps as below.
There are two modes for your selection to recover from iOS device in a direct way. One is Normal mode, the other is DFU mode. However, DFU mode is only available for iPhone 4 and iPod touch 4, while Normal mode is applicable to all iOS devices. Therefore, here we will guide you on how to recover the deleted items on iPad in Normal Mode.

iOS Data Recovery
☉ Extract and export 14 types of files from previous iTunes&iCloud backup
☉ Back up 14 kinds of data on iOS devices to computer
☉ Recover data lost due to jailbreak, iOS upgrade, deletion, etc.
☉ Support iPhone SE/6/7/8/X, iOS 12, iTunes 12.9 & Win10
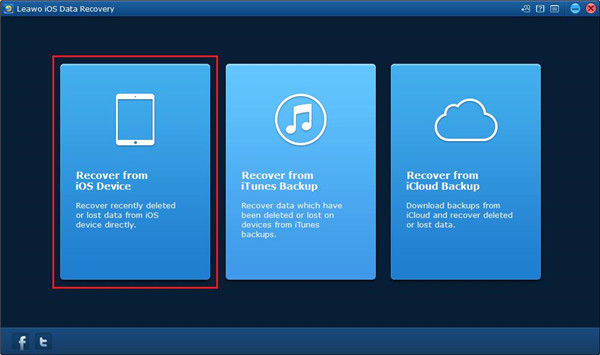
1. Launch Leawo iOS data recovery on your computer and then connect your iPad to the computer via USB cable. Then choose the first tab from the main interface of the software.
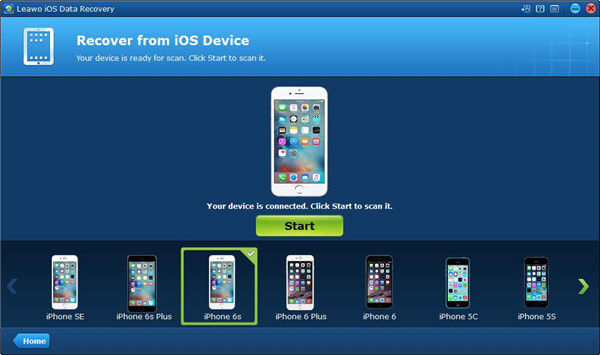
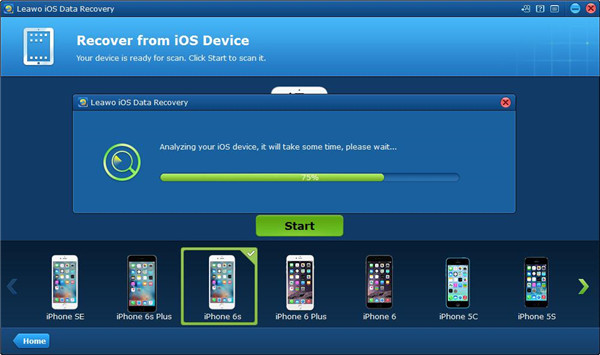
2. Choose your iPad device from the bottom device list. Then click on the button “Start” to begin scanning your iPad.
3. The scanning process will be completed in a few seconds.
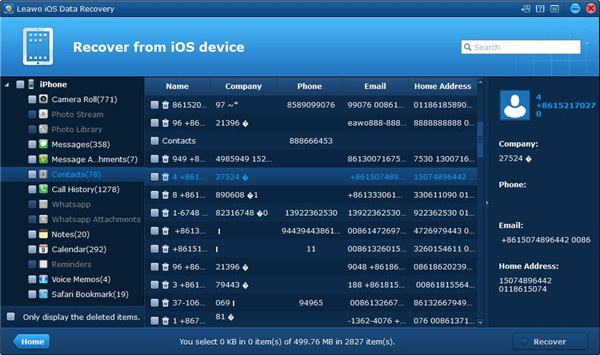
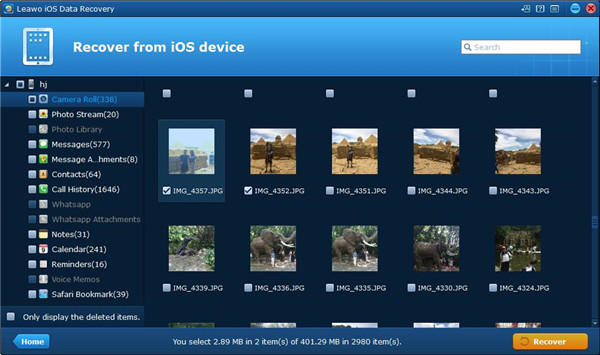
4. Once the scanning process has been completed, a list of all data from your iPad can be seen on the left sidebar of the window. You can check the option Only display the deleted items to view what you have deleted only. Then all the recoverable items will be displayed on the left column and the related specific data will be shown on the right part.
5. Choose the items that you would like to recover and then click on the button “Recover” on the right bottom corner.
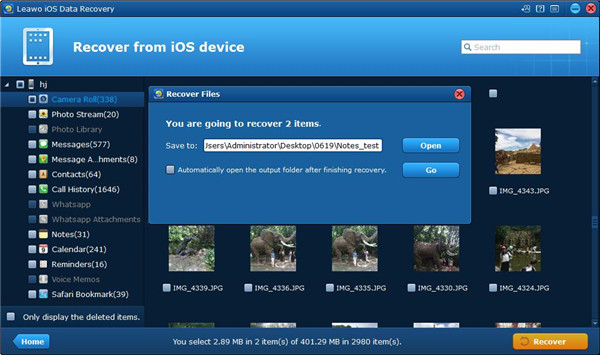
6. A dialog will pop up and requires you to choose a target folder to save the recovered items. Click on the button “Open” to select the output directory for the recovered files, also you can check the option “Automatically open the output folder after finishing recover” beneath the “Save to” option. Then click on the button “Go” to begin recovering the deleted trash items to your computer.

