"Hi, I've got a bunch of songs purchased on iTunes that I'd like to upload to OneDrive. But I checked and was told that I can't because of the DRM protection on them. What am I supposed to do to remove the DRM protection from those songs and upload them to OneDrive?"
OneDrive is Microsoft's file hosting service. It's part of the company's Office Offline services. You can use it to store different files and personal data. All the data stored on OneDrive can be accessed on PC or mobile handsets. It's a convenient tool to make backups of personal data and share data with other people.
DRM protection is used to prevent users from copying and spreading intellectual properties freely. And every song you purchased and downloaded from iTunes has DRM protection on it. You won't be able to copy those songs you downloaded ther handsets other than Apple's products. With that being said, even if you move iTunes music library to OneDrive, you won't be able to play them on other devices. If it's simply for backing them up, then it's okay. But if it's for playing the songs on other devices, then you are going to have to remove the DRM protection from them first. If you want to remove DRM from those iTunes music and transfer music from iTunes to OneDrive, try using a DRM removal program. After removing the DRM protection from your music, you would be able to upload them to OneDrive and access them with any mobile handsets you like.
Part 1: Brief Introduction to OneDrive
As mentioned above, OneDrive is Microsoft's file hosting service. Actually, OneDrive is a free, secure, online storage space for you to save and store data like photos, videos, business documents, music, etc. As an online data storage cloud service, OneDrive allows you to access to the saved or stored data from different devices like Windows PC, Mac computer, Android devices, tablets, etc. by logging in the same OneDrive account over the Internet. All you need is a compatible web browser or the OneDrive app, a personal OneDrive storage area, and a Microsoft Account. And all of these are free.
OneDrive is available for almost all devices and mobile gadgets like Windows PC, Mac computer, Kindle Fire and Kindle Phone, Android tablets, computers, and phones, iOS devices, etc. There have been OneDrive apps for different platforms. Even though you don't want to download and install the OneDrive app, you could still access to OneDrive via your device browser online.
Part 2: How to Remove DRM from iTunes Music With the Best iTunes Music DRM Removal Tool
As mentioned above, DRM protection has prevented your from adding iTunes music to OneDrive directly. To add iTunes music to OneDrive, you need to firstly remove the iTunes DRM protection and convert DRM iTunes music to non-DRM music with 3rd-party iTunes DRM music converter.
Leawo Prof. DRM is an all-in-one iTunes/Audible DRM removal tool and iTunes/Audible media content converter. It's developed to remove DRM protection from iTunes media contents including videos, music and audiobooks and Audible audiobooks. It can remove DRM from the music you downloaded from the iTunes Store and convert your music to ordinary MP3 audio files. After the conversion, you can start to upload them to OneDrive for free access on other mobile handsets. To more iTunes music library to OneDrive, Leawo Prof. DRM is necessary.
Here's how to remove DRM protection from iTunes music files using Leawo Prof. DRM for uploading to OneDrive.
Step 1. Add music files to Leawo Prof. DRM
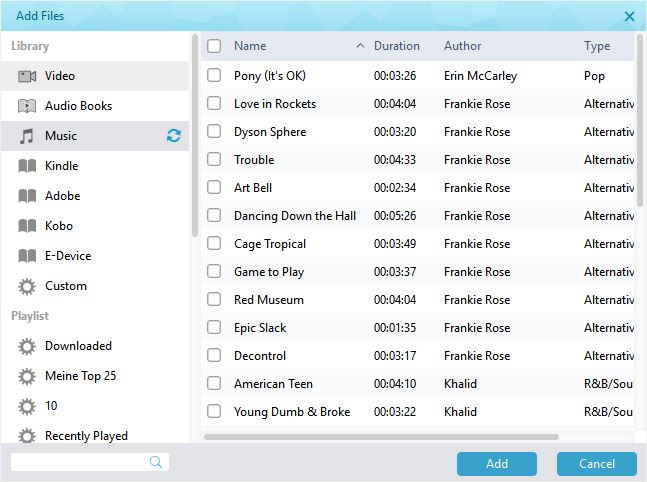
Launch Leawo Prof. DRM on your computer and then click Add Files. On the following window, you can see Video, Audio Books and Music under the Library tag on the top left corner. Click on Music and you will see all the songs in your iTunes music library. Selct those songs you want to upload to OneDrive and then click the Add button to import them to the program.
Step 2. Edit the parameters of your songs
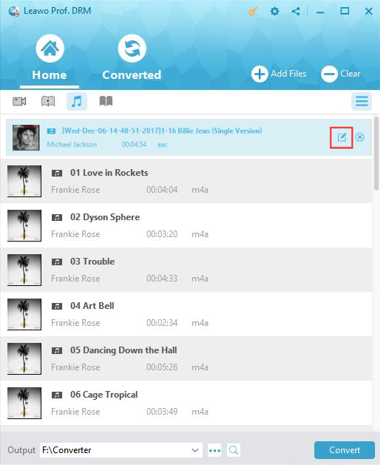
Before the DRM removal and conversion process starts, you are allowed to make changes to the parameters of the output audio file. There are several parameters you can tweak. Just click the Edit button to the right of the title of every song. The parameters that are available for adjustments include: Channels, Sampling Rates and Bit Rates.
Step 3. Set output path for your music files
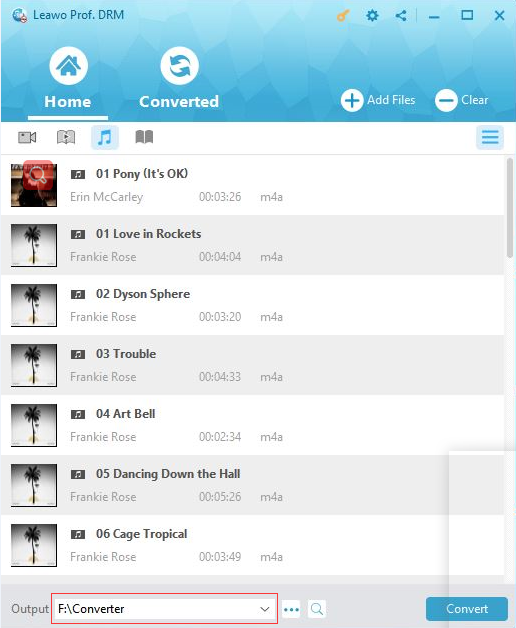
Another thing to do before starting the DRM removal process is to set the output directory for your music file. The default output directory is shown at the bottom left-hand corner of the interface. You can change it by clicking the "…" button to the right of the output directory box.
Step 4. Start the DRM removal and conversion process
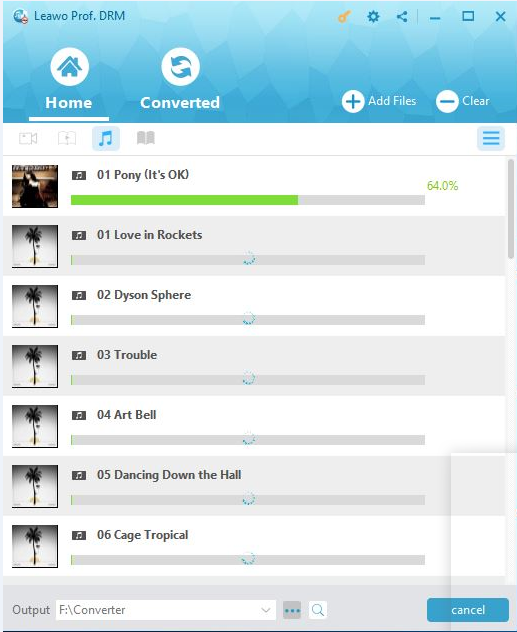
After getting all the things ready, you can start the DRM removal and conversion process. Just click on that Convert button that sits in the bottom right corner of the interface to start the conversion. And the conversion progress will be shown on the interface.
After the conversion is done, you can start to transfer music from iTunes to OneDrive.
Actually, Leawo Prof. DRM is a comprehensive DRM removal and converter program that could perform as far more than a single iTunes DRM music converter to convert iTunes DRM music to DRM-free MP3 audio files. It could remove DRM protection and convert iTunes DRM M4V video to DRM-free MP4 video, convert iTunes/Audible DRM audiobooks to DRM-free MP3 file, convert eBooks from Kindle, Kobo and Adobe Digital Edition, and download Spotify music freely. More things could be done with Leawo Prof. DRM.
Part 3: How to Add iTunes Music to OneDrive via Leawo Music Recorder
Prof. DRM is not the only solution for removing DRM protection from iTunes music and converting iTunes DRM music to DRM-free MP3 audio files for OneDrive. Leawo Music Recorder, an easy-to-use audio recorder that could record any computer and built-in audio and then save into MP3 or WAV files, is another effective solution that could bypass the DRM protection and turn iTunes DRM M4P music to DRM-free MP3/WAV files. The more competitive thing is that Music Recorder could even automatically download and add music tags like artist, album, cover, etc. This makes music management easier.
Install Leawo Music Recorder on your computer. than follow the below steps to learn how to convert iTunes DRM M4P music to DRM-free MP3/WAV files for adding to OneDrive for storing.
Step 1: Set audio source
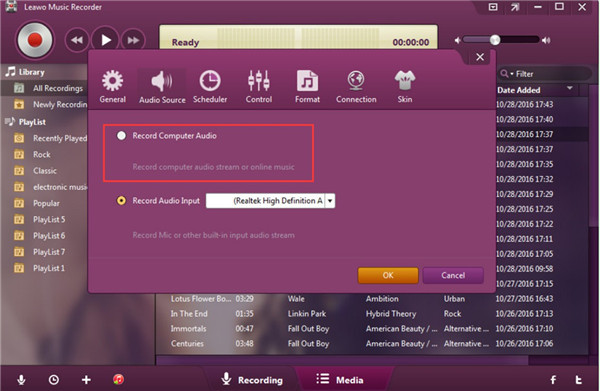
Click the microphone icon on the main interface. Choose "Record Computer Audio" option under the “Audio Source” tab.
Step 2: Set output directory
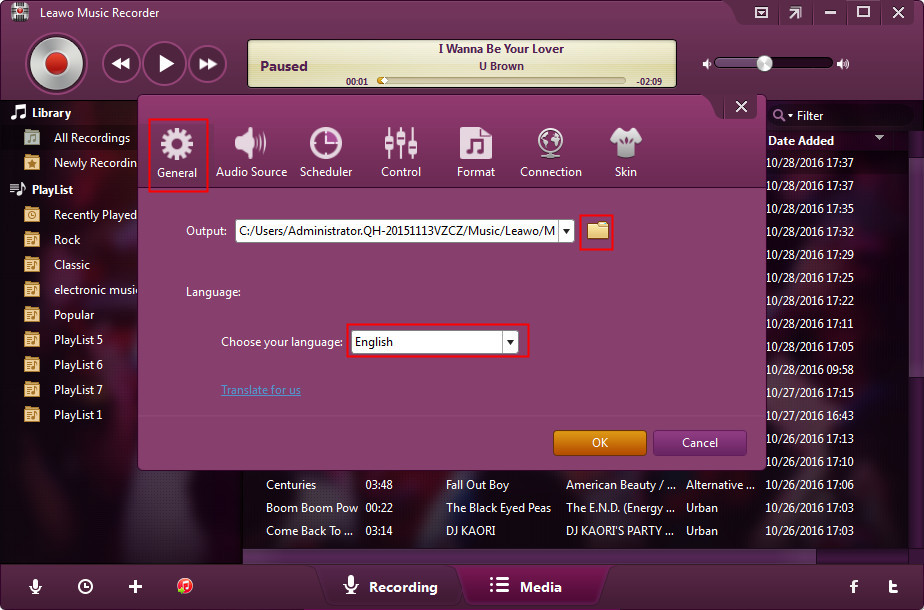
On the "General" tab, open the "Output" box to set an output directory. Set program UI language here if you need.
Step 3: Set output format
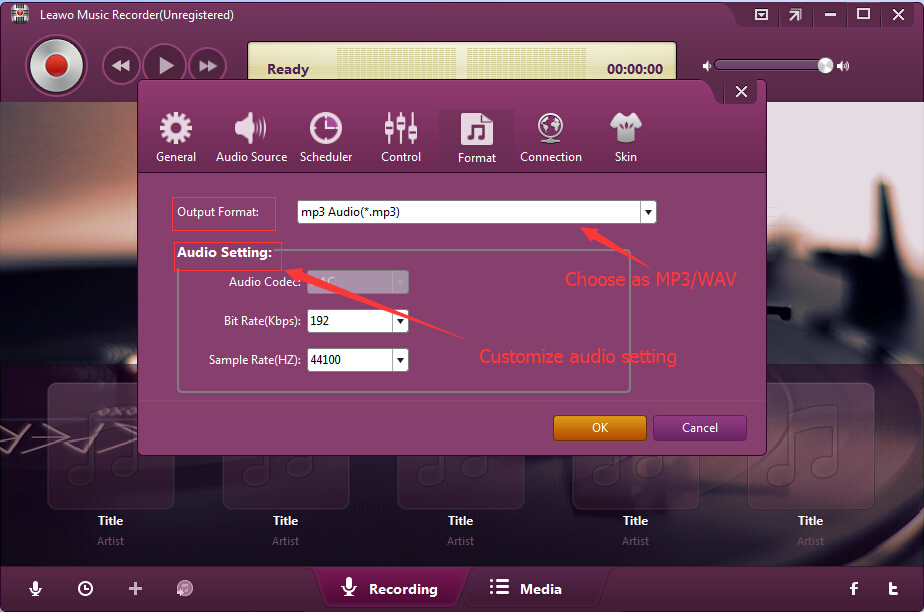
Thirdly, open the "Format" tab to choose output format from MP3 audio and WAV audio. Choose either one as you like. If you need, you could adjust audio bit rate and sample rate of output recording file as well.
Step 4: Start to convert iTunes M4P music
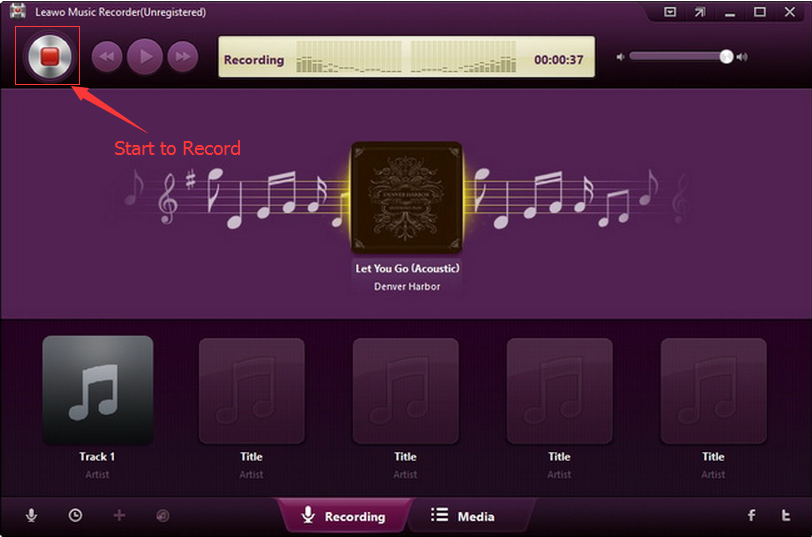
After above settings, click the red "Start" button. Then play back iTunes music to let this audio recorder software to start recording iTunes music to DRM-free MP3/WAV files. Click the red button to stop recording when it's needed.
Note: It's important to press the red record button before you play back iTunes music for recording completeness.
As introduced above, Leawo Music Recorder would automatically download and add music tags to complete music, including artist, album, genre, cover, etc. However, the built-in music tag editor would let you edit these tags manually. You could right click recorded file on the “Media” tab and then choose “Edit Music Tags” option to do this.
After recording, your iTunes music files have been turned to DRM-free MP3/WAV audio files. You could now add the converted iTunes music files to OneDrive. Actually, Leawo Music Recorder could also help you record and download online songs with ease. If you are using a Mac computer, you could turn to Leawo Music Recorder for Mac.
Part 4: How to Add iTunes Music to OneDrive
Now that you've had your iTunes Music converted into MP3, you can now start to upload them to OneDrive. If you've never done this before, here's one way to transfer music from iTunes to OneDrive.
OneDrive's got it's own website, which means you don't have to install the OneDrive program on your computer if you don't want to. Just go with the OneDrive website. Here's how to upload the converted MP3 files to OneDrive through the service's website.
1. Open OneDrive Website with your browser, and then click the Sign In button and sign in with your Microsoft account.
2. After signing in, click the Upload button and then select the converted iTunes music to upload to OneDrive.
That's how you can move iTunes music library to OneDrive, it's easy. You can also use OneDrive to backup iTunes music. It'll just take a few steps for you to backup iTunes music to OneDrive.

