If you want to free up the iOS space, you can save photos to iCloud Drive for backup. This is easy to handle on your iDevices. You can take advantage of the settings to help you make it. If your computer also have stored lots of photos, you can also import them to your iCloud Drive for backup. However, when you do not have enough storage on your iCloud Drive to save more pictures, you can also export to your computer from iDevices to manage them as you like. All these situations are not tough to handle after you read this tutorial. Now let’s begin the guidance to see how to upload photos to iCloud Drive and how to transfer photos to computer.
Part 1: How to Save Photos to iCloud Drive on iPhone, iPad and iPod
If your iDevice has no space to store new things, you can free up the space by exporting the photos to your iCloud Drive. iCloud Drive is absolutely a great cloud service for iOS users to back up various kinds of files and data, such as songs, photos, videos and so on. If you do not know how to save photos to iCloud Drive, congratulations, you can refer to this method to help you to make it. Here I would like to take iPhone for instance. First you need to download and install the iCloud Drive app on your iPhone to start to solve how to move photos to iCloud Drive.
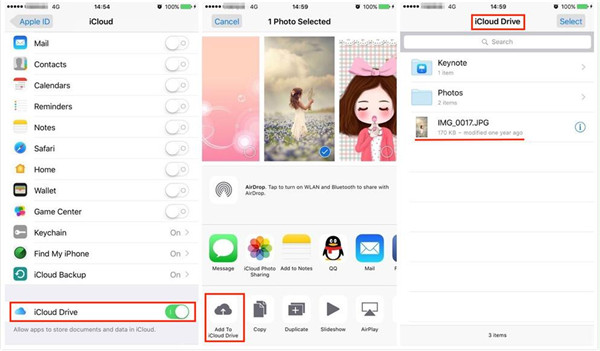
1. Navigate to “Settings > Apple ID > iCloud” and then click the “iCloud Drive” panel to enable it.
2. Tap on the photos on your iPhone and choose one photo you like to upload to iCloud Drive. Then you need to click on the button at the lower left corner of the interface and click on the option of “Add to iCloud Drive”.
3. Launch your iCloud Drive application on your iDevice and you will see the selected photos on iCloud Drive.
Although this method is simple, you only can save photos to iCloud Drive from iDevices one by one. If you want to know how to add photos to iCloud Drive on your computer, you can look at the second part of this tutorial.
Part 2: How to Upload Photos to iCloud Drive on Computer
If there are some photos that you want to upload to iCloud Drive for backup on your computer, you can refer to this solution to direct you to solve how to upload photos to iCloud Drive on computer easily. The detailed steps will be stated in the following passages to tell you how to move photos to iCloud Drive.
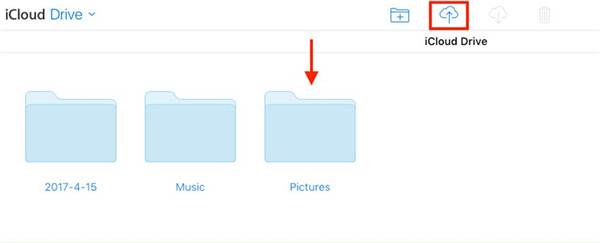
1. On your computer, open iCloud.com on a web browser and log into it with your Apple ID and password.
2. Then you need to tap “iCloud Drive”. Find the cloud-like button with an upward arrow on it and click on it.
3. Then you can choose the photos on your computer that you would like to add to iCloud Drive.
4. Finally, you need to click on the “Open” button to start uploading pictures on computer to iCloud Drive. Thus the issue of how to add photos to iCloud Drive can be solved simply. You can use the photos on iCloud Drive at any time as you like.
You can solve how to upload photos to iCloud Drive simply with iCloud.com. In order to manage the photos much better, you can either upload these photos to a folder after the procedure of adding pictures. You can also select a folder like “Photos” or add a new folder at first before you continuing to save photos on iCloud Drive.
Part 3: How to Transfer Photos to Computer with iTransfer
As we all know, iCloud Drive has storage limitation. Therefore, if you want to buy the iCloud Drive to store photos, you can upload photos from your iDevices to computer for backup as well. The computer space is large and you can also edit photos or delete the unwanted pictures. To save photos on computer would help prevent from insufficient iCloud Drive storage. You can use Leawo iTransfer to help you to upload photos to computer rather than save photos to iCloud Drive. This tool has many powerful functions on solving how to upload photos to iCloud Drive. You can continue to read the following contents to see how to make it with iTransfer. Here I would like to take iPad for instance.

Leawo iTransfer
☉ Transfer files among iOS devices, iTunes and PCs with ease.
☉ Transfer up to 14 kinds of data and files without iTunes.
☉ Support the latest iOS devices like iPhone 7, iPhone 7 Plus, etc.
☉ Play back, view, and delete data and files on iOS devices.
1. Connect iPad to Computer
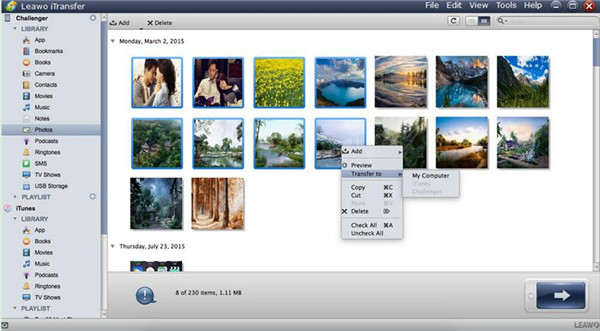
Launch Leawo iTransfer on your PC and then plug your iPad into PC with suitable USB cable. Wait until your iPad libraries are shown in the left sidebar to begin the process to solve how to add photos to iCloud Drive.
2. Select Photos to Transfer
Navigate to the iPad icon and click on “Photos” under the menu of “LIBRARY”. Your iPad photos will display in the right part of the interface for you to view and manage. Then you need to select photos that you need to transfer to your computer. Right click on one picture and then choose “Transfer to > My Computer”. In the dialog that pops up, you need to click on “Change” to set the output folder on your computer to save the exported pictures. Finally, you can click on the “Transfer Now” button to transfer photos to your computer from your iPad. The transfer process will take a few minutes, and then the iPad photos will be available on your PC.
Rather than put photos on iCloud Drive, you can use this powerful tool to transfer photos to computer. iTransfer can help you to manage up to 12 types of files on computers, iTunes and iDevices. It can solve different kinds of transfer problems accurately and professionally. If you want to have a try, now you can download and install this great program on your computer. As for how to move photos to iCloud Drive, you can refer to the first solutions in this guidance.


