Voice recording is pretty helpful when you want to review content of the meetings, courses or your own thoughts. It’s quite fast and simple to record anything important to an audio file. Some of you may wonder how to record voice on Mac, and some want to find a voice recorder on Mac which works better than Quick Time Player. So here’s an introduction to voice recording on a Mac and the best voice recorder for Mac.
Part 1: Record Voice on Mac with Leawo Music Recorder for Mac
Leawo Music Recorder for Mac is a fast and convenient Mac voice recorder which records any built-in input audio, computer audio, and online music source. It has a user friendly interface and it is especially suitable for daily use. This voice recorder Mac updates the audio tags automatically. You can also edit the music tags for those audio files manually. This function manages your recording library orderly and neat. Leawo Music Voice Recorder Mac can be the best voice recorder for Mac to the majority users. Let’s check how to record your voice on a Mac.
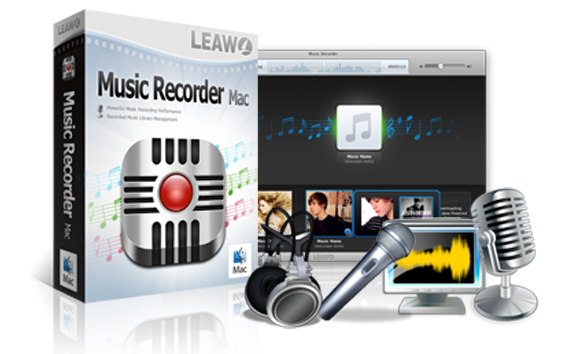
Leawo Music Recorder for Mac
☉ Record from 1000+ music sites like YouTube, Facebook, etc.
☉ Schedule music recording via recording task scheduler.
☉ Automatically/manually add tags: artist, album, etc.
☉ Save recordings to M4A, WAV or MP3 format.
Step 1: Settings before Recording
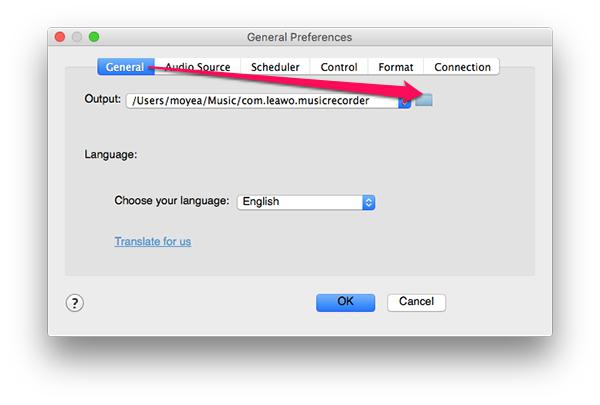
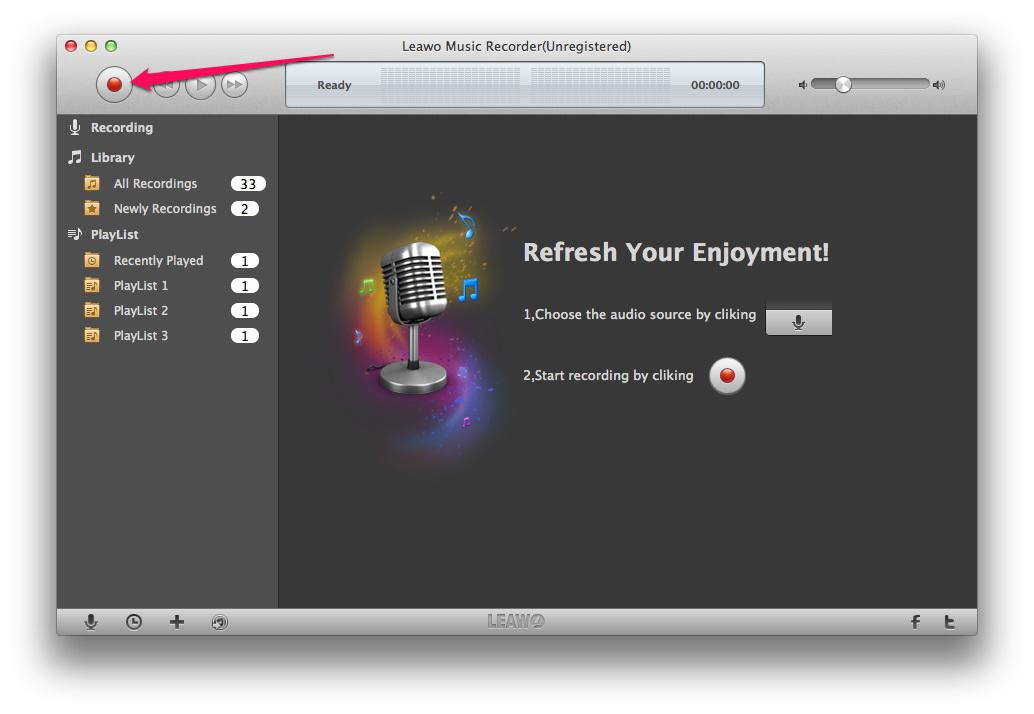
First, run the Leawo Music Voice Recorder Mac, click on the microphone icon on the left-hand corner and do some basic setup. Click on “General” and choose a folder as output location.
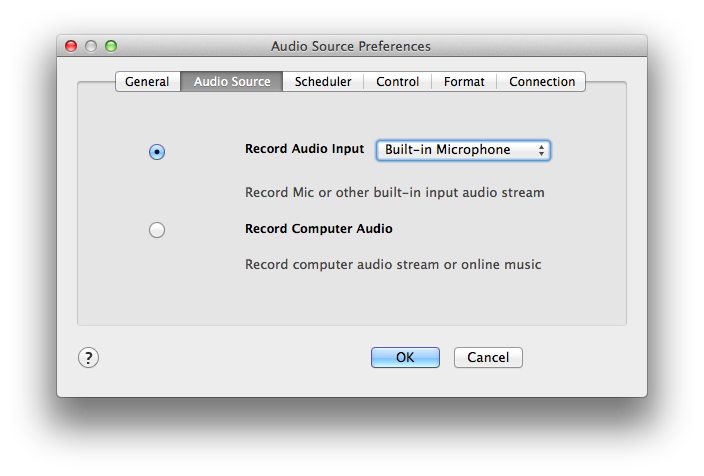
Second, click the “Audio Source” icon on the main interface and choose the audio input you need. “Record Computer Audio” mode records the sound from PC sound card. You can also choose “Build-in Input” and select the built-in or external microphone as your input device.
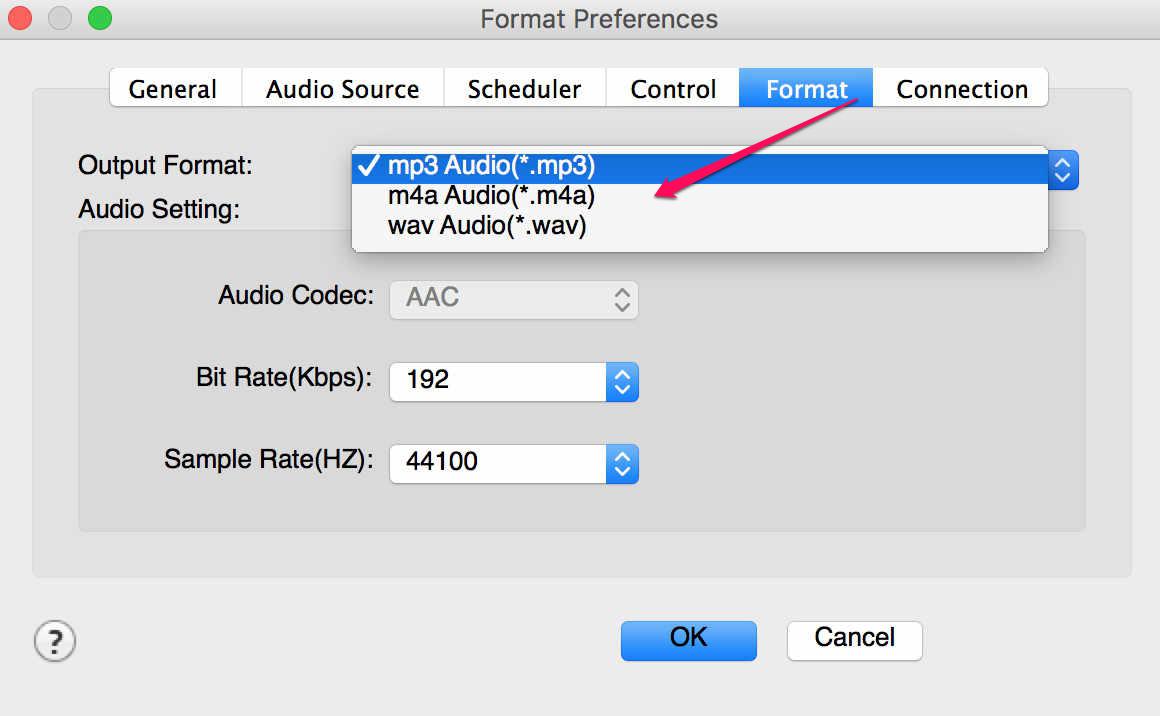
Third, choose the “Format” option and select the saving format as MP3, M4A or WAV. You can adjust the Bit Rate and Sample Rate for your audio here to maximum the music quality.
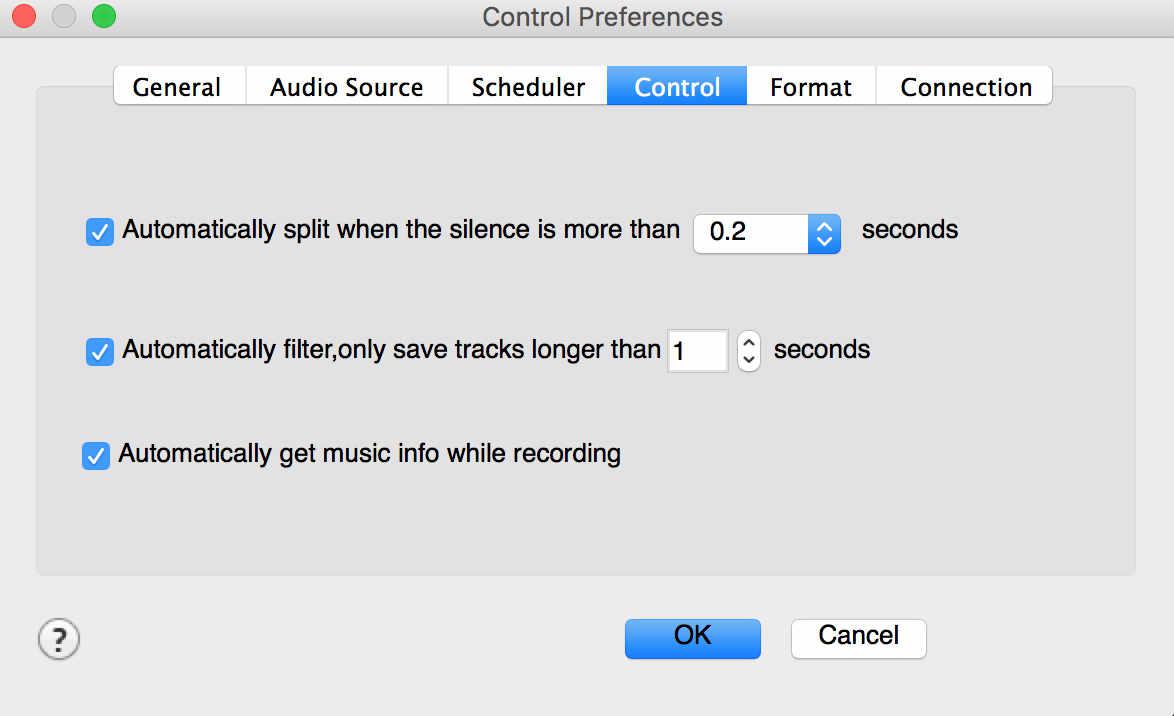
Last, go to “Control” and choose “Automatically split” and “Autocratically get music info”. It will be able to split the audios into two tracks according to the time range of silence you have set.
Step 2. Record the Audio
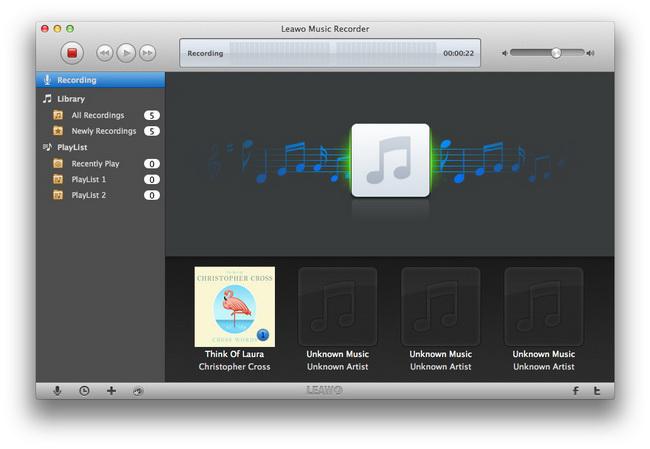
Click on the recording button and start recording. The audio will be recorded by Leawo Music Recorder completely on just one click. And it starts to record only when the sound is detected by the recorder. Click stop or let the recorder stop automatically when the sound fades.
Step 3. Modify the Audio Tag
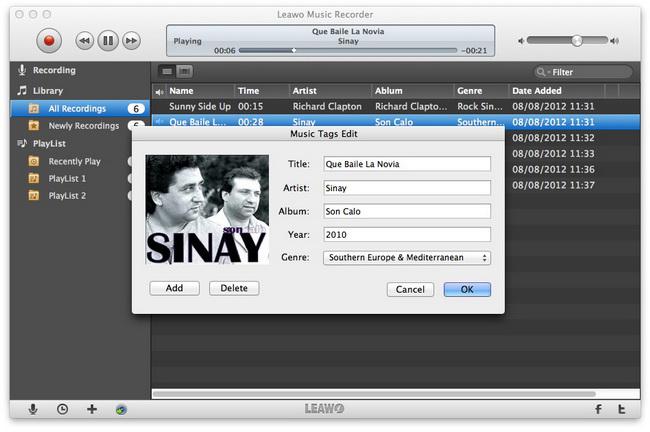
Leawo Music Recorder downloads the music information from its music database automatically. After finishing all the recording process, an audio file will be saved on your PC. Right click on the new-created track and open the download folder. If the audio is not a song but you want to add music tag for it, you can right click the track and add the audio tags manually like album picture, title, and artist, etc. You can change any of the information you like.
You can also go to Media Library to modify all the audio at one time, select all the music tracks and right click and download info. Leawo Music Recorder downloads all the music tags in a few seconds. In the Media tab, you can find all of your recordings sorted by name, where you can quickly pass files to an audio editor, add them to iTunes, or share them.
It’s quite easy for you to record voice on Mac as long as you have microphone well connected and Leawo Music Recorder for Mac installed. Actually, Leawo Music Recorder could not only help you record voice on Mac, but also record online music from YouTube, radio stations, song sites, etc. If you ware using a Windows computer, you could turn to Leawo Music Recorder to record any sound on Windows computer.
Part 2: Record Voice on Mac with Audacity Mac
Audacity Mac Voice Recorder is a free, open source, free multi-track voice recorder app for Mac. It has many features like envelope editing, mixing, built-in effects and plug-ins, all with unlimited undo. Audacity is more like a professional voice recorder for Mac users. Let’s see how to voice record on Mac with Audacity.
Step 1: Run Audacity and Record Voice
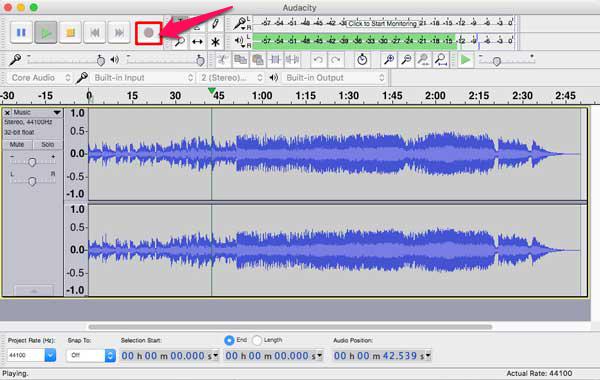
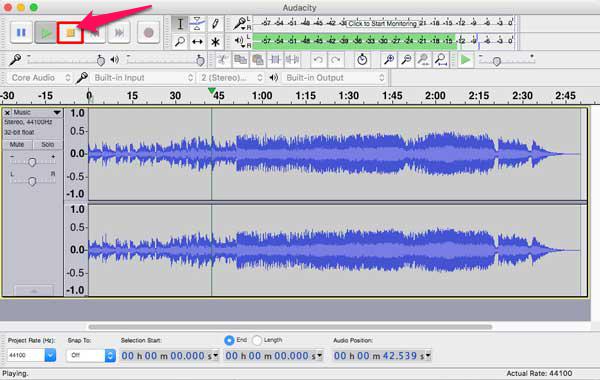
Install and launch Audacity Voice Recorder on Mac, click the record button and it will start to record voice automatically. You can pause and continue the recording anytime you want by one click. You can see the track on the screen showing the volume of the audio.
Step 2: Stop Recording and Save File
Click on the yellow stop button and finish your voice recording.
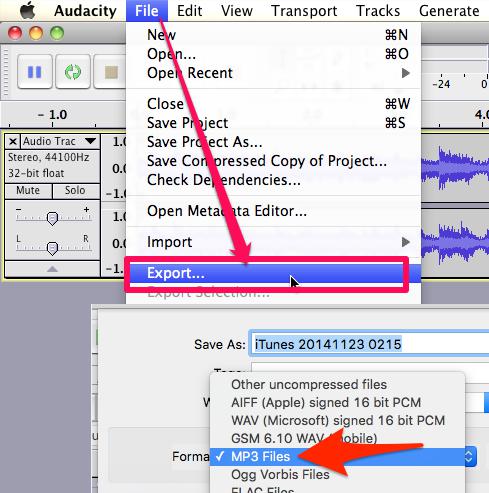
Click on “File” – “Export…” and you can save your audio as MP3/WAV format by your choosing. Edit a name for the audio and select a location to save the file to. Then you can playback your record in any player.
Now you have successfully recorded voices on Mac and save them in MP3, OGG, WAV, or other formats with the help of Audacity. You could freely make use of the recorded voice files in the way you like.
Part 3: Record Voice on Mac via QuickTime Player
QuickTime Player can easily capture sound input from a microphone and save it as a lightweight m4a file, making it perfect for recording quick voice notes, capturing conversations, recording sound effects, making simple ringtones, or whatever other possible reason you’d like to record some audio.
You can record any audio on a Mac from a microphone with this method, using either a built-in microphone or an external mic. Follow the below steps to learn how to record voice on Mac with QuickTime Player.
1. Open QuickTime Player, found in the /Applications/ folder.
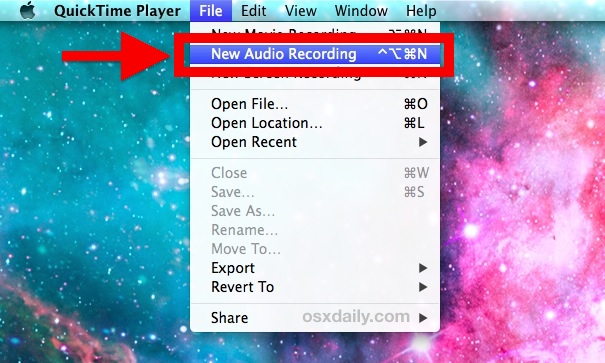
2. Pull down the “File” menu and choose “New Audio Recording” option.
3. Click the red (o) Record button to start recording audio from the default microphone source.
4. When finished, hit the same button to stop recording sound
5. Go to the “File” menu and choose “Save”, name the file and choose the output somewhere convenient
QuickTime also supports limited audio editing features, so if you have an unnecessarily long segment in the front or beginning of the file you can trim it or even break the sound into multiple files.
Part 4: Record Voice on Mac using Voice Memos
With the update of Mac OS, recording voice notes on the Mac has been never easier than ever thanks to the appropriately named Voice Memos application in Mac OS Mojave. While people have been long making use of QuickTime player to record voice on Mac, since Mac OS Mojave, Apple has preset a Voice Memo app to make voice memo recording a bit easier and more centralized within a dedicated app for that purpose. Moreover, the new Voice Memos app on Mac also syncs through iCloud with the accompanying iOS app as long as you have logged in your iOS devices and Mac computer with the same Apple ID. Therefore, if you have installed Mac OS Mojave on your iMac or Macbook, try Voice Memos application to record voice on Mac.
The below steps would show you how to record voice on Mac by using the Voice Memos app on Mac computer running Mac OS Mojave (10.14) and later.
1. Open the Application folder, and then launch the “Voice Memos” application.
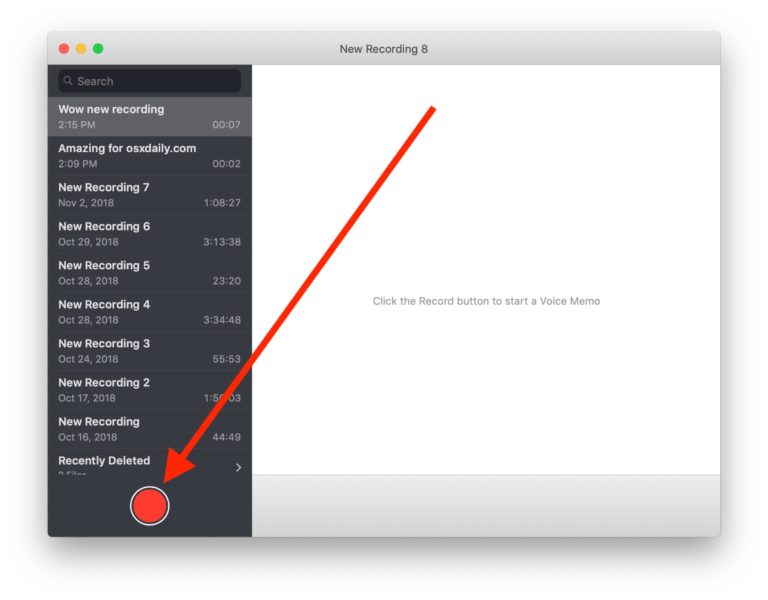
2. Click the red button and then speak via microphone to begin recording a new voice memo.
3. When you have finished recording your voice memo, click the pause button.
4. Click on the “Done” button to save the recording. Before you save the recording, you could edit or playback the voice memo to check the content.
5. Find the newly recorded voice memo now visible in the list of voice recordings, where you can share or save the voice memo or audio file as needed too.
The recorded voice files will be saved within the Voice Memos app on your computer, and could be synced to your iOS devices that have the same Apple ID logged in.
After checking each voice recorder on Mac, we know how to record voice on Mac and we can see the differences between Leawo Music Recorder for Mac, Mac Audacity Voice Recorder, QuickTime player and Voice Memos app. To those people like music producers who not only want to record voices but also edit or combine sounds, Audacity can be a good choice. QuickTime Player and Voice Memos help you fully record what you want to say in audio file on your Mac, and Voice Memos app is only available in Mac OS Mojave and later. But Leawo Music Recorder performs differently. It not only provides high quality audio recording, but also automatically downloads song tags if you are going to record a song sung through microphone. The former 3 recorders are generally voice recorders, while Leawo Music Recorder is a combination of voice recorder, song recorder and song manager.

