
The iPhone7/7 Plus have been rolled out for almost a year and the iPhone 8 is just a few months away from being announced. It's a good time to get rid of your old iPhone and get a new one. And I believe that's what many people, especially Apple fans, are planning on doing when the new iPhone 8 is released. When updating their devices, most people would choose to sell their old ones. If that's what you are doing, there are things to be taken care of before you sell your old iPhone and that is erasing your iPhone.
iPhone contains a lot of personal information and if you want to sell it, you should probably erase it before you do so. If you forget to format your iPhone, it could cause you or the new owner a lot of trouble. Check out the content below to see how to format iPhone.
How to Format iPhone without a Computer
If you remember your Apple ID and password and the passcode of your iPhone, you can directly format your iPhone on your device. Here's how to format iPhone on iPhone itself.
- On your iPhone, Open Settings app, and then go to General>Reset>Erase All Content and Settings.

How to Format iPhone with iTunes
Another way to erase iPhone is through iTunes. Just a few simple steps and you'll be able to format iPhone with iTunes. And when iTunes erases your iPhone, it would automatically download the latest version of iOS and install it on your iPhone.
The procedure of erasing an iPhone on Windows is basically the same as on Mac, follow the instructions below to see how to erase an iPhone on PC and Mac.
- Step 1. Open iTunes on Windows or Mac OS.
- Step 2. Connect your iPhone to your computer via USB Cable.
- Step 3. There might be a popup on your iPhone asking for your passcode or to Trust This Computer, just follow the steps, input your passcode or trust this computer.
- Step 4. Click on the icon of your iPhone to enter Summary.
- Step 5. In the Summary Panel, Click on Restore iPhone, a popup would appear, click Restore again to confirm.

When your iPhone finishes restoring to factory settings, it'll restart automatically and you can set it up as new.
How to Format iPhone without Passcode
The above two methods require passcode, if you happen to forget your passcode, you'll have to find another way around. The following steps can be applied to your iPhone when you forget your passcode or your iPhone is disabled after you've entered the wrong passcode on your iPhone 6 times in a row.
Method 1: Use iCloud to erase iPhone
If you've set up Find My iPhone on your iPhone or Mac, you can erase your iPhone using iCloud without the passcode. Check out the instructions below to see how to format iPhone using iCloud without passcode.
- 1. On your PC or Mac, go to icloud.com/find.
- 2. If needed, sign in with your Apple ID.
- 3. Click All Device at the top of the website.
- 4. Select your iPhone.
- 5. Click Erase iPhone to erase your iPhone.
Note: If you iPhone is not connected to a Wi-fi or cellular network, you cannot erase it on iCloud.
When your iPhone is formatted to factory settings, you can turn it off and back on to set it up as new.
Method 2: Use Recovery Mode to format iPhone
You can use Recovery Mode to format your iPhone if you've never synced with iTunes or set up Find My iPhone before.
- 1. Connect your iPhone to PC and open iTunes.
-
2. Force restart your iPhone.
- If you are using iPhone 6S or earlier, press and hold the Sleep/Wake and Home buttons at the same time. When you see the Apple logo you should keep holding the two buttons until you see the Recovery Mode screen.
- If you are using iPhone 7/7 Plus, press and hold the Sleep/Wake and Volumn Down buttons at the same time. When you see the Apple logo you should keep holding the two buttons until you see the Recovery Mode screen.
- 3. When you see the popup on iTunes, click Restore.
- 4. iTunes would download the latest version of iOS for your device. If this process got stuck for 15 minutes, iPhone will exit Recovery mode and you'll have to repeat Step 2 and 3.


When the whole process is done, you can set it up as new.
How to Restore iPhone from an iTunes Backup
If you get a new iPhone and have backups of your old iPhone, you can restore it from your old backups with iTunes.
- 1. Open iTunes on the computer that has the backup of your old iPhone.
- 2. Connect your iPhone to your computer with a USB cable. There might be a message that asks for your device passcode or to Trust This Computer, just enter your passcode or trust the computer to proceed.
- 3. On iTunes, click the icon of your iPhone to open Summary panel.
- 4. Click Restore Backup.
- 5. Choose the backup you want to be recovered to your iPhone.
- 6. Click Restore to start the restoring process and wait for the process to finish.
- 7. Keep your iPhone connected to your computer after it restarts and syncs with iTunes, You may disconnect your device afterwards.

iTunes backups includes all kinds of data on your old iPhone. And some of them might not be needed on your new iPhone. If you want to transfer specific files to your iPhone instead of the whole package of your old backup, here's a great program for you. Leawo iOS Data Recovery is a powerful data recovery program which allows you to recover specific files to your iPhone from an iTunes backup on your computer. With it you can easily select the type of data you'd like to recover to your iPhone. There are in total of 10 types of data that you can recover to iPhone with Leawo iOS Data Recovery: Camera Roll, Photo Stream, Messages, Message attachments, Contacts, Call History, Notes, Calendar, Reminders, Voice Memos and Safari Bookmark.
![]()
![]()
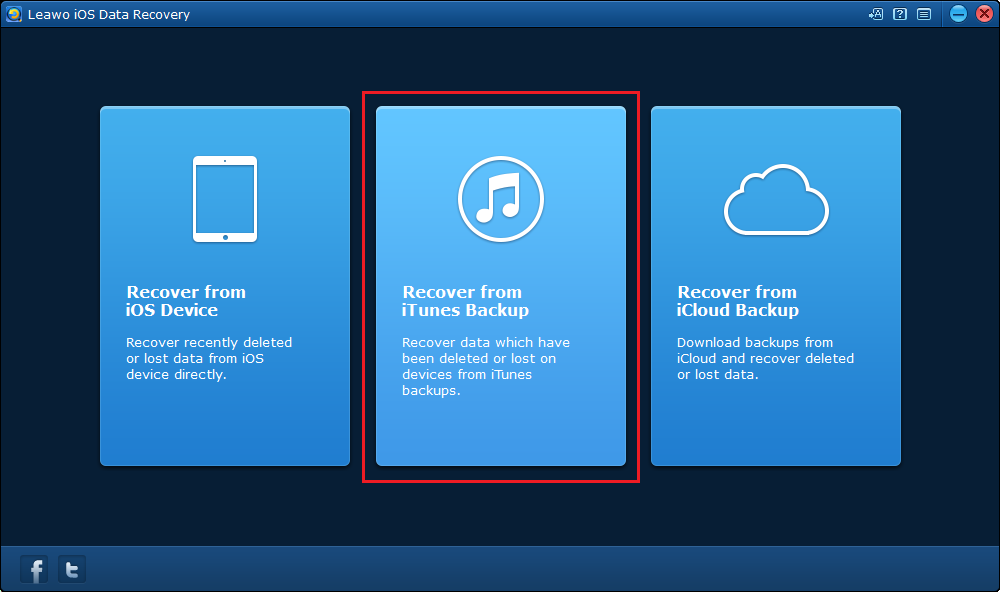
Step 1: Download and install Leawo iOS Data Recovery on your computer, open it and click on Recover from iTunes Backup.
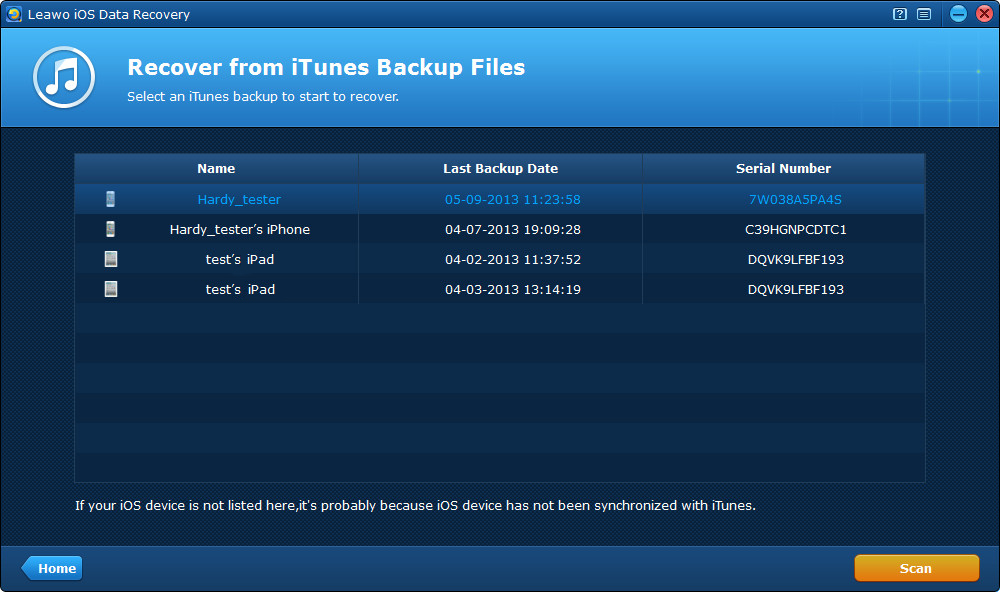
Step 2: You should see a list of all the backups you’ve made before. Select the backup you need and click Scan and the program would start scanning your backup.
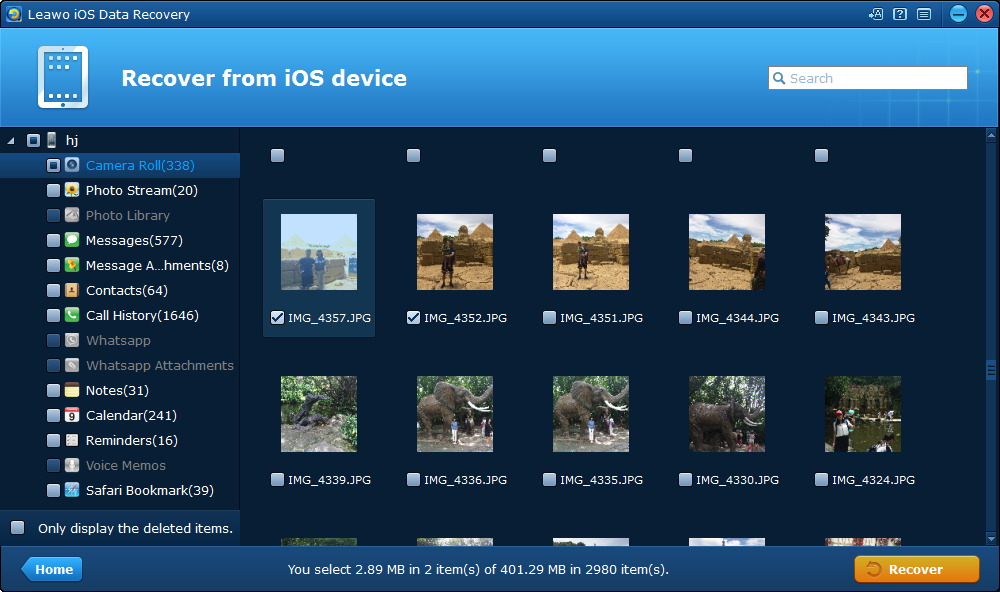
Step 3: You can freely view all the data and select those you want to transfer to your new iPhone. Choose the files you need and then click Recover button at the bottom right of the interface.
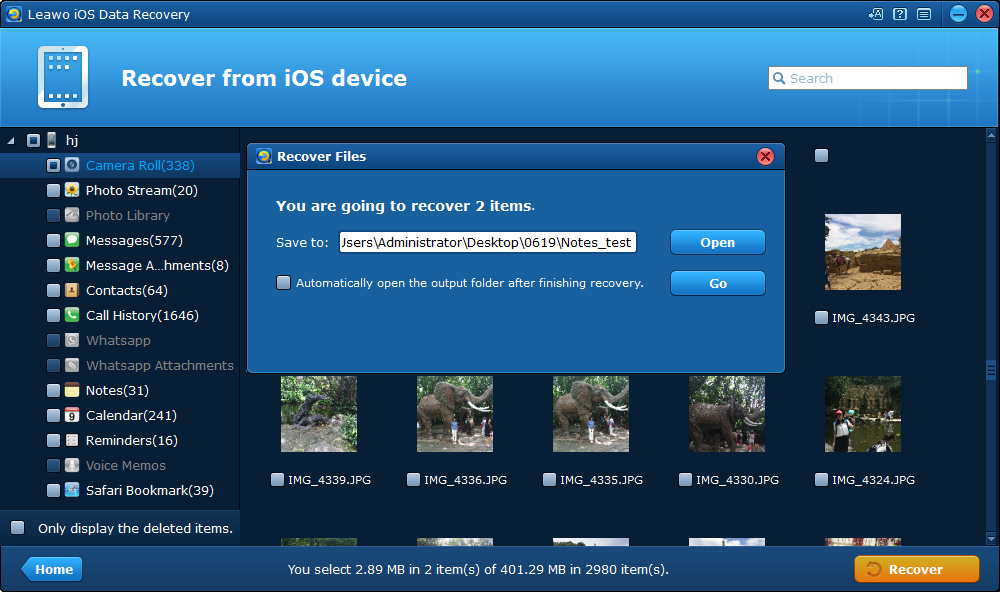
Step 4: On the following popup, set the directory for the files you’ve chosen as they would be saved to your computer at the same time they are transferred to your new iPhone. After setting the directory, click Go to start the data transfer process.
After reading this post you should have a basic understanding on how to format iPhone with different approaches. By following the instructions above you can easily format an iPhone. And once you get all the things cleared, you can sell your old iPhone without having to worry about your personal information being exposed.
 May. 24, 2017 by


 Prof. Media
 Blu-ray Ripper
 Blu-ray Copy
 iOS Data Recovery
 [12/29/23] MAX Downloader V15.0.0
 10,000,000 people are using Leawo!
 All Transactions are protected!
 30-Day Money Back Guarantee!