I'm editing a movie and I need to use a song purchased from iTunes, but I can't make it to work…it there any application that make these drm-protected songs to work? Any tips?"
Many users have encountered this problem. Today we will give you answer on how to make your iTunes music work on your final cut pro, please read the following article carefully.
Part 1. Why can't import iTunes m4p music to Final Cut Pro directly?
Final Cut Pro is a professional non-linear video editing application created by Apple for the Mac. It was released on June 21, 2011 for sale in the Mac App Store, which allows users to create and edit videos. It is a widely used by a wide variety of persons, including industry professionals and studios, which allows supporting importing multiple video formats with no problem. Users can add music to offer special video effect, such as using music to play in your video's background or during the opening and closing credits. Video and audio in many formats are supported by this application. However, the iTunes M4V video format is an exception. It refused to add video from iTunes when you try to directly import the videos from iTunes Store.
In fact, the Apple Music songs you purchased from iTunes stores in M4P format and all the music tracks in Apple Music are protected by Apple's FairPlay DRM technology. The drm-protected files are prohibited iTunes music from playbacking other device. So,if you want to import iTunes music to final cut pro project, you will need to get some software that help crack the DRM completely from the protected music streams. Here comes the rescue.
Part 2. How to remove DRM from iTunes M4P music for importing to Final Cut Pro with Leawo Prof. DRM?
Leawo Prof. DRM is a professional DRM removal solution specially designed for Apple Music users. It is available for both Mac and Windows OS, aiming to completely remove DRM lock from Apple Music songs without quality loss. With this smart app, you can easily convert the Apple Music tracks from protected M4P format to common MP3. The following features are the summary of the drm-removing application.
- Remove DRM from iTunes M4P music, Audiobooks, Apple Music to common format;
- Convert any audio at 50X faster speed with lossless quality;
- Easy-to-use with an intuitive and streamlined user interface;
- Enjoy Free Lifetime Update & Technical Support.
The following is the detailed tutorial to guide you to remove DRM from Apple Music and add to Final Cut Pro. Please follow the steps below to finish this process step by step after you download and install Leawo Prof. DRM.
Step 1: Add iTunes M4P music to Leawo Prof. DRM.
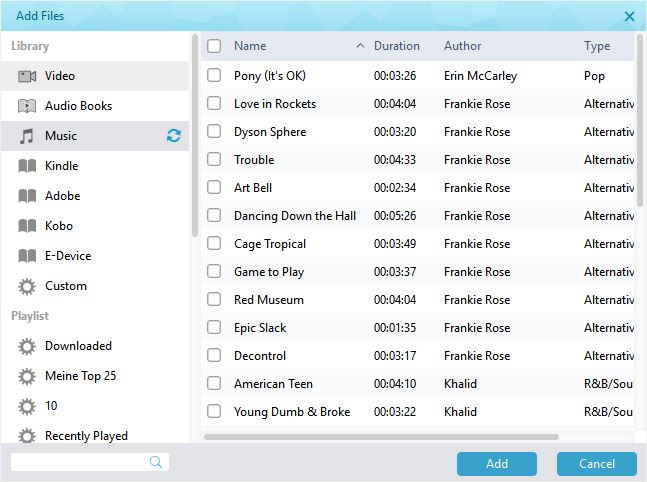
Click the button "Add Files " in the middle of main interface or "Add Files" on the sub-menu bar to add your Apple Music, it will pop up a window, which will show you all of songs you have downloaded from Apple Music, all files can by drag-and-drop into these application. All files you want to convert that can be added into this application at a time.
Step 2: Select Channel, Sampling Rate and Bit Rate.
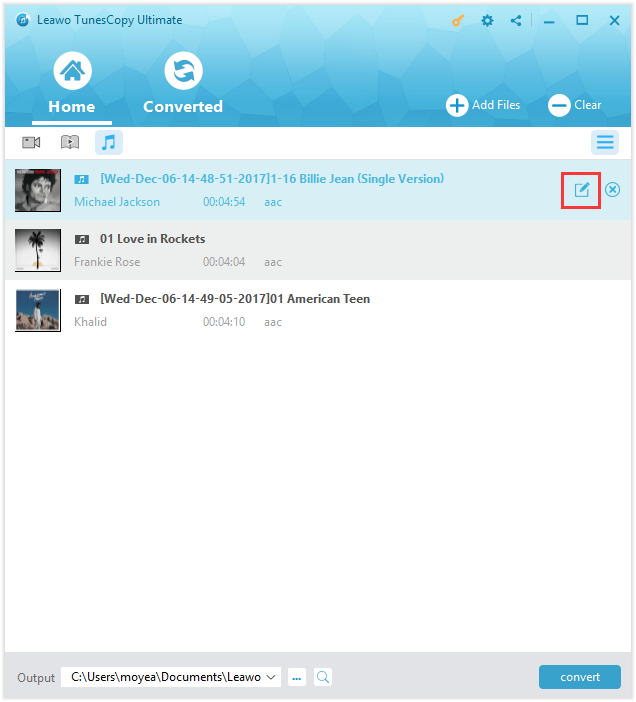
All files can be got under the category "music" icon after importing the iTunes music files. Before removing DRM from iTunes M4P to MP3 audio file, you edit your M4P files by clicking "Edit" button to freely choose Channels, Sampling Rates and Bit Rates.
Step 3: Set Output directory
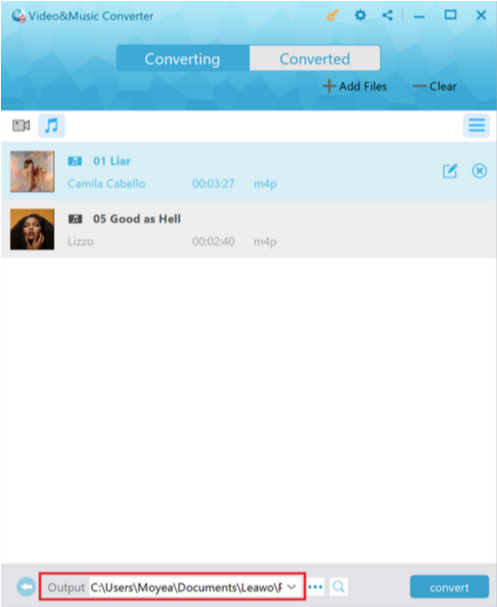
After the successful adding, click "…" button at the bottom of "Home" list to set an output directory in the pop-up window.
Step 4: Start removing DRM from iTunes music songs and convert these music to MP3
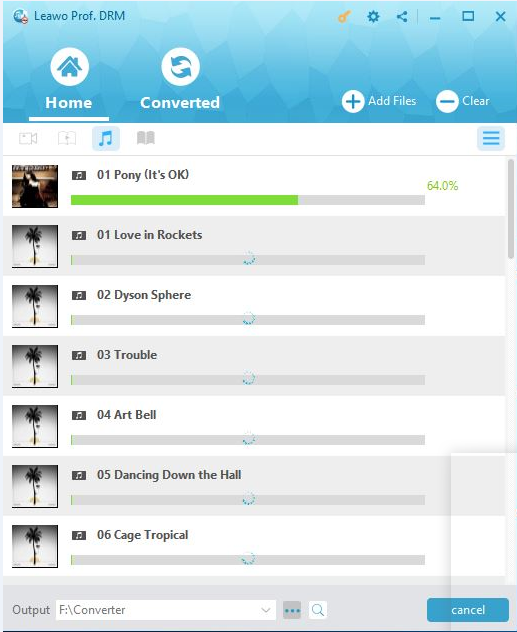
The final step is clicking the button "Convert" at the bottom right to remove the DRM-ed iTunes music tracks to DRM-free audios and covert M4P to MP3. Just a few second, it will succeed.
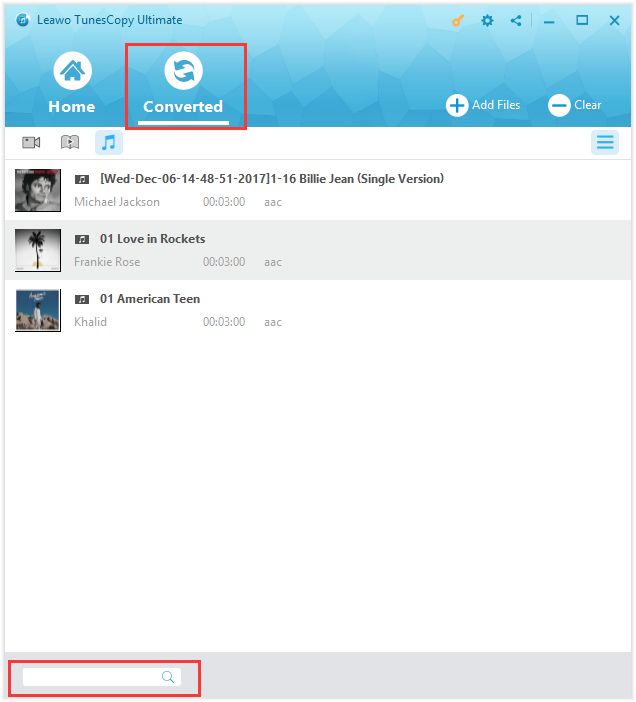
Step 5: Check the converted files.
Actually, its conversion speed mainly depends on the amount of the songs you are converting. After converting, find these file in your output directory.
Part 3. Simple steps to add the converted iTunes drm-free mp3 music to Final Cut Pro
After you finish transferring, you can add drm-free MP3 music files directly to Final Cut Pro. MP3 is one of audio file supported by Final Cut Pro. Then you can follow the simple steps below to add the iTunes music files to Final Cut Pro.
Step 1. Open "project library"
Open Final Cut Pro from your computer if you have installed on your computer. And then click to open the "project library". You will find the icon for that on the bottom-left side of the program. Now you can double-click to open the music you want to add to Final Cut Pro by freely navigating to locate the project.
Step 2. Choose the music file
When browsing through the timeline, find and click the icon marked "music and sound" to open up the music files that you have saved from iTunes. Then choose the music file that you are going to use.
Step 3. Note the music file to use, click on it and drag to the timeline.
Make sure you have noted the music files to use. Then click on it and drag to the timeline. Ensure that the music file is stay on the exact point where you desire it to play. Your project will now play together with the music and you can do some testing to be sure it is added successfully.
Here, it is easy for you to use iTunes music on final cut pro with Leawo Prof. DRM. With it, you can remove drm-protection from your iTunes music for playbacking and storing. Its' fluid interface and easy operation system provide easy operation for the user, so Leawo Prof. DRM is always an option for adding iTunes music or even iTunes videos to final cut pro. For iTunes video, you just need to follow the above steps to remove DRM from iTunes M4V video and convert M4V to MP4. After that, you can easily add converted DRM-free MP4 video to final cut pro.

